Craving a warm, fluffy cake but don’t want to spend hours in the kitchen? We’ve got the perfect solution that’ll satisfy your sweet tooth in just 90 seconds! Our 3-ingredient mug cake transforms basic pantry staples into a decadent dessert faster than you can say “microwave magic.”
This game-changing recipe proves that incredible flavors don’t require complicated ingredient lists or fancy equipment. With just three simple ingredients you probably already have at home, we’ll show you how to create a perfectly portioned cake that’s ready in under two minutes. No mixing bowls, no measuring cups full of ingredients, and definitely no waiting around for ovens to preheat.
Whether you’re dealing with a midnight craving or need a quick dessert for unexpected guests, this foolproof mug cake delivers every single time. It’s become our go-to solution for those moments when we want something sweet, warm, and satisfying without any of the usual baking hassle.
Ingredients
Our 3-ingredient mug cake requires only the most basic pantry staples that we likely already have in our kitchen. The beauty of this recipe lies in its simplicity and accessibility.
For one single-serving mug cake:
- 4 tablespoons all-purpose flour
- 4 tablespoons granulated sugar
- 2 tablespoons unsweetened cocoa powder
- 3 tablespoons milk (any type)
- 3 tablespoons vegetable oil or melted butter
- Small pinch of salt (optional but recommended)
We use standard measuring spoons for accuracy since precise measurements ensure our mug cake achieves the perfect texture every time. The flour provides structure while the sugar adds sweetness and helps create that tender crumb we want. Our cocoa powder delivers rich chocolate flavor without requiring expensive chocolate bars or chips.
Fresh milk works best though we can substitute with non-dairy alternatives like almond or oat milk if needed. The oil keeps our cake moist and prevents it from becoming dry or rubbery in the microwave. We recommend measuring ingredients directly into our microwave-safe mug to minimize cleanup and streamline the process.
Equipment Needed
 1")
Creating our perfect 3 ingredient mug cake requires minimal equipment that most kitchens already have on hand. We focus on simplicity to make this dessert accessible to everyone.
Microwave serves as our primary cooking appliance for this recipe. Any standard microwave with adjustable power settings will work perfectly for achieving the ideal texture in just 90 seconds.
Microwave-safe mug forms the foundation of our entire recipe. We recommend using a mug with at least 8 ounces of capacity to prevent overflow during cooking. Ceramic or glass mugs work best as they distribute heat evenly and won’t affect the cake’s flavor.
Whisk or spoon helps us combine ingredients smoothly. A small whisk creates the fluffiest texture by incorporating air into our batter. A regular spoon works just as well if you don’t have a whisk available.
Measuring spoons ensure accuracy in our simple recipe. Since we’re working with just three basic ingredients precise measurements make the difference between success and disappointment.
| Equipment | Purpose | Alternative Options |
|---|---|---|
| Microwave | Primary cooking method | None required |
| 8+ oz microwave-safe mug | Mixing bowl and baking vessel | Glass or ceramic bowl |
| Small whisk | Ingredient mixing | Regular spoon or fork |
| Measuring spoons | Accurate portioning | Eyeball measurements (less precise) |
Optional additions include a small bowl for pre-mixing dry ingredients if you prefer extra smooth batter. Some bakers like having a microwave-safe plate to place under the mug as extra protection against spills.
The beauty of our mug cake lies in this minimal equipment list. We eliminate the need for mixing bowls electric mixers or traditional baking pans. Everything happens directly in the mug which means less cleanup and faster results.
Instructions
 2")
Now that we have our ingredients measured and ready, let’s walk through the simple process of creating this delicious mug cake in just three easy steps.
Prep the Mug
We start by selecting a microwave-safe mug that holds at least 12 ounces to prevent any overflow during cooking. Clean and dry the mug thoroughly before adding any ingredients. The larger capacity gives our cake room to rise without spilling over the edges.
Mix the Ingredients
We combine all our measured ingredients directly in the prepared mug to minimize cleanup. Using a fork or small whisk, we blend the flour, sugar, and cocoa powder first until no dry streaks remain. Next, we add the milk and oil, stirring vigorously until the batter becomes completely smooth. The mixture should have no lumps and appear evenly combined throughout.
Microwave the Cake
We place the mug in the microwave and cook on high power for exactly 1 minute as our starting point. After the initial cooking time, we check the cake’s doneness by looking for a set surface that remains slightly moist on top. If the center still appears too wet, we continue microwaving in 15-second intervals until the texture looks just right. Most microwaves will complete the cooking process between 1 to 1.5 minutes depending on their power level. We allow the finished cake to cool for one full minute before serving to prevent burns and let the texture settle properly.
Cooking Tips for Perfect Results
 3")
Success with your 3 ingredient mug cake depends on several key factors that ensure consistently delicious results. We’ve gathered essential techniques that will help you achieve the perfect texture and prevent common mishaps.
Choosing the Right Mug
We recommend using a microwave-safe mug that holds at least 12 ounces to prevent spills as your cake rises during cooking. Tall mugs work better than wide ones because they provide adequate room for the batter to expand without overflowing. Always verify that your mug is labeled as microwave-safe to avoid breakage or damage during the heating process.
Ceramic and glass mugs distribute heat most evenly throughout the cooking process. Avoid using metal containers or mugs with metallic decorations as these can cause dangerous sparking in your microwave.
Microwave Power Settings
Most microwaves should be set to high power for optimal results with mug cakes. Cooking time typically ranges from 1 to 1.5 minutes depending on your microwave’s wattage. We find that 1000-watt microwaves usually require only 1 minute while 700-watt units may need up to 1.5 minutes for thorough cooking.
| Microwave Wattage | Recommended Cooking Time |
|---|---|
| 700W | 1.5 minutes |
| 800W | 1.25 minutes |
| 1000W | 1 minute |
Monitor your cake closely during cooking since microwave power varies significantly between models. Stop cooking immediately if you notice the batter overflowing or becoming too firm.
Testing for Doneness
Your mug cake is ready when it looks set but maintains a slightly moist appearance on top. Insert a toothpick into the center of the cake to check for doneness. The toothpick should come out clean or with just a few moist crumbs clinging to it.
Avoid overcooking as this creates a dry rubbery texture that diminishes the cake’s appeal. Let your finished cake cool for about one minute after microwaving for safer handling and improved texture before adding any desired toppings.
Flavor Variations
 4")
Once you master the basic 3-ingredient mug cake recipe, countless flavor possibilities await to transform your simple dessert into exciting new treats. We can easily customize our base recipe with just a few additional ingredients to create entirely different taste experiences.
Chocolate Chip Version
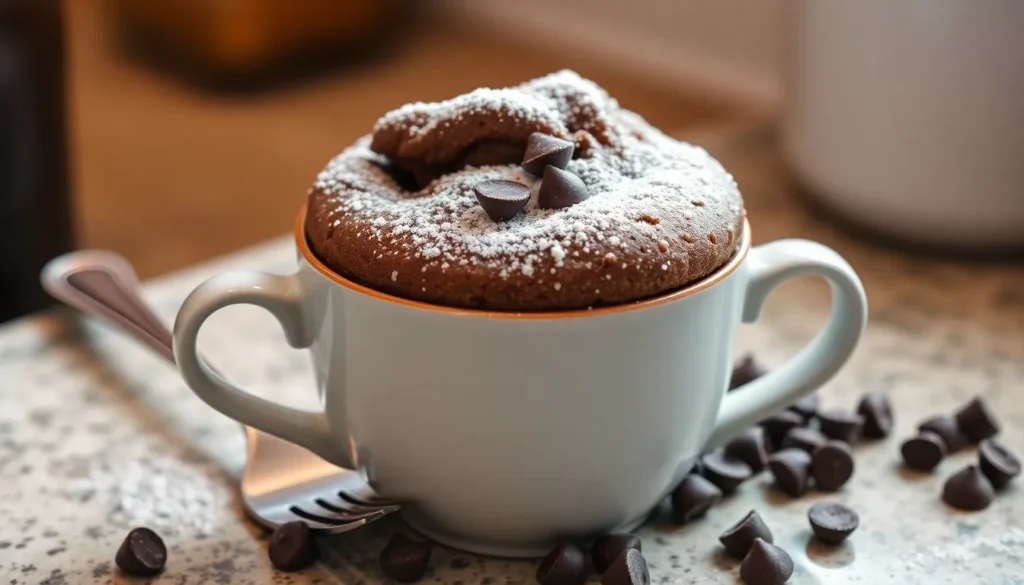
We enhance our basic mug cake by folding in 1-2 tablespoons of mini chocolate chips before microwaving. The chips melt partially during cooking and create pockets of extra chocolatey goodness throughout the cake. For best results, we distribute the chips evenly by gently stirring them into the batter just before cooking. Semi-sweet chocolate chips work perfectly, but we can also experiment with white chocolate chips or dark chocolate varieties for different flavor profiles.
Vanilla Bean Option
We create a sophisticated vanilla version by replacing the cocoa powder with 1/2 teaspoon of pure vanilla extract and adding 1/4 teaspoon of vanilla bean paste if available. This substitution transforms our chocolate base into a classic vanilla cake with aromatic depth. The vanilla bean paste provides those distinctive black specks that signal authentic vanilla flavor. We recommend using real vanilla extract rather than artificial flavoring for the richest taste experience.
Funfetti Style
We bring celebration vibes to our mug cake by mixing 1-2 tablespoons of rainbow sprinkles directly into the batter before cooking. The sprinkles maintain their color and add delightful pops of sweetness throughout each bite. For extra festive appeal, we can top the finished cake with additional fresh sprinkles while it’s still warm. Birthday cake flavored sprinkles work especially well, but any colorful sprinkles will create that classic funfetti experience we love.
Serving Suggestions
 5")
Our 3-ingredient mug cakes transform into extraordinary desserts with the right toppings and presentation. We recommend serving these warm treats immediately after microwaving for the best texture and moisture retention.
Classic Toppings
Vanilla ice cream pairs perfectly with our warm mug cake creating a delightful temperature contrast. The cold creaminess balances the cake’s rich chocolate flavor while adding extra indulgence to each bite. Fresh berries like strawberries or raspberries provide natural sweetness and bright acidity that cuts through the cake’s richness.
Whipped cream offers a light and airy complement to the dense cake texture. We suggest dolloping it generously on top while the cake remains warm so it slightly melts into the surface. Chocolate chips scattered over the finished cake add extra chocolate intensity and appealing visual texture.
Creative Enhancement Options
Nuts bring satisfying crunch and protein to our mug cakes. Chopped walnuts or pecans work exceptionally well while toasted almonds add sophisticated flavor depth. Skor bits provide toffee sweetness with delightful caramel notes that enhance the overall dessert experience.
Salted caramel sauce creates an elegant finishing touch that elevates our simple mug cake into restaurant-quality indulgence. The salt enhances the chocolate flavors while the caramel adds luxurious sweetness. Drizzle it warm over the cake for best results.
Customization Approach
We encourage experimenting with different topping combinations to match personal preferences. Mix and match various elements like combining vanilla ice cream with fresh fruit or pairing whipped cream with chocolate chips. Each combination creates a unique dessert experience from our basic recipe foundation.
Timing matters significantly when adding toppings. Cold elements like ice cream should be added just before serving while sauces work best when warmed slightly. This approach ensures optimal temperature contrast and prevents melting issues that could affect presentation.
Storage and Reheating
 6")
We recommend enjoying your 3 ingredient mug cake immediately after cooking for the best texture and flavor experience. These quick desserts are designed for immediate consumption since their moist and fluffy characteristics begin to change rapidly once they cool down.
Short-Term Storage
Our mug cakes should be consumed within 24 hours when storage becomes necessary. Allow the cake to cool completely in the mug before covering it tightly with plastic wrap or a microwave-safe lid. Place the covered mug in the refrigerator to maintain freshness and prevent spoilage. Storage beyond this timeframe is not recommended as the cake will lose its characteristic moisture and may become crumbly or hard.
| Storage Method | Duration | Container | Temperature |
|---|---|---|---|
| Refrigerated | 24 hours maximum | Covered mug | 35-40°F |
| Room temperature | 2 hours maximum | Not recommended | Below 70°F |
Proper Reheating Technique
We can successfully reheat stored mug cake with careful attention to timing and temperature. Remove any plastic wrap from the mug and cover with a paper towel to prevent moisture loss. Microwave the cake for 10-20 seconds on high power while checking frequently to avoid over-drying. The reheated cake will not achieve the original moist and fluffy texture of a freshly made version but can be made warm and enjoyable.
Safety Considerations
Always verify that your mug is microwave-safe before both initial cooking and reheating processes. We recommend using mugs with at least 12 oz capacity to prevent overflow during the cooking process. Check the temperature before consuming since microwaves can create uneven heating patterns. Discard any cake that has remained at room temperature for more than two hours or shows signs of spoilage.
Metal containers should never be used for storage or reheating purposes. We suggest sticking with ceramic or glass mugs for the best heat distribution and safety results.
Troubleshooting Common Issues
 7")
Even with the simplest recipes, we sometimes encounter challenges that can affect our mug cake’s final result. Understanding these common issues and their answers helps us achieve consistently delicious results every time we make this quick dessert.
Cake Turns Out Dry or Dense
When our mug cake feels heavy or lacks moisture, we’re likely dealing with overmixing or excess flour. Aggressive stirring develops gluten in the flour, creating a tough texture that ruins the cake’s tender crumb. We should mix our batter gently until ingredients just combine, avoiding the temptation to whip it vigorously.
Measuring flour accurately prevents density issues as well. Too much flour absorbs moisture and creates a brick-like texture. For eggless versions, plant-based milk adds extra moisture that keeps our cake tender and light.
Cake Remains Undercooked or Wet at the Bottom
Nothing disappoints more than cutting into what appears to be a finished cake only to find raw batter underneath. This issue typically stems from insufficient microwave time or using an oversized mug that doesn’t heat evenly.
We recommend using mugs that hold at least 8 ounces but aren’t excessively large. After the initial cooking time, we check our cake and continue microwaving in 15-second intervals until the center sets completely. The cake should spring back slightly when touched and appear dry on top.
Cake Becomes Overcooked or Rubbery
Overcooking transforms our tender treat into a chewy disappointment. High microwave power or excessive cooking time causes proteins to toughen and moisture to evaporate rapidly.
Starting with shorter cook times prevents this issue entirely. We begin with 30 to 45 seconds for smaller portions and check frequently. Adding time in 10 to 15-second increments allows us to monitor progress and stop at the perfect moment.
Flavor Lacks Depth or Interest
Sometimes our finished cake tastes bland even though following the recipe correctly. Insufficient flavoring ingredients often cause this problem, leaving us with a cake that meets technical requirements but fails to excite our taste buds.
Adding a pinch of salt enhances all other flavors in our recipe. A few chocolate chips boost richness while vanilla extract deepens the overall taste profile. These small additions transform ordinary mug cakes into memorable desserts.
| Issue | Cause | Solution |
|---|---|---|
| Dry/Dense | Overmixing, excess flour | Mix gently, measure accurately |
| Wet/Undercooked | Insufficient microwaving | Microwave in 15s intervals |
| Overcooked/Rubbery | Too long in microwave | Shorten cook time, check often |
| Flavor is weak | Not enough flavoring | Add salt, chips, or extract |
These troubleshooting strategies ensure we create perfect mug cakes that satisfy our cravings every single time. Understanding why problems occur empowers us to prevent them and adjust our technique for consistently excellent results.
Conclusion
Now you’ve got everything you need to master this incredibly simple yet satisfying dessert. This 3-ingredient mug cake proves that you don’t need complicated recipes or hours in the kitchen to create something delicious.
Whether you’re craving a midnight snack or need a quick dessert for unexpected guests this recipe delivers every time. The beauty lies in its flexibility – you can customize it with different flavors and toppings to match your mood.
We encourage you to experiment with the variations we’ve shared and create your own signature mug cake. With just a few pantry staples and 90 seconds you’ll have a warm homemade treat that rivals any bakery dessert. Happy baking!
Frequently Asked Questions
How long does it take to make a 3-ingredient mug cake?
The entire process takes just 90 seconds to 2 minutes. You’ll need about 30 seconds to mix the ingredients in your mug, 1 minute of microwave cooking time, and another minute to let it cool before serving. This makes it perfect for satisfying sudden sweet cravings quickly.
What are the 3 main ingredients needed for this mug cake?
The basic recipe uses flour, sugar, and cocoa powder as the three main dry ingredients. However, you’ll also need milk and oil (or melted butter) to create the batter, plus an optional pinch of salt. All ingredients are common pantry staples that most people already have at home.
Can I use non-dairy milk alternatives for this recipe?
Yes, you can substitute regular milk with any non-dairy alternative like almond milk, oat milk, soy milk, or coconut milk. The recipe works well with all milk types, so choose based on your dietary preferences or what you have available in your kitchen.
What size mug should I use for the mug cake?
Use a microwave-safe mug that holds at least 12 ounces to prevent overflow during cooking. Ceramic or glass mugs work best as they distribute heat evenly. Avoid using metal containers in the microwave, and choose a taller mug rather than a wide, shallow one.
How do I know when my mug cake is done cooking?
The cake is done when the top appears set and springs back lightly when touched. If unsure, insert a toothpick into the center – it should come out with just a few moist crumbs. Start with 1 minute of cooking time and add 15-second intervals if needed.
Can I add toppings or mix-ins to customize my mug cake?
Absolutely! Popular mix-ins include mini chocolate chips, rainbow sprinkles for funfetti style, or vanilla extract for different flavors. For toppings, try vanilla ice cream, fresh berries, whipped cream, nuts, or caramel sauce. Add toppings after the cake cools for about a minute.
How should I store leftover mug cake?
It’s best to eat the mug cake immediately while warm for optimal texture. If you must store it, let it cool completely, cover, and refrigerate for up to 24 hours. To reheat, microwave for 10-20 seconds covered with a paper towel, checking frequently to avoid over-drying.
Why did my mug cake turn out dry or dense?
A dry or dense cake usually results from overmixing the batter or using too much flour. Mix ingredients gently until just combined, and measure flour accurately by spooning it into the measuring spoon rather than packing it. Also, avoid overcooking in the microwave.
What microwave power setting should I use?
Cook on high power (100%) for most microwaves. However, cooking times vary by wattage: 1000-watt microwaves typically need 1 minute, while 700-watt units may require up to 1.5 minutes. Start with less time and add more as needed to prevent overcooking.
Can I make this recipe without cocoa powder?
Yes! Replace the cocoa powder with an equal amount of flour and add 1/2 teaspoon of vanilla extract for a vanilla cake. You can also create other flavors by substituting cocoa powder with different extracts or adding mix-ins like cinnamon or lemon zest.


