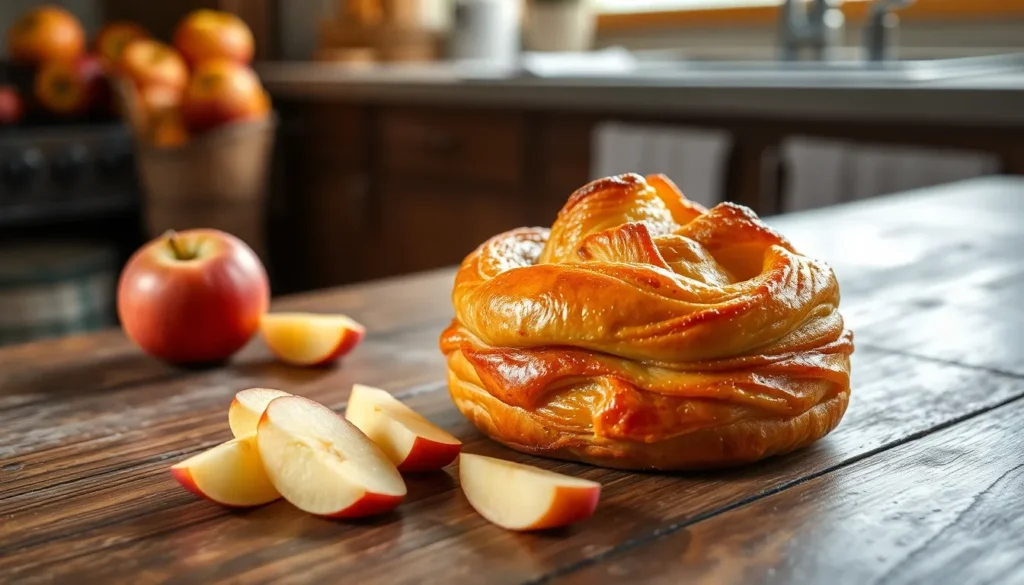
We’ve all experienced that magical moment when flaky pastry meets sweet cinnamon apples – and that’s exactly what makes apple danish so irresistible. This beloved Danish pastry combines buttery, golden layers with tender spiced apples that create the perfect balance of textures and flavors in every single bite.
What started as a traditional European bakery staple has become a breakfast and dessert favorite worldwide. The secret lies in the contrast between the crisp pastry exterior and the warm apple filling that practically melts in your mouth. Whether you’re enjoying it with your morning coffee or serving it as an elegant dessert, apple danish delivers that bakery-quality experience right from your own kitchen.
We’re excited to share our foolproof recipe that’ll have your home smelling like a professional patisserie. With just a few simple techniques, you’ll create danish pastries that rival any bakery – and trust us, once you master this recipe, store-bought versions just won’t compare.
Ingredients
We’ll break down our apple danish ingredients into three essential components to ensure perfect results every time. Each element plays a crucial role in creating that bakery-quality pastry we’re aiming for.
For the Danish Dough
- 2 cups all-purpose flour
- 1/4 cup granulated sugar
- 1 teaspoon active dry yeast
- 1/2 teaspoon salt
- 1/3 cup warm milk (110°F)
- 1 large egg, room temperature
- 1 teaspoon vanilla extract
- 1 cup unsalted butter, cold and cut into small cubes
- 2 tablespoons cold water (if needed)
For the Apple Filling
- 3 medium Honeycrisp apples, peeled and diced into 1/4-inch pieces
- 1/3 cup brown sugar, packed
- 2 tablespoons cornstarch
- 1 teaspoon ground cinnamon
- 1/4 teaspoon ground nutmeg
- 1/8 teaspoon salt
- 1 tablespoon lemon juice
- 2 tablespoons unsalted butter
For the Egg Wash and Topping
- 1 large egg
- 2 tablespoons heavy cream
- 2 tablespoons pearl sugar or coarse sugar
- 1/2 cup sliced almonds (optional)
- 1 cup powdered sugar (for glaze)
- 2-3 tablespoons milk (for glaze)
- 1/2 teaspoon vanilla extract (for glaze)
Equipment Needed

Creating bakery-quality apple danish at home requires exact tools that will help us achieve those perfectly flaky layers and evenly cooked filling. We’ve organized our equipment list based on the different stages of danish preparation to ensure you have everything ready before starting.
Essential Mixing and Preparation Tools
A large mixing bowl serves as our primary workspace for combining dough ingredients and creating the apple filling. We recommend using a saucepan for cooking down our apple mixture to the perfect consistency. Our spatula becomes indispensable for folding ingredients together without overworking the dough.
Dough Handling Equipment
Rolling pin usage is crucial for achieving uniform pastry thickness and proper butter incorporation. We need a pastry wheel to create clean cuts and professional-looking edges on our danish pieces. Baking paper prevents sticking and ensures easy removal from our baking surfaces.
Baking and Finishing Tools
Our baking sheet provides the foundation for even heat distribution during the baking process. A pastry brush allows us to apply egg wash evenly across each danish for that golden bakery finish. We also benefit from having mini tart pans available if we prefer individual-sized portions.
Optional but Helpful Equipment
| Equipment | Purpose | Alternative |
|---|---|---|
| Potato Masher | Breaking down cooked apples | Fork or spoon |
| Stand Mixer | Dough preparation | Hand mixing |
| Bench Scraper | Clean dough handling | Knife edge |
These tools work together to streamline our danish-making process and help us achieve consistent results every time we bake.
Instructions

Creating perfect apple danish requires careful attention to each step from dough preparation to final baking. We’ll guide you through the complete process to achieve bakery-quality results at home.
Prepare the Danish Dough
Thaw frozen puff pastry according to package instructions for convenient preparation. Roll out the pastry on a floured surface if needed to achieve uniform thickness. Traditional laminated dough creates the signature flaky layers through butter incorporation but requires more time and technique. Pre-made puff pastry provides excellent results with significantly less effort while maintaining that coveted flaky texture.
Make the Apple Filling
Peel core and chop apples into small uniform pieces for even cooking. Melt butter in a saucepan over medium heat until it begins to foam. Add the chopped apples sugar and cinnamon to the melted butter stirring to combine. Cook the mixture until apples soften and sugar dissolves completely creating a sticky thickened consistency. Add a small amount of water if the mixture becomes too thick during cooking. Incorporate cornstarch or arrowroot starch to help thicken the filling and prevent it from becoming too runny during baking.
Assemble the Apple Danish
Cut the prepared dough into squares or rectangles depending on your preferred danish shape. Spoon a generous portion of apple filling onto the center of each dough piece leaving space around the edges. Fold the corners or edges of the dough over the filling while keeping the center open to showcase the apple mixture. Create decorative braids or twisted patterns if desired for visual appeal.
Apply Egg Wash and Toppings
Whisk one egg until smooth and well combined for the perfect golden finish. Brush the egg wash evenly over the assembled danishes using a pastry brush. Sprinkle sugar sliced almonds or crumb toppings over the egg wash before baking for added texture and flavor. The egg wash creates that signature shiny golden appearance that makes bakery danish so appealing.
Bake the Danish
Preheat oven to 400°F (200°C) ensuring it reaches full temperature before baking. Place assembled danishes on a parchment lined baking sheet with adequate spacing between each piece. Bake for 20 to 25 minutes until the pastry turns golden brown and puffs beautifully. The danish should sound hollow when lightly tapped indicating proper doneness. Drizzle with simple powdered sugar glaze after baking for additional sweetness if desired.
Make-Ahead Instructions

Apple danish becomes even more convenient when we prepare components ahead of time. We can streamline our baking process significantly by following these tested make-ahead strategies.
Preparing Danish in Advance
We recommend assembling the complete apple danish up to two days before baking. After shaping our pastry and adding the apple filling, we cover the baking sheet with plastic wrap and refrigerate the unbaked danish. When we’re ready to bake, we allow the danish to reach room temperature before placing them in the oven.
Apple Filling Preparation
Our apple filling stores beautifully for extended periods. We can prepare this mixture up to two weeks in advance and keep it refrigerated in an airtight container. This approach allows us to have fresh apple danish ready whenever we want them.
Storage Guidelines
| Storage Method | Duration | Instructions |
|---|---|---|
| Refrigerated (baked) | Up to 7 days | Store in airtight container |
| Frozen (baked) | 1-2 months | Cool completely before freezing |
| Apple filling only | Up to 2 weeks | Refrigerate in sealed container |
Freezing and Reheating
Baked apple danish freeze exceptionally well for longer storage. We let them cool completely before transferring to freezer-safe containers. When we’re ready to enjoy them, we thaw the danish overnight at room temperature. For warm danish, we reheat them in a low oven until heated through.
Assembly Tips for Make-Ahead Success
We follow our standard recipe steps when preparing danish in advance, stopping just before the baking stage. Our apple preparation remains the same: we core, peel, and chop apples into small uniform pieces for even cooking. Before baking refrigerated danish, we remove them from the refrigerator and let them sit briefly at room temperature for optimal results.
Storage and Reheating Tips

After creating these delicious apple danish pastries, we want to ensure they maintain their quality and flavor for as long as possible. Proper storage techniques will preserve the flaky texture and sweet apple filling we worked so hard to achieve.
Room Temperature Storage
We recommend storing freshly baked apple danish at room temperature for optimal texture preservation. Cover the pastries with a clean cloth or place them in a paper bag to prevent moisture from compromising the pastry’s crispness. This storage method keeps our danish fresh for 2 to 3 days while maintaining their delightful flaky exterior.
| Storage Method | Duration | Container Type |
|---|---|---|
| Room Temperature | 2-3 days | Clean cloth or paper bag |
| Refrigeration | Up to 1 week | Airtight container |
| Freezing | Up to 3 months | Cling wrap or airtight container |
Refrigerated Storage
For extended freshness, we can store apple danish in the refrigerator for up to one week. Place the cooled pastries in an airtight container to prevent them from absorbing other flavors. Keep in mind that refrigeration may cause the pastry to become slightly soggy due to moisture accumulation, though the flavor will remain intact.
Freezing for Long Term Storage
Freezing offers the longest storage option for our homemade apple danish. After the pastries have completely cooled, wrap each one individually in cling wrap or store them together in an airtight container. Properly frozen danish will maintain their quality for up to 3 months, making this an excellent option for batch preparation.
Reheating Methods
Oven Reheating: We achieve the best results by reheating apple danish in a preheated 350°F oven. Place whole pastries on a baking sheet and warm for approximately 10 minutes. Individual slices require only 5 minutes to heat through completely.
Microwave Option: For quick reheating, we can use the microwave method. Heat the danish for 8 to 10 seconds until warmed through. This method works well when we need a fast solution, though it won’t restore the original crispness.
Important Reheating Note: Any icing or glaze on our apple danish may melt during the reheating process. We suggest adding fresh glaze after reheating if desired, or simply enjoy the pastries without additional sweetening since the apple filling provides plenty of natural flavor.
Recipe Variations

Apple danish offers incredible flexibility that allows us to customize flavors and textures to suit different preferences. We can explore many variations by changing apple varieties, experimenting with alternative fillings, and adapting assembly methods.
Different Apple Varieties
The apple variety we choose significantly impacts both flavor and texture in our danish. Pink Lady apples stand out as our top recommendation due to their exceptional tart-sweet balance and firmness that holds up beautifully during baking.
But, we can successfully substitute with several other varieties based on our desired outcome:
- Granny Smith: Provides bright tartness and maintains structure well
- Honeycrisp: Offers natural sweetness with satisfying crunch
- Fuji: Delivers mild sweetness and crisp texture
- Gala: Creates a tender, sweet filling with subtle flavor
Softer varieties like McIntosh work differently in our recipe. While they may become mushier during cooking, they still provide excellent flavor and create a more sauce-like filling that some bakers prefer.
Alternative Fillings
Beyond traditional cinnamon-apple combinations, we can create exciting variations with alternative fillings. Cream cheese fillings rank among the most popular alternatives, offering rich tanginess that complements the sweet apples perfectly.
Ricotta-based cheese fillings provide another excellent option, creating a lighter texture while maintaining creamy richness. We can layer these cheese fillings with our apple mixture for complex flavor profiles, or mix them together before adding the apples for a unified filling.
Creative flavor enhancements include:
- Citrus zest: Adds bright, fresh notes that brighten the overall taste
- Ground nuts: Provide textural contrast and nutty depth
- Coconut sugar: Offers subtle caramel notes as a refined sugar alternative
For those following gluten-free diets, we can adapt our recipe using pancake mix combined with coconut milk as substitutes for traditional wheat flour and dairy products.
Troubleshooting Tips

Even experienced bakers encounter challenges when making apple danish. We’ve compiled answers for the most common issues to help you achieve perfect results every time.
Soggy or Wet Pastry
Excess moisture from the apple filling often causes soggy pastry bottoms. We recommend cooking the apples until most liquid evaporates before adding cornstarch. Allow the filling to cool completely before assembling the danish to prevent steam from softening the dough. Pre-baking the pastry base for 5 minutes helps create a barrier against moisture.
Dough Too Soft to Handle
Warm conditions can make laminated dough difficult to work with. Refrigerate the dough for 30 minutes if it becomes too soft during rolling. We suggest working in a cool kitchen environment and chilling your rolling pin in the refrigerator beforehand. Return the dough to the refrigerator between steps if needed.
Uneven Baking
Danish pieces that brown unevenly usually result from inconsistent sizing or oven hot spots. Cut all pastry squares to the same dimensions using a ruler for accuracy. Rotate the baking sheet halfway through cooking time to ensure even browning. We recommend using the center rack position for optimal heat circulation.
Filling Leaks Out During Baking
Overfilling or improper sealing causes the apple mixture to escape during baking. Use approximately 2 tablespoons of filling per danish square. Seal the edges firmly by pressing with a fork or your fingers. Leave a small border around the filling when folding the pastry to prevent overflow.
Dense or Heavy Texture
Overworked dough creates dense pastries instead of flaky layers. Handle the dough minimally and avoid excessive kneading. Keep butter cold during the lamination process to maintain distinct layers. We find that refrigerating the assembled danish for 15 minutes before baking helps maintain structure.
Pale or Underbaked Appearance
Insufficient egg wash or incorrect oven temperature results in pale danish. Apply egg wash evenly to all exposed pastry surfaces before baking. Verify your oven temperature with a thermometer since variations affect browning. Bake until the pastry reaches a deep golden color rather than relying solely on time.
Apple Filling Too Sweet or Bland
Apple variety greatly influences the final flavor balance. Taste your filling before assembly and adjust sugar accordingly. We add a pinch of salt to enhance overall flavor complexity. Granny Smith apples require more sugar while Honeycrisp varieties need less sweetening.
Conclusion
We’ve equipped you with everything needed to create exceptional apple danish that rivals any bakery. From mastering the flaky pastry layers to perfecting that sweet cinnamon apple filling this recipe will become your go-to for impressing family and friends.
The beauty of homemade apple danish lies in your ability to customize every element. Whether you prefer tart Granny Smith apples or sweet Honeycrisp varieties you can tailor the flavors to match your taste preferences perfectly.
With our make-ahead tips and storage guidelines you’ll never have to worry about timing again. Prepare components in advance and enjoy fresh warm danish whenever the craving strikes. Your kitchen will smell like a professional bakery and the results will taste even better.
Frequently Asked Questions
What type of apples work best for apple danish?
Honeycrisp and Pink Lady apples are ideal choices due to their perfect balance of sweetness and tartness. Granny Smith offers more tartness, while Fuji and Gala provide extra sweetness. Avoid softer varieties like McIntosh as they can create a sauce-like filling that may make the pastry soggy.
Can I make apple danish ahead of time?
Yes! You can assemble apple danish up to two days in advance and refrigerate before baking. The apple filling can be prepared up to two weeks ahead and stored in an airtight container. Allow refrigerated assembled danish to reach room temperature before baking for best results.
How do I store leftover apple danish?
Store freshly baked apple danish at room temperature for 2-3 days covered with a clean cloth. For longer storage, refrigerate in an airtight container for up to one week or freeze for up to 3 months when properly wrapped.
Why is my apple danish pastry soggy?
Soggy pastry typically results from excess moisture in the apple filling. Cook your apple filling longer to reduce moisture content, and add cornstarch to thicken the mixture. Also, avoid overfilling each pastry square to prevent moisture from seeping into the dough.
What temperature should I bake apple danish at?
Bake apple danish at 400°F (200°C) for 20-25 minutes until golden brown. This high temperature ensures the pastry becomes flaky and crispy while properly cooking the apple filling inside.
Can I use frozen puff pastry for apple danish?
Absolutely! Frozen puff pastry is a convenient option that saves time. Simply thaw it according to package directions and roll it out if necessary. The results will be just as delicious as homemade danish dough.
How do I prevent the filling from leaking out?
Avoid overfilling each pastry square and ensure proper sealing of edges. Leave adequate borders around the filling, and gently press edges together. Also, make sure your apple filling isn’t too liquidy by cooking it until properly thickened.
What’s the best way to reheat apple danish?
For optimal results, reheat in a preheated 350°F oven for 5-10 minutes to restore crispness. You can also use a microwave for quick reheating, though this may soften the pastry. Note that any icing may melt during reheating.


