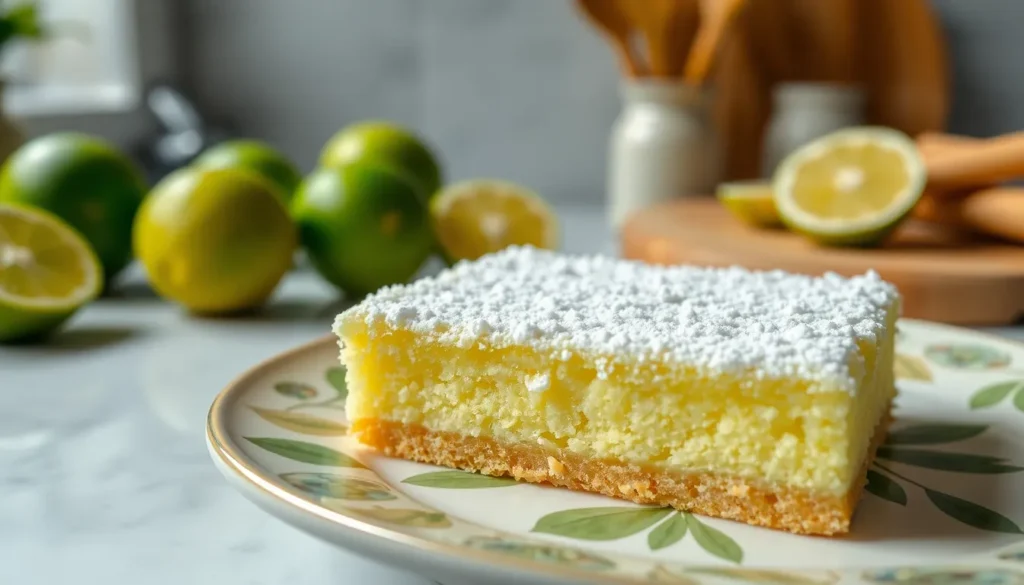
Key lime bars bring the bright tropical flavors of Florida’s famous key lime pie into a convenient handheld dessert. We’ve transformed the classic tart-meets-sweet combination into perfectly portioned squares that are easier to serve and even more irresistible to eat.
These zesty lime bars feature a buttery shortbread crust topped with a silky smooth key lime curd that strikes the perfect balance between tangy and creamy. The vibrant citrus flavor paired with that rich, custard-like filling creates an absolutely divine dessert that’s guaranteed to brighten any occasion.
What makes our recipe special is how we’ve simplified the traditional key lime pie process while maintaining all those authentic Florida Keys flavors. Whether you’re hosting a summer barbecue or need a make-ahead dessert for the office potluck, these bars deliver maximum flavor with minimal fuss. They’re also freezer-friendly, making them perfect for meal prep or unexpected guests.
Ingredients
We’ve carefully balanced our key lime bar recipe to create the perfect harmony between a buttery shortbread base and a vibrant citrus topping. These simple ingredients combine to deliver the authentic taste of Florida’s beloved key lime pie in convenient bar form.
For the Crust
- 2 cups all-purpose flour
- 1/2 cup powdered sugar
- 1/2 teaspoon salt
- 1 cup (2 sticks) unsalted butter, cold and cubed
- 1 large egg yolk
- 2 tablespoons cold water
For the Key Lime Filling
- 6 large egg yolks
- 1 can (14 ounces) sweetened condensed milk
- 1/2 cup fresh key lime juice (about 12-15 key limes)
- 2 tablespoons key lime zest
- 1/4 teaspoon salt
- 3 large eggs, whole
- 2 tablespoons all-purpose flour
- Powdered sugar for dusting (optional)
Equipment Needed

Creating perfect key lime bars requires the right tools to achieve that signature smooth filling and crisp crust. We recommend gathering these essential pieces of equipment before starting your baking process.
Baking Pan
An 8×8 or 9×9 inch metal or aluminum pan works best for even heat distribution. We avoid glass dishes as they can create uneven baking and make it difficult to achieve the proper texture contrast between the crust and filling.
Food Processor or Rolling Pin
Graham crackers need to be transformed into fine crumbs for our crust base. A food processor makes quick work of this task while a rolling pin offers more control over the texture if you prefer a slightly coarser crumb.
Mixing Equipment
Multiple mixing bowls accommodate the separate preparation of crust and filling components. A hand mixer or whisk becomes essential when incorporating cream cheese or ensuring our filling reaches the perfect smooth consistency.
Preparation Tools
Parchment paper lines the pan for effortless bar removal after chilling. Sharp measuring cups and spoons ensure accuracy in our ingredient ratios. A flexible spatula helps scrape every bit of filling from the bowl.
Citrus Processing
A citrus juicer or reamer extracts maximum juice from fresh key limes while preserving the essential oils that enhance flavor. Fresh juice makes a important difference in the final taste compared to bottled alternatives.
Final Steps Equipment
Your refrigerator provides the crucial chilling environment that sets our bars to the perfect sliceable consistency. A sharp knife creates clean cuts through the chilled bars without dragging the filling.
Instructions

These detailed steps will guide you through creating perfectly balanced key lime bars with a buttery crust and tangy filling. We’ll walk you through each stage to ensure your bars turn out restaurant quality every time.
Prep the Pan and Oven
We start by preheating our oven to 350°F for optimal baking temperature. Line your 8×8 or 9×9 inch metal baking pan with parchment paper, making sure the paper extends up the sides for easy removal later. This preparation step prevents sticking and creates clean edges for professional looking bars.
Make the Shortbread Crust
We combine 1 cup all-purpose flour, ½ cup powdered sugar, and ¼ teaspoon salt in a large mixing bowl. Cut in 6 tablespoons cold unsalted butter using a pastry cutter or fork until the mixture resembles coarse crumbs. Beat together 1 egg yolk and 1 tablespoon cold water, then drizzle over the flour mixture while stirring with a fork. Press the dough evenly into the bottom of our prepared pan using clean hands or the bottom of a measuring cup. Bake the crust for 15-18 minutes until the edges are lightly golden and the surface appears set.
Prepare the Key Lime Filling
We whisk together 4 egg yolks and 1 can (14 ounces) sweetened condensed milk in a large bowl until smooth and well combined. Add ½ cup fresh key lime juice, 2 tablespoons key lime zest, and ¼ teaspoon salt, whisking until the mixture is completely incorporated. Beat in 2 whole eggs one at a time, then whisk in 2 tablespoons all-purpose flour until the filling is silky and free of lumps. The mixture should be pale yellow and pourable at this stage.
Bake the Bars
We reduce our oven temperature to 325°F once the crust is ready. Pour the prepared key lime filling over the warm baked crust, spreading it evenly to the corners. Bake for 18-22 minutes until the filling is just set around the edges but still slightly jiggly in the center. The surface should no longer look wet or glossy when properly baked.
Cool and Chill
We allow the bars to cool completely in the pan on a wire rack for at least 1 hour at room temperature. Cover the pan with plastic wrap and refrigerate for a minimum of 4 hours or overnight for the filling to fully set. Use the parchment paper overhang to lift the chilled bars from the pan, then cut into squares with a sharp knife wiped clean between cuts. Dust with powdered sugar just before serving for an elegant finishing touch.
Directions for Serving

We recommend chilling our key lime bars for at least 4 hours before serving to ensure the perfect texture and flavor balance. The bars need this time in the refrigerator to set completely and develop their signature creamy consistency.
Cut the bars into squares just before serving to maintain their fresh appearance and prevent the filling from softening. We suggest using a sharp knife dipped in warm water and wiped clean between cuts for the cleanest edges. This technique prevents the creamy filling from sticking to the blade and creates professional-looking portions.
Temperature plays a crucial role in serving these bars at their best. We always serve our key lime bars chilled straight from the refrigerator as this enhances both the texture and the bright citrus flavors. The contrast between the cool temperature and the tangy lime creates the most refreshing experience.
Fresh lime zest grated over the top adds both visual appeal and an extra burst of citrus flavor that elevates each bite. We recommend using a microplane grater for the finest zest that distributes evenly across the surface. The aromatic oils from fresh zest provide an immediate sensory preview of the bright flavors within.
Dust the bars lightly with powdered sugar just before presenting them to guests for an elegant finishing touch. This final step creates a beautiful contrast against the pale yellow filling and adds a subtle sweetness that complements the tart lime flavors. The powdered sugar also helps mask any small imperfections from cutting.
Store any remaining bars covered in the refrigerator where they will maintain their quality for several days. We find that the flavors actually continue to meld and improve over the first day or two of storage.
Make-Ahead Instructions

We love that these key lime bars are perfect for advance preparation, making them ideal for entertaining or busy schedules. The bars can be made up to 3 days ahead and stored in the refrigerator, though we recommend consuming them within this timeframe for optimal texture and flavor.
Refrigerator Storage
Store the cooled bars in an airtight container or cover them lightly with plastic wrap before refrigerating. We’ve found that while the bars maintain their delicious flavor for up to 5 days, the crust may begin to soften after the second day. For best results, we suggest making them 1-3 days before serving.
| Storage Method | Duration | Notes |
|---|---|---|
| Refrigerated (covered) | 3-5 days | Crust softens after day 2 |
| Frozen bars | Up to 3 months | Thaw overnight in refrigerator |
| Graham cracker crust only | 3 days | Store covered at room temperature |
Freezer Storage
These bars freeze beautifully for up to 3 months when properly wrapped. We recommend cutting them into individual squares before freezing for easier serving. To serve frozen bars, transfer them to the refrigerator and allow them to thaw overnight.
Component Preparation
The graham cracker crust can be prepared separately up to 3 days in advance. Simply cover the prebaked crust and store it at room temperature until you’re ready to add the filling and complete the recipe.
Serving After Storage
Always serve the bars chilled directly from the refrigerator. We suggest using the parchment paper overhang to lift the entire batch from the pan, then cutting into squares just before serving for the cleanest presentation. Fresh lime zest or a dollop of whipped cream can be added at serving time for extra visual appeal and flavor.
Storage Tips

Proper storage maintains the creamy texture and bright citrus flavor of our key lime bars. We recommend storing these bars in the refrigerator to preserve their quality and ensure food safety.
Refrigeration Guidelines
Place your finished bars in an airtight container or cover them tightly with plastic wrap or aluminum foil. This prevents moisture loss and protects them from absorbing other refrigerator odors. Our bars stay fresh and delicious for 3 to 5 days when properly stored in the refrigerator.
The crust may begin to soften after 2 to 3 days of storage. But, the bars remain completely safe to eat throughout the entire storage period. We find that many people actually prefer the slightly softer texture that develops over time.
Freezing Instructions
For longer storage, we can freeze key lime bars for up to 3 months. Start by placing the cut bars in a single layer on a baking sheet and freeze them solid for about 1 hour. This prevents the bars from sticking together during storage.
Transfer the frozen bars to a freezer-safe container or heavy-duty freezer bag once they’re completely solid. Label the container with the date to track storage time. When ready to serve, thaw the bars overnight in the refrigerator rather than at room temperature.
Best Storage Practices
Always chill the bars for at least 2 to 4 hours before cutting to ensure clean slices and proper texture. Use a sharp knife for cutting and wipe it clean between each slice for the most professional appearance.
Store any whipped cream topping separately and add it just before serving. This prevents the cream from becoming runny or separating during storage. Fresh lime zest and lime slices should also be added as garnishes right before serving to maintain their vibrant appearance and fresh flavor.
| Storage Method | Duration | Temperature | Container Type |
|---|---|---|---|
| Refrigerated | 3-5 days | 35-40°F | Airtight container or covered |
| Frozen | Up to 3 months | 0°F | Freezer-safe container or bag |
| Pre-cutting chill | 2-4 hours | 35-40°F | Covered in baking pan |
Recipe Variations

These key lime bar variations allow you to customize the classic recipe while maintaining the essential tangy-sweet balance that makes this dessert so beloved. Each variation offers unique flavors and textures that complement the bright citrus filling.
Coconut Key Lime Bars
We love adding tropical coconut to our key lime bars for extra flavor and texture. Mix 1/2 cup of shredded coconut directly into the graham cracker crust before pressing it into the pan. For the filling we incorporate 1/4 cup of coconut cream in place of some of the sweetened condensed milk to create a richer tropical flavor.
Toast 1/3 cup of coconut flakes in a dry skillet over medium heat until golden brown. Sprinkle these toasted flakes over the bars just before serving for added crunch and visual appeal. The coconut variation pairs beautifully with the tart key lime filling and creates a dessert that tastes like a tropical vacation.
Graham Cracker Crust Option
Graham cracker crust offers a classic alternative to our shortbread base and delivers that authentic key lime pie experience. Crush 1 1/2 cups of graham crackers into fine crumbs using a food processor or by placing them in a sealed bag and rolling with a rolling pin.
Combine the graham cracker crumbs with 1/4 cup of granulated sugar and 5 tablespoons of melted butter. Press this mixture firmly into your prepared pan and bake at 350°F for 8 minutes before adding the filling. For extra crunch we sometimes add 1/4 cup of finely chopped pecans to the crust mixture.
| Crust Component | Amount | Notes |
|---|---|---|
| Graham crackers | 1 1/2 cups crushed | Use honey or regular graham crackers |
| Sugar | 1/4 cup | Granulated works best |
| Melted butter | 5 tablespoons | Unsalted preferred |
| Optional pecans | 1/4 cup chopped | Adds extra crunch |
The graham cracker crust provides a slightly sweeter foundation that complements the tart key lime filling perfectly. This variation creates bars that taste remarkably similar to traditional key lime pie but in a convenient handheld form.
Troubleshooting Tips

Even experienced bakers encounter challenges when making key lime bars. We’ve compiled answers to the most common issues to help you achieve perfect results every time.
Preventing Overbaked Filling
Watch for visual cues when determining doneness. The edges should appear set while the center maintains a slight wobble when you gently shake the pan. Overbaking results in a dry filling that lacks the signature creamy texture we love in key lime bars. Remove the pan from the oven as soon as the edges firm up, even if the center seems slightly underdone.
Fixing Filling That Won’t Set
Several factors can prevent your filling from achieving the proper consistency. Too much liquid in the mixture creates a runny texture that never firms up properly. Measure your key lime juice precisely and avoid adding extra liquid ingredients. Also, using too much filling for your pan size can prevent proper setting. Stick to the recipe measurements and ensure your baking pan matches the specified dimensions.
Avoiding Bitter Flavors
Key lime juice extraction requires a gentle touch. Squeezing limes too aggressively releases bitter compounds from the pith into your juice. Roll the limes on the counter before cutting to maximize juice yield, then squeeze gently to extract the sweet-tart juice without the bitter elements. Fresh key lime juice produces the best flavor, but regular limes work as substitutes when handled with the same care.
Achieving Clean Cuts
Temperature control determines your cutting success. Allow the bars to cool at room temperature for one hour after baking. Transfer them to the refrigerator and chill for at least two hours before attempting to cut. This cooling process ensures the filling sets completely and prevents messy, uneven squares. Use a sharp knife wiped clean between cuts for the neatest presentation.
Making Ingredient Substitutions
Flexibility in ingredients can save your recipe when you’re missing key components. Regular limes substitute effectively for key limes, though handle them gently to avoid bitter flavors. For dairy substitutions, sour cream or crème fraîche can replace yogurt in recipes that call for it, maintaining the tangy flavor profile while providing the necessary creaminess.
Conclusion
These key lime bars offer everything we love about traditional key lime pie in a perfectly portable format. The combination of buttery shortbread crust and silky citrus filling creates an irresistible dessert that’s both elegant and approachable.
We’ve found that the make-ahead friendly nature of these bars makes them ideal for entertaining and meal prep. Whether you’re hosting a summer gathering or simply craving a bright citrusy treat, this recipe delivers consistent results every time.
The versatility of key lime bars truly shines through the various customization options available. From coconut variations to graham cracker crusts, you can easily adapt this recipe to suit different preferences while maintaining that signature tangy-sweet balance that makes key lime desserts so beloved.
Frequently Asked Questions
What are key lime bars?
Key lime bars are a handheld dessert inspired by Florida’s key lime pie, featuring a buttery shortbread crust topped with silky key lime curd. They combine the authentic tangy-sweet flavors of traditional key lime pie in a convenient bar form that’s perfect for summer barbecues, potlucks, and entertaining.
Can I make key lime bars ahead of time?
Yes, key lime bars are excellent for make-ahead preparation. You can prepare them up to 3 days in advance and store them covered in the refrigerator. They’re also freezer-friendly, making them ideal for meal prep and accommodating unexpected guests while maintaining their creamy texture and bright citrus flavor.
What equipment do I need to make key lime bars?
Essential equipment includes an 8×8 or 9×9 inch metal baking pan for even heat distribution, parchment paper for easy removal, a food processor or rolling pin for crust preparation, mixing bowls, and a citrus juicer for maximum key lime juice extraction. A sharp knife is needed for clean cuts when serving.
How long do key lime bars need to chill?
Key lime bars should be chilled for at least 4 hours before serving to achieve the proper texture. This chilling time allows the key lime filling to set completely and develop the ideal creamy consistency. Cut them into squares just before serving for the best presentation.
Can I substitute regular limes for key limes?
While fresh key lime juice provides the most authentic flavor, you can substitute regular lime juice if key limes are unavailable. However, key limes offer a more distinctive tartness and aromatic quality that makes these bars special. Use the same amount of regular lime juice if substituting.
What are some variations of key lime bars?
Popular variations include Coconut Key Lime Bars, which incorporate shredded coconut into the crust and coconut cream into the filling, topped with toasted coconut flakes. You can also use a graham cracker crust instead of shortbread for a more traditional key lime pie flavor experience.
How should I store key lime bars?
Store key lime bars in an airtight container in the refrigerator for up to 3 days. For longer storage, they can be frozen for up to 3 months. Keep them covered to maintain their creamy texture and prevent them from absorbing other flavors from the refrigerator.
Why won’t my key lime filling set properly?
Filling that won’t set is usually caused by inaccurate ingredient measurements or underbaking. Ensure you measure ingredients precisely, especially the eggs and sweetened condensed milk. The filling should be just set when you remove it from the oven, as it will continue to firm up during chilling.


