We’ve discovered the perfect combination that’ll make your taste buds sing – chocolate cherry cake. This decadent dessert brings together rich chocolate’s deep intensity with tart-sweet cherries that burst with flavor in every bite. The classic pairing has been winning hearts for generations and it’s easy to see why.
Our chocolate cherry cake recipe transforms simple ingredients into something truly extraordinary. The moist chocolate cake layers perfectly complement the bright cherry filling while creating a beautiful contrast that’s both visually stunning and incredibly delicious. Whether you’re celebrating a special occasion or simply craving something indulgent this cake delivers restaurant-quality results right from your kitchen.
What makes this recipe special is how effortlessly the flavors work together. The cherries add natural sweetness and acidity that balances the rich chocolate creating a dessert that’s never too heavy or overwhelming. We’ll show you exactly how to achieve that perfect harmony between these two beloved flavors.
Ingredients
We’ve organized our ingredients into three essential components to make preparation seamless. Each layer contributes its own unique flavor profile to create the perfect chocolate cherry cake.
For the Chocolate Cake
- 1¾ cups all-purpose flour
- 2 cups granulated sugar
- ¾ cup unsweetened cocoa powder
- 2 teaspoons baking soda
- 1 teaspoon baking powder
- 1 teaspoon salt
- 2 large eggs, room temperature
- 1 cup buttermilk
- 1 cup strong black coffee, cooled
- ½ cup vegetable oil
- 1 teaspoon vanilla extract
For the Cherry Filling
- 2 cups fresh cherries, pitted and halved (or 1½ cups frozen cherries, thawed)
- ⅓ cup granulated sugar
- 2 tablespoons cornstarch
- 1 tablespoon lemon juice
- ¼ teaspoon almond extract
- Pinch of salt
For the Chocolate Frosting
- 1 cup unsalted butter, softened
- 3½ cups powdered sugar
- ¾ cup unsweetened cocoa powder
- ½ cup heavy cream
- 2 teaspoons vanilla extract
- ¼ teaspoon salt
- Additional fresh cherries for garnish (optional)
Equipment Needed

Creating our chocolate cherry cake requires several essential tools that will ensure smooth preparation and professional results. We’ve organized these items based on their importance and frequency of use throughout the baking process.
Essential Baking Equipment
Our primary tools include a 9×13 baking dish for the main cake layer, which provides the perfect size for family gatherings and special occasions. A mixing bowl serves as our foundation for combining ingredients, while a spatula helps us fold components together without overmixing the delicate cake batter.
Mixing and Preparation Tools
A stand mixer or hand mixer becomes invaluable when creaming butter and sugar for our frosting, though we can accomplish this task manually if needed. These electric mixers also help us achieve the perfect cake batter consistency while saving time and energy during preparation.
Cooking Equipment
Our oven naturally takes center stage for baking the cake layers to perfection at the precise 350°F temperature. We also need access to a stovetop for preparing the chocolate frosting, where we’ll heat our sugar, butter, and milk mixture until it reaches the proper boiling point.
Alternative Pan Options
Depending on our preferred presentation style, we can substitute a jelly roll pan or 13×9 pan for the standard baking dish. These alternatives work particularly well when we want to create multiple thin layers or achieve a different cake height and serving size.
Having these tools ready before we begin ensures our chocolate cherry cake preparation flows smoothly from start to finish.
Prep Work

Proper preparation sets the foundation for a flawless chocolate cherry cake. We’ll walk through the essential steps to prepare both our cherries and baking pans for optimal results.
Preparing the Cherries
Cherry preparation varies depending on which type we’re using for our cake. When working with cherry pie filling, we can skip the preparation process entirely since the cherries come ready to use. Fresh cherries require pitting and chopping before incorporating them into our batter or filling. We recommend draining frozen cherries thoroughly after thawing to prevent excess moisture from affecting our cake’s texture.
For scratch recipes requiring fresh cherry preparation, we should pit each cherry carefully and chop them into uniform pieces. This ensures even distribution throughout our cake layers. Fresh cherries provide the brightest flavor but require the most prep time compared to their processed counterparts.
Preparing the Pans
Pan preparation prevents our beautiful chocolate cherry cake from sticking and ensures easy removal after baking. We need to grease our 13 x 9-inch baking pan thoroughly with cooking spray, covering every corner and surface. This step eliminates the frustration of broken cake pieces when we’re ready to serve.
Alternative pan options like jelly roll pans can create different cake heights for varied presentations. Regardless of which pan we choose, generous greasing remains essential for success. We should apply the cooking spray evenly, paying special attention to corners where sticking commonly occurs.
Instructions

Now we’ll guide you through each step to create this stunning chocolate cherry cake. Follow these detailed instructions to achieve the perfect balance of rich chocolate and bright cherry flavors.
Making the Chocolate Cake Batter
We begin by whisking together our dry ingredients in a large mixing bowl. Combine 2 cups all-purpose flour, 1¾ cups granulated sugar, ¾ cup cocoa powder, 2 teaspoons baking soda, 1 teaspoon baking powder, and 1 teaspoon salt until evenly distributed.
Create a well in the center of the dry mixture and add the wet ingredients. Pour in 2 large eggs, 1 cup buttermilk, ½ cup strong coffee (cooled), ½ cup vegetable oil, and 2 teaspoons vanilla extract. Stir the mixture until just combined and smooth.
Add 1 teaspoon almond extract to enhance the cherry flavor profile. Mix the batter until no lumps remain, being careful not to overmix which can result in a tough cake texture.
Baking the Cake Layers
Preheat your oven to 350°F (175°C) and thoroughly grease your 9×13 inch baking dish. Pour the prepared batter into the pan, spreading it evenly with a spatula to ensure uniform baking.
Place the pan in the preheated oven and bake for 25 to 35 minutes. Test for doneness by inserting a toothpick into the center of the cake. The cake is ready when the toothpick comes out clean or with just a few moist crumbs attached.
Remove the cake from the oven and allow it to cool completely in the pan before frosting. This cooling period prevents the frosting from melting and ensures clean application.
Preparing the Cherry Filling
Open one 21 oz can of cherry pie filling and pour it into a medium bowl. If using fresh cherries, combine 2 cups pitted and chopped cherries with ¼ cup sugar, 2 tablespoons cornstarch, 1 tablespoon lemon juice, ½ teaspoon almond extract, and a pinch of salt.
Fold the cherry filling gently into the cooled cake batter if making a mixed version, or reserve it for layering between cake sections. For frozen cherries, ensure they are completely thawed and drained of excess moisture before incorporating.
Set aside whole or halved maraschino cherries for garnishing the finished cake if desired.
Making the Chocolate Frosting
Combine ½ cup granulated sugar, ¼ cup butter, and ¼ cup milk in a medium saucepan. Heat the mixture over medium heat, stirring constantly until it reaches a rolling boil.
Remove the saucepan from heat and immediately stir in 1 cup chocolate chips until completely melted and smooth. The residual heat will melt the chocolate chips without burning them.
Allow the frosting to cool for 10 to 15 minutes until it reaches a spreadable consistency. Drizzle or spread the chocolate frosting over the completely cooled cake, creating an even layer across the surface.
Assembly

We transform our cooled components into an impressive chocolate cherry cake through careful layering and strategic application of our filling and frosting. The key to professional results lies in working with completely cooled cake layers and applying each element with precision.
Layering the Cake
We begin by placing our first chocolate cake layer onto a serving platter with the flat side facing up. The cooled cake should rest at room temperature before we start assembling to prevent any melting or sliding of our components. We gently brush away any loose crumbs from the surface to ensure smooth frosting application later.
For our second layer preparation, we position it carefully on top after adding our cherry filling, ensuring the edges align properly. The weight of the upper layer helps compress the filling slightly, creating a stable structure that holds together beautifully when sliced.
Adding the Cherry Filling
We spread our prepared cherry filling evenly across the surface of our bottom cake layer, leaving approximately half an inch border around the edges. This border prevents the filling from oozing out when we add the top layer and apply pressure during assembly.
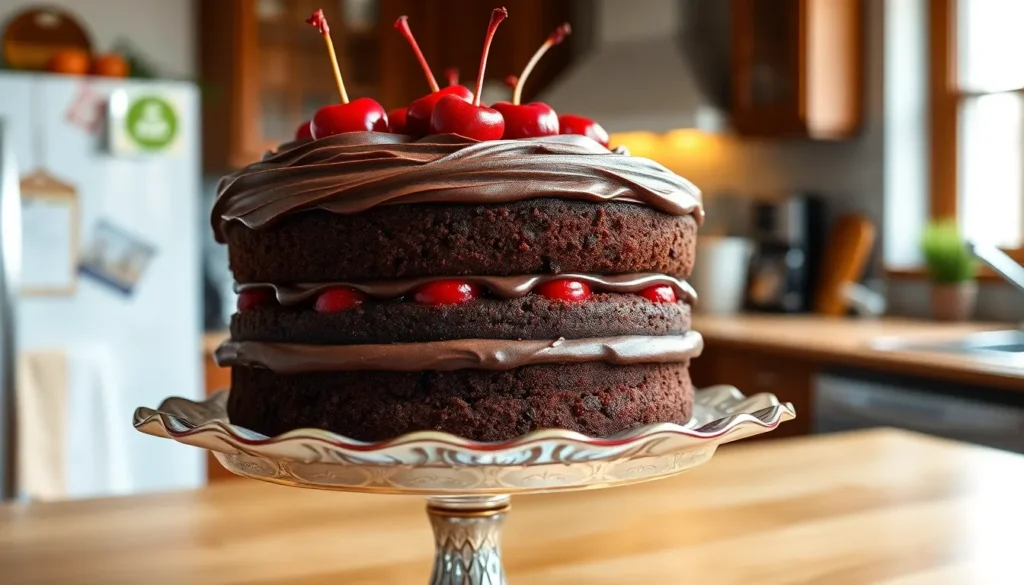
Our cherry mixture should be thick enough to stay in place without running off the sides. We distribute the cherries uniformly using a spatula, ensuring every slice will contain a generous amount of fruit. The filling creates a vibrant layer that contrasts beautifully with the dark chocolate cake when cut.
Frosting the Cake
We apply our chocolate frosting starting with the top layer, spreading it evenly from the center outward with smooth, confident strokes. The frosting should be at room temperature for optimal spreading consistency, allowing us to create a professional finish without tearing the cake surface.
We work our way down the sides, using long vertical strokes to create a smooth exterior. Our final step involves garnishing with reserved maraschino cherries or chocolate shavings, positioning them strategically around the top edge for visual appeal. The completed cake should be stored in the refrigerator if using whipped cream components, otherwise room temperature storage maintains the frosting’s ideal texture.
Decorating Tips

Now that we’ve assembled our chocolate cherry cake, we can transform it into a stunning centerpiece with professional decorating techniques. The key to beautiful cake decoration lies in layering our elements thoughtfully and adding finishing touches that complement both the chocolate and cherry flavors.
We start by applying a crumb coat to our assembled cake. This thin layer of frosting seals in any loose crumbs and creates a smooth foundation for our final decorating layer. After spreading this initial coating, we refrigerate the cake for 30 minutes to set the frosting properly.
For the final frosting layer, we apply our chocolate buttercream or cherry buttercream in smooth, even strokes. Using an offset spatula, we work from the top of the cake downward, creating clean edges and a professional finish. The frosting should be thick enough to cover the cake completely while allowing the beautiful layers to show through slightly.
Creating a dramatic ganache drip adds elegance to our chocolate cherry cake. We prepare a simple chocolate ganache by heating heavy cream and pouring it over chopped chocolate, then stirring until smooth. Once the ganache reaches the perfect consistency, we drizzle it around the edges of the cake, allowing it to flow naturally down the sides. The ganache sets beautifully when we refrigerate the cake for another 15 minutes.
Piped frosting designs elevate our cake’s appearance significantly. Using a piping bag fitted with various tips, we can create borders, rosettes, or intricate Lambeth style patterns around the cake’s perimeter. Star tips work wonderfully for creating textured borders, while round tips allow us to pipe delicate dots or lines that frame our cherry decorations.
Fresh cherries serve as the perfect final touch for our decorated cake. We arrange whole cherries with stems intact around the top border, creating pops of vibrant red color against the rich chocolate backdrop. Maraschino cherries also work beautifully and provide consistent color and size for a more uniform appearance.
For special occasions, we can dust the finished cake lightly with powdered sugar or add edible gold leaf accents. These sophisticated touches make our chocolate cherry cake worthy of any celebration while maintaining the classic appeal that makes this dessert so beloved.
Storage becomes crucial once we’ve completed our decorating work. We keep the finished cake refrigerated until serving time to maintain the frosting’s structure and prevent the cherry elements from compromising the cake’s stability.
Storage Instructions

Proper storage keeps our chocolate cherry cake fresh and maintains its delicious flavor profile for several days. We recommend following exact guidelines based on whether the cake is assembled or still in individual components.
Storing Unfilled Cake Layers
We can prepare unfilled chocolate cake layers up to two days ahead of assembly time. Store these layers at room temperature in an airtight container to maintain their moisture and texture. For longer storage periods, we wrap unfilled layers tightly in plastic wrap and aluminum foil before freezing for up to three months.
Refrigerating Assembled Cake
Once we assemble our chocolate cherry cake with filling and frosting, refrigeration becomes essential. The assembled cake stays fresh in an airtight container in the refrigerator for 3 to 5 days, though we notice the best texture and flavor within the first 3 to 4 days.
| Cake Type | Storage Location | Storage Duration |
|---|---|---|
| Unfilled layers | Room temperature | Up to 2 days |
| Unfilled layers | Freezer | Up to 3 months |
| Filled/assembled | Refrigerator | 3–5 days |
| Slices (frosted) | Freezer | Up to 1 month |
Room Temperature Storage Options
We can keep unfrosted cake layers at room temperature for 1 to 2 days when stored in an airtight container. Simple versions without perishable cherry filling maintain quality for up to 3 to 4 days at room temperature, though we always prioritize food safety when making this decision.
Freezing Individual Portions
Individual cake slices freeze beautifully when wrapped properly. We place frosted slices upright on a sheet pan until firm, then wrap each piece tightly in plastic wrap and foil. These frozen portions maintain quality for up to one month and thaw quickly when needed.
Handling Perishable Toppings
We add fresh whipped cream or other perishable toppings just before serving our chocolate cherry cake. Pre-frozen cakes should thaw completely at room temperature before we add any final decorative elements or serve to guests.
Make-Ahead Tips

We can prepare our chocolate cherry cake components well in advance to make entertaining stress-free and ensure the flavors develop beautifully. The cake layers themselves benefit from advance preparation and can be baked up to two days before serving when stored in an airtight container at room temperature.
| Component | Make-Ahead Timeline | Storage Method |
|---|---|---|
| Cake Layers | 1-2 days ahead | Airtight container at room temperature |
| Cherry Filling | 3-4 days ahead | Refrigerated or frozen up to 3 months |
| Buttercream Frosting | 2 days ahead | Refrigerated |
| Vanilla Cherries | 2 days ahead | Refrigerated |
Baking the cake a day in advance actually improves the final result as the flavors meld together overnight. We recommend wrapping each cooled layer tightly in plastic wrap before placing them in the container to prevent moisture loss.
Cherry filling preparation offers the most flexibility in our make-ahead strategy. We can prepare this component 3 to 4 days before assembly and store it in the refrigerator. For longer storage, the filling freezes beautifully for up to three months, making it perfect for seasonal cherry availability.
Frosting components vary in their make-ahead potential. Buttercream frosting stores well when made two days in advance and kept refrigerated. We simply need to bring it to room temperature and re-whip before using. Chocolate ganache frosting works best when prepared just before cake assembly to maintain its silky texture and spreadability.
Layer cake assembly becomes effortless when we prepare vanilla cherries up to two days ahead. These enhanced cherries develop deeper flavor when stored in the refrigerator and can be used directly from cold storage during assembly.
Our make-ahead approach ensures we have ample time for proper cake assembly and decoration while allowing each component to reach its flavor peak.
Serving Suggestions

Our chocolate cherry cake deserves presentation that matches its exceptional flavor profile. We recommend displaying this stunning dessert on a decorative cake stand to showcase the beautiful layers and create an elegant focal point for any gathering.
Temperature plays a crucial role in serving this delicate cake. We suggest removing it from the refrigerator 15-20 minutes before serving to allow the frosting to soften slightly and the flavors to reach their optimal intensity. This brief warming period ensures each slice cuts cleanly without disturbing the carefully constructed layers.
Portion Size and Cutting Techniques
The rich nature of this dessert calls for thoughtful portioning. We find that cutting 2-3 inch squares provides the perfect balance of indulgence without overwhelming guests. Sharp knives work best for clean cuts through the multiple layers.
Fresh garnishes elevate each individual serving significantly. We love adding a dollop of freshly whipped cream alongside each slice to complement the dense chocolate cake. Maraschino cherries or fresh cherry halves placed strategically on the plate create visual appeal while reinforcing the cake’s signature flavor combination.
Complementary Beverages and Accompaniments
Coffee pairs exceptionally well with our chocolate cherry cake due to its ability to balance the sweetness while improving the chocolate notes. We also recommend serving cold milk or vanilla ice cream as traditional accompaniments that guests consistently enjoy.
For special occasions we suggest offering dessert wine or cherry liqueur to adult guests who appreciate sophisticated flavor pairings. The slight tartness of these beverages cuts through the rich frosting beautifully.
Presentation Ideas for Different Occasions
Casual gatherings benefit from simple plating with minimal garnish allowing the cake’s natural beauty to shine. We often dust individual plates lightly with powdered sugar for an effortless elegant touch.
Formal dinner parties call for more elaborate presentation techniques. We recommend warming chocolate sauce slightly and drizzling it artfully around each plate before placing the cake slice. Additional fresh berries scattered around the plate create restaurant quality presentation that impresses every time.
For celebrations we love incorporating themed decorations that complement the chocolate cherry combination. Chocolate shavings curled with a vegetable peeler add texture and visual interest while staying true to the dessert’s core flavors.
Conclusion
This chocolate cherry cake recipe delivers everything we’ve promised – a perfect balance of rich chocolate and bright cherry flavors that’ll impress any crowd. With our detailed guidance you’ll create a dessert that’s both stunning and delicious.
The make-ahead tips we’ve shared make this cake perfect for entertaining without the stress. Whether you’re celebrating a special occasion or simply indulging in a weekend treat this recipe ensures success every time.
We’re confident that once you try this chocolate cherry combination you’ll understand why it’s been a beloved classic for generations. The moist layers vibrant filling and smooth frosting create a dessert experience that’s truly unforgettable.
Frequently Asked Questions
Can I use frozen cherries instead of fresh ones for this chocolate cherry cake?
Yes, you can use frozen cherries! However, make sure to drain excess moisture thoroughly before using them in the filling. This prevents the cake from becoming soggy and maintains the proper texture. Fresh cherries need to be pitted and chopped, while frozen ones can be used directly after draining.
How far in advance can I make this chocolate cherry cake?
You can prepare components ahead of time for convenience. Cake layers can be baked 1-2 days in advance and stored at room temperature. Cherry filling keeps for 3-4 days refrigerated or can be frozen longer. Buttercream frosting can be made 2 days ahead and refrigerated. Actually, the cake tastes better when made a day in advance!
What temperature should I bake the chocolate cherry cake at?
Bake the chocolate cake layers at 350°F for 25 to 35 minutes. Make sure your oven is properly preheated before placing the cake inside. Test for doneness with a toothpick inserted in the center – it should come out clean when the cake is fully baked.
Do I need special equipment to make this cake?
The essential equipment includes a 9×13 baking dish, mixing bowls, and spatula. A stand mixer or hand mixer is recommended for making the frosting, though not absolutely necessary. You’ll also need basic baking tools like measuring cups and an oven. Alternative pan options like jelly roll pans can create different cake heights.
How should I store the finished chocolate cherry cake?
Store the completed cake in the refrigerator to maintain its structure and prevent the frosting from melting. The cake should be covered or stored in an airtight container. Before serving, allow it to sit at room temperature for optimal flavor and texture. Proper refrigeration helps maintain both taste and appearance.
What’s the best way to cut and serve this cake?
Cut the cake into 2-3 inch squares for ideal portion sizes. Use a sharp knife and clean it between cuts for neat slices. Allow the cake to come to room temperature before serving for the best flavor experience. Present on a decorative cake stand and consider garnishing individual servings with whipped cream and fresh cherries.


