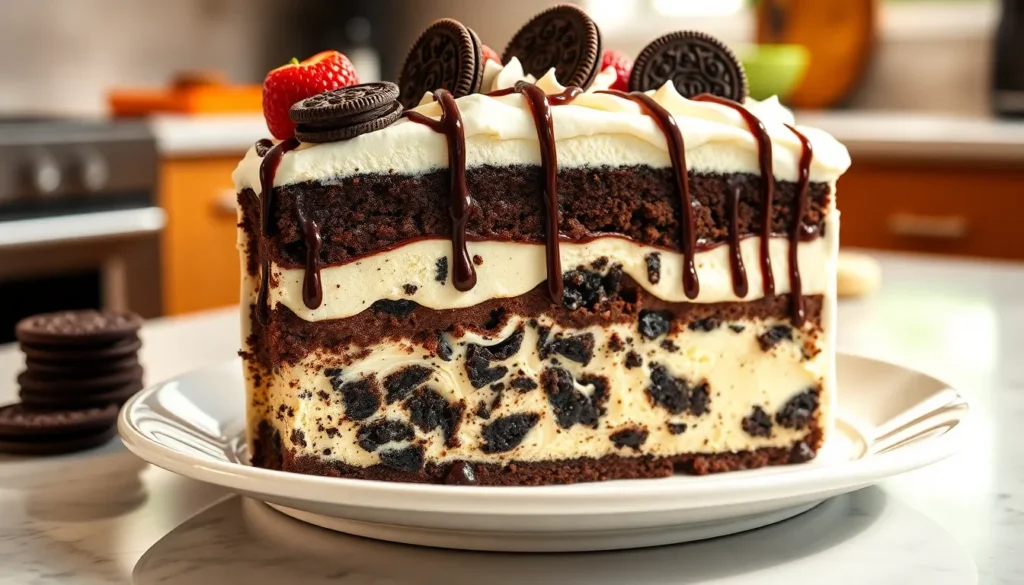
Nothing beats the irresistible combination of chocolate cookies and creamy ice cream, especially when they’re layered into a show-stopping Oreo ice cream cake. We’ve perfected this crowd-pleasing dessert that transforms simple ingredients into an extraordinary treat that’ll have everyone asking for seconds.
This no-bake wonder combines crushed Oreo cookies with your favorite ice cream flavors to create layers of pure indulgence. Whether you’re celebrating a birthday, hosting a summer party, or simply craving something spectacular, this cake delivers impressive results without the fuss of traditional baking.
What makes our version special? We’ll show you how to achieve the perfect cookie-to-cream ratio and create those Instagram-worthy layers that slice beautifully every time. Plus, you can customize it with different ice cream flavors to match any occasion or preference. Ready to create a dessert that’s guaranteed to steal the spotlight?
Ingredients
Creating our show-stopping Oreo ice cream cake requires just a handful of simple ingredients that come together to form distinct layers. We’ve organized these ingredients by component to help you gather everything efficiently before starting.
For the Oreo Crust
- 36 Oreo cookies (about 1 sleeve)
- 4 tablespoons unsalted butter, melted
- 2 tablespoons granulated sugar
- 1/4 teaspoon vanilla extract
For the Ice Cream Filling
- 1.5 quarts vanilla ice cream, softened
- 1 quart chocolate ice cream, softened
- 12 Oreo cookies, coarsely chopped
- 1/2 cup hot fudge sauce, cooled
- 1/4 cup mini chocolate chips
For the Whipped Cream Topping
- 2 cups heavy whipping cream, chilled
- 1/2 cup powdered sugar
- 1 teaspoon vanilla extract
- 2 tablespoons instant vanilla pudding mix (optional, for stability)
For Garnish and Decoration
- 8-10 whole Oreo cookies
- 1/4 cup chocolate shavings or curls
- 2 tablespoons chocolate syrup
- Fresh berries (optional)
- Maraschino cherries (optional)
Equipment Needed
 2")
Creating the perfect Oreo ice cream cake requires exact tools to ensure smooth preparation and professional-looking results. We’ve compiled a comprehensive list of essential equipment that will make your cake-making process effortless and enjoyable.
9×13 Inch Glass or Baking Pan
This pan size provides the ideal dimensions for layering and freezing your Oreo ice cream cake. Glass pans work exceptionally well as they distribute cold temperatures evenly during the freezing process and allow you to monitor your layers as you build them.
Cookie Crushing Tools
You’ll need either a blender, food processor, or the traditional method of a large ziplock bag paired with a rolling pin. These tools transform whole Oreo cookies into the perfect crumb consistency for your crust base. The blender and food processor offer more control over texture, while the ziplock bag method provides a satisfying hands-on approach.
Spreading Implements
A sturdy spatula or large spoon becomes essential for spreading ice cream, fudge, and whipped topping evenly across each layer. The key lies in using tools that won’t crack or break under the pressure of frozen ingredients.
Covering Materials
Plastic wrap or aluminum foil protects your cake between preparation steps and during the crucial freezing periods. Proper covering prevents ice crystals from forming and maintains the cake’s texture and flavor integrity.
Cutting Tools
A sharp knife ensures clean, professional-looking slices when serving your frozen masterpiece. The blade should be substantial enough to cut through all layers without creating messy edges or uneven portions.
Instructions
 4")
Creating our delicious Oreo ice cream cake requires careful layering and proper freezing time between each step. We’ll guide you through each stage to ensure perfect results every time.
Preparing the Oreo Crust
We start by crushing 36 Oreo cookies into fine crumbs using our food processor or blender. The cream centers should remain mixed with the cookie pieces for optimal flavor. Next we melt 1/2 cup (113g) of unsalted butter and stir it into the cookie crumbs until the mixture becomes thick and cohesive.
We press this mixture firmly and evenly into the bottom of our ungreased 9×13 inch pan. Using the bottom of a measuring cup helps create a solid and uniform base layer. The crust should be compacted well to prevent crumbling when we slice the finished cake.
Making the Ice Cream Layer
Our 1/2 gallon of cookies and cream ice cream needs to be slightly softened for easy spreading. We remove it from the freezer about 10-15 minutes before use to achieve the perfect consistency. Using our sturdy spatula we spread the softened ice cream evenly over the prepared Oreo crust.
We cover the pan with plastic wrap or aluminum foil and freeze for approximately one hour. This freezing time allows the ice cream layer to firm up properly before adding the next component.
Adding the Whipped Cream Topping
After removing our cake from the freezer we gently spread the whipped topping over the set ice cream layer. Cool Whip or our homemade whipped cream should be applied evenly across the entire surface. We use smooth spreading motions to avoid disturbing the ice cream underneath.
The whipped cream layer should be allowed to set briefly at room temperature before we proceed to the final decoration step.
Final Assembly and Decoration
We sprinkle crushed or chopped Oreo cookies generously over the whipped cream layer for texture and visual appeal. Optional chocolate fudge sauce can be drizzled over the top in decorative patterns for extra flavor enhancement.
Our completed cake gets covered and returned to the freezer for 3-4 hours or overnight to fully set all layers. Before serving we let the cake sit at room temperature for 5-10 minutes to make slicing easier. We use a hot sharp knife for the cleanest cuts and return any leftover portions to the freezer immediately for proper storage.
Make-Ahead Instructions
 6")
We strongly recommend preparing this Oreo ice cream cake a day before serving to ensure all layers set properly. The freezing process takes several hours and cannot be rushed if you want clean slices and stable layers.
Timeline Planning
| Stage | Time Required | Action |
|---|---|---|
| Crust Layer | 30 minutes | Press and initial freeze |
| Ice Cream Layer | 2-3 hours | Spread and firm freeze |
| Hot Fudge Layer | 1 hour | Drizzle and set freeze |
| Whipped Topping | 4+ hours | Final layer and overnight freeze |
Day Before Assembly
Start by removing your ice cream from the freezer 15 minutes before assembly to achieve the perfect spreading consistency. We find that slightly softened ice cream creates smoother layers without tearing the crust beneath.
Prepare each layer completely before moving to the next stage. Press the Oreo crust firmly into your pan and freeze for 30 minutes until solid. This prevents the crust from shifting when you add the ice cream layer.
Overnight Freezing Strategy
After completing all layers allow the entire cake to freeze overnight for optimal results. We recommend covering the cake tightly with plastic wrap to prevent ice crystals from forming on the surface.
Place your serving plate in the refrigerator the night before serving. This chilled plate prevents the bottom layer from melting too quickly during presentation.
Pre-Serving Preparation
Remove the cake from the freezer 10 minutes before slicing to soften slightly. This brief thawing period makes cutting much easier and prevents the layers from cracking. We suggest running your knife under warm water between cuts for the cleanest slices.
Storage Tips
 8")
Proper storage techniques ensure our Oreo ice cream cake maintains its perfect texture and flavor for maximum enjoyment. We recommend understanding the different storage durations and methods to keep this frozen dessert at its best.
Storage Duration Guidelines
The length of time we can store our Oreo ice cream cake depends on how we cover and protect it from freezer burn.
| Storage Method | Duration | Conditions |
|---|---|---|
| Uncovered | 1 day | Uncut cake only |
| Covered | 1 week | Wrapped properly |
| Long-term | 2 months | No perishable decorations |
Optimal Storage Methods
We achieve the best results by storing our cake in freezer conditions set at 0°F (-18°C) or below to prevent freezer burn. The cake should be wrapped tightly in plastic wrap and placed in a large freezer bag or covered with an upside-down plastic container for maximum protection.
Individual slices require special attention after cutting. We recommend rewrapping leftover pieces individually to maintain their freshness and prevent ice crystals from forming on the surface.
Pre-Serving Preparation
Timing plays a crucial role in serving our Oreo ice cream cake at the perfect consistency. We should remove the entire cake from the freezer about 20 minutes before serving to allow it to soften slightly for easier cutting.
Individual pieces benefit from a shorter thawing period. We suggest allowing single servings to sit at room temperature for 5-10 minutes if they feel too hard straight from the freezer. This brief warming period makes the cake more enjoyable to eat while maintaining its structural integrity.
Serving Suggestions
 10")
Our Oreo ice cream cake shines brightest when presented with thoughtful finishing touches that enhance both flavor and visual appeal. We recommend starting with a generous layer of whipped cream topping that maintains the cake’s pristine appearance while adding an extra dimension of sweetness.
Perfect Toppings and Garnishes
Crushed Oreos make the ultimate decorative element for our ice cream cake. We love mixing these cookie crumbs directly into the whipped cream topping or sprinkling them generously across the entire surface. This technique creates textural contrast while reinforcing the signature Oreo flavor profile.
Hot fudge sauce transforms each slice into a restaurant-quality dessert experience. We suggest drizzling this rich chocolate sauce over individual portions rather than the whole cake to prevent overwhelming the delicate ice cream layers. Chocolate sauce offers another delicious alternative that complements the Oreo theme beautifully.
Ice Cream Pairings
Additional scoops of vanilla or chocolate ice cream alongside our cake slices create an indulgent serving experience. We find that matching these classic flavors enhances rather than competes with the Oreo elements already present in the dessert.
Essential Serving Tips
| Serving Aspect | Recommendation | Timing |
|---|---|---|
| Assembly timing | Just before serving | Immediate |
| Storage if delayed | Freezer storage | Up to several hours |
| Cutting technique | Warmed serrated knife | Before each slice |
| Nutritional content | 340 calories per serving | 17g fat per serving |
We always assemble our final decorative elements just before serving to prevent melting and maintain optimal texture. When immediate serving isn’t possible, the decorated cake stores beautifully in the freezer for several hours without compromising quality.
Our secret to perfect slices involves using a long serrated knife warmed under hot running water. This technique glides through the frozen layers smoothly and creates clean presentation-worthy portions that showcase all the beautiful layers we’ve carefully constructed.
Recipe Variations
 12")
We love experimenting with different flavor combinations to create unique versions of this beloved frozen dessert. These variations offer exciting twists on the classic recipe while maintaining the same simple preparation method.
Cookies and Cream Version
We start this variation with a traditional Oreo crust made from crushed cookies combined with melted butter. The ice cream layer features cookies and cream ice cream for an extra dose of cookie flavor throughout every bite. Hot fudge sauce and fluffy whipped cream create the perfect topping combination. We finish this version by sprinkling crushed Oreos generously over the surface for added texture and visual appeal.
Double Chocolate Oreo Cake
Our chocolate lovers’ dream begins with the same crushed Oreo and melted butter crust foundation. We recommend using rich chocolate ice cream or cookies and cream ice cream for an intensely chocolate experience. The topping layer showcases both hot fudge sauce and silky chocolate ganache for maximum indulgence. Chocolate shavings or additional whole Oreos make stunning garnish options that enhance the dessert’s decadent appearance.
Mint Oreo Ice Cream Cake
We create this refreshing variation using the classic crushed Oreo and melted butter crust base. Mint chocolate chip ice cream provides a cool and invigorating flavor profile that pairs beautifully with the chocolate cookies. Hot fudge sauce and whipped cream maintain the traditional topping approach. We recommend garnishing with crushed Mint Oreos or chocolate chips to complement the mint flavor and add delightful texture contrast.
| Variation | Ice Cream Type | Special Toppings | Garnish Options |
|---|---|---|---|
| Cookies and Cream | Cookies and cream | Hot fudge, whipped cream | Crushed Oreos |
| Double Chocolate | Chocolate or cookies and cream | Hot fudge, chocolate ganache | Chocolate shavings, whole Oreos |
| Mint Oreo | Mint chocolate chip | Hot fudge, whipped cream | Crushed Mint Oreos, chocolate chips |
Troubleshooting Tips
 14")
Even experienced bakers encounter challenges when making Oreo ice cream cake. We’ve compiled the most common issues and their answers to ensure your dessert turns out perfectly every time.
Ensure Your Freezer Has a Flat Surface
The most critical factor for success involves placing your cake pan on a completely level surface in the freezer. Uneven positioning causes the ice cream layers to shift and create lopsided results. We recommend clearing a dedicated shelf space before you begin assembly.
Freeze Each Layer Before Adding the Next
Patience becomes essential when building multiple layers. Allow each component to freeze completely for at least 2 hours before adding the subsequent layer. This prevents the ice cream from melting and mixing with other elements. We find that rushing this step leads to muddy flavors and poor texture.
Use Room Temperature Butter for the Crust
Cold butter creates clumpy mixtures that won’t bind properly with crushed Oreos. Let your butter sit at room temperature for 30-45 minutes before mixing. We test readiness by pressing gently with a finger—the butter should yield easily without being completely soft.
Apply a Crumb Coat for Clean Frosting
When using whipped cream as your final layer spread a thin base coat first and freeze for 30 minutes. This crumb coat technique prevents Oreo pieces from mixing into your smooth topping. We then apply the final decorative layer for professional-looking results.
Line Your Pan for Easy Removal
Parchment paper or plastic wrap becomes your best friend for clean cake removal. Leave several inches of overhang on all sides to create handles for lifting. We spray the pan lightly with cooking spray before adding the liner to prevent shifting during assembly.
| Common Problem | Solution | Freezing Time |
|---|---|---|
| Lopsided layers | Use flat freezer surface | N/A |
| Melted ice cream | Freeze between each layer | 2+ hours |
| Crumbly crust | Room temperature butter | N/A |
| Messy frosting | Apply crumb coat first | 30 minutes |
| Stuck cake | Line pan with parchment | N/A |
Conclusion
This Oreo ice cream cake proves that impressive desserts don’t require complicated techniques or professional skills. We’ve shown you how simple ingredients and straightforward steps can create a show-stopping treat that’ll have everyone asking for the recipe.
Whether you’re planning a birthday celebration or just craving something indulgent this cake delivers every time. The beauty lies in its versatility – you can customize flavors and decorations to match any occasion or personal preference.
With proper storage techniques and our troubleshooting tips you’ll avoid common pitfalls and achieve perfect results. Remember to plan ahead since the overnight freezing time is what transforms simple ingredients into layers of creamy deliciousness.
Now it’s time to gather your ingredients and start creating this crowd-pleasing dessert that combines the beloved flavors of Oreos with the cool satisfaction of ice cream cake.
Frequently Asked Questions
How long does it take to make an Oreo ice cream cake?
The assembly takes about 30 minutes, but the cake needs to freeze for at least 6-8 hours or overnight for all layers to set properly. Each layer should freeze for 2 hours before adding the next one to prevent melting.
Can I make this cake ahead of time?
Yes! This cake is perfect for make-ahead preparation. It’s actually recommended to prepare it a day before serving to ensure all layers set properly. The cake can be stored in the freezer for up to one week when properly wrapped.
What size pan should I use for this recipe?
A 9×13 inch glass or baking pan is ideal for this recipe. The glass material provides optimal layering and freezing conditions, while the size ensures proper proportions for all the layers.
How do I get clean slices when cutting the cake?
Remove the cake from the freezer 20 minutes before cutting to soften slightly. Use a sharp serrated knife warmed under hot water and wiped clean between cuts. This prevents the layers from cracking or separating.
Can I customize the flavors of this ice cream cake?
Absolutely! You can create variations like cookies and cream, double chocolate with ganache, or mint chocolate chip. Simply substitute different ice cream flavors while keeping the basic Oreo crust and whipped cream topping structure.
How should I store leftover Oreo ice cream cake?
Wrap the cake tightly in plastic wrap or aluminum foil to maintain texture and flavor. Store in the freezer for up to one week. Always keep it frozen until ready to serve to prevent melting.
What equipment do I need to make this cake?
Essential equipment includes a 9×13 inch pan, a food processor or blender for crushing cookies, a sturdy spatula for spreading layers, plastic wrap or foil for covering, and a sharp knife for cutting clean slices.
Do I need to bake anything for this recipe?
No! This is a completely no-bake dessert. The only preparation required is crushing cookies, mixing ingredients, and layering them in the pan. The freezer does all the work to set the layers.


