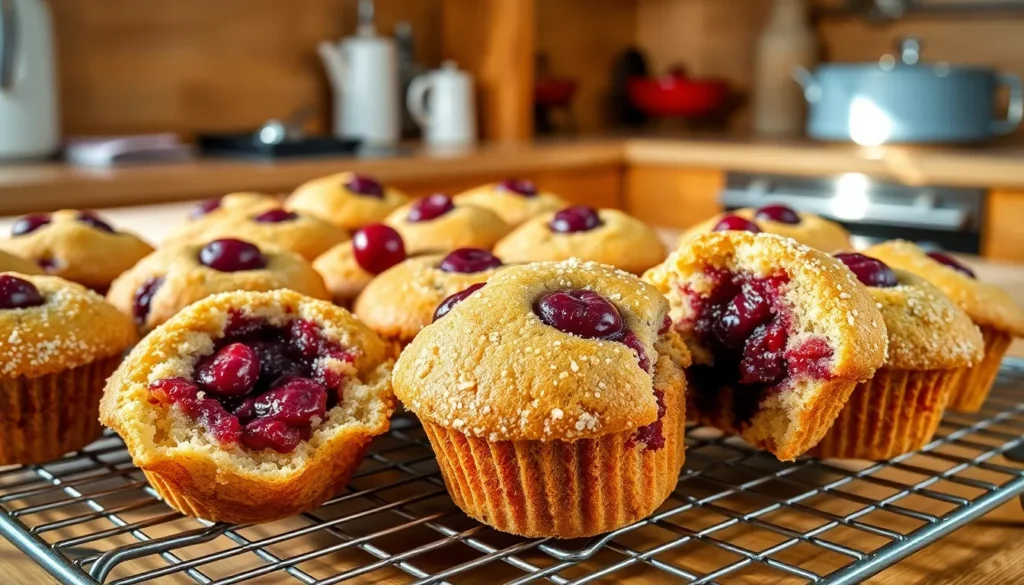
There’s something magical about biting into a warm cherry muffin that instantly transports us to summer mornings filled with sweet anticipation. These delightful treats combine the tartness of fresh cherries with tender crumb perfection that’ll make your taste buds dance with joy.
We’ve perfected this cherry muffin recipe through countless kitchen experiments and we’re confident it’ll become your new favorite go-to breakfast or snack. The secret lies in balancing the natural sweetness of ripe cherries with just the right amount of vanilla and a hint of almond extract that elevates each bite.
Whether you’re hosting a weekend brunch or simply craving something homemade and delicious these cherry muffins deliver bakery-quality results right from your own oven. They’re surprisingly easy to make and require ingredients you likely already have in your pantry making them perfect for those spontaneous baking moments when you need something special.
Ingredients
Our cherry muffin recipe calls for simple ingredients that work together to create tender bakery-style muffins. We’ve organized the ingredients by category to make preparation easier and ensure perfect results every time.
Dry Ingredients
- 2 cups all-purpose flour
- 3/4 cup granulated sugar
- 2 teaspoons baking powder
- 1/2 teaspoon salt
- 1/4 teaspoon ground cinnamon
Wet Ingredients
- 1/2 cup unsalted butter, melted and slightly cooled
- 2 large eggs, room temperature
- 3/4 cup whole milk
- 1 teaspoon vanilla extract
- 1/2 teaspoon almond extract
Cherry Preparation
- 1 1/2 cups fresh cherries, pitted and halved
- 2 tablespoons all-purpose flour (for coating cherries)
- 1 tablespoon granulated sugar (for macerating)
Equipment Needed
 2")
Creating perfect cherry muffins requires the right tools to ensure success in every batch. We’ve compiled a comprehensive list of essential equipment that will make your baking process smooth and efficient.
Standard 12-Hole Muffin Tin forms the foundation of our cherry muffin recipe. This essential pan shapes our muffins perfectly while providing even heat distribution throughout the baking process. We recommend lining the tin with paper liners or applying nonstick spray for effortless muffin removal after baking.
Mixing Bowls play a crucial role in proper ingredient preparation. Glass or stainless steel bowls work best for combining wet and dry ingredients separately, which ensures our muffins develop the ideal texture without overmixing.
Sturdy Whisk becomes indispensable for efficiently combining ingredients without creating lumps. This tool helps us achieve the smooth batter consistency that produces tender, fluffy muffins every time.
Cherry Pitter stands out as our most specialized tool for this recipe. When working with fresh cherries, this equipment removes pits quickly and efficiently, saving important preparation time while keeping our cherries intact for better distribution throughout the batter.
Cooling Racks complete our equipment setup by promoting even air circulation around freshly baked muffins. These racks prevent soggy bottoms while allowing our cherry muffins to cool properly before serving or storing.
| Equipment | Purpose | Material Preference |
|---|---|---|
| Muffin Tin | Shapes and bakes 12 muffins | Standard non-stick or lined |
| Mixing Bowls | Separates wet/dry ingredients | Glass or stainless steel |
| Whisk | Combines ingredients smoothly | Sturdy metal construction |
| Cherry Pitter | Removes pits efficiently | Any quality pitter tool |
| Cooling Racks | Ensures proper cooling | Wire construction |
Instructions
 4")
Now we’ll walk you through each step to create these perfect cherry muffins. Our method ensures the cherries stay evenly distributed throughout the batter while maintaining the ideal tender crumb.
Prep the Cherries
We start by pitting our fresh cherries and cutting them into quarters to ensure even distribution throughout each muffin. Drain any excess juice from the quartered cherries using a paper towel to prevent soggy batter. Take a small portion of our measured flour and coat the cherry pieces thoroughly. This flour coating acts as a barrier that prevents the cherries from sinking to the bottom during baking.
Mix the Dry Ingredients
We combine all purpose flour, baking powder, baking soda, and salt in a large mixing bowl. Whisk these dry ingredients together until they’re evenly distributed throughout the mixture. This step ensures our leavening agents are properly incorporated for consistent rise across all muffins.
Combine Wet Ingredients
In a separate bowl, we whisk together the melted butter and sugar until smooth. Add the eggs one at a time, beating well after each addition. Pour in the milk, sour cream, and almond extract, whisking continuously until the mixture is completely smooth and well blended. The wet ingredients should form a cohesive mixture before we add them to our dry components.
Fold Together the Batter
We pour our wet ingredient mixture into the bowl containing the dry ingredients. Stir just until the ingredients are combined, being careful not to overmix the batter. Overmixing develops the gluten too much and results in tough, dense muffins. Gently fold in our flour coated cherries using a rubber spatula, distributing them evenly throughout the batter with minimal stirring.
Fill Muffin Cups
We line our 12 cup muffin tin with paper liners or grease each cup if preferred. Using a large spoon or ice cream scoop, we fill each muffin cup about three quarters full to allow proper room for rising. Sprinkle coarse sugar on top of each muffin for an optional crispy finish that adds delightful texture contrast.
Bake the Muffins
We preheat our oven to 400°F and bake the muffins for 18 to 22 minutes. The muffins are done when a toothpick inserted into the center comes out clean and the tops are golden brown. Allow the muffins to cool in the pan for 5 minutes before transferring them to a wire rack. This cooling period prevents the muffins from breaking apart while ensuring they don’t become soggy from trapped steam.
Baking Tips for Perfect Cherry Muffins
 6")
Success with cherry muffins begins with understanding temperature control and preparation timing. We recommend preheating your oven to 375°F (190°C) for conventional ovens or 200°C (390°F) for fan-assisted models before starting your batter preparation.
Essential Temperature Control
Room temperature ingredients create the foundation for superior muffin texture. We always ensure our eggs, milk, and butter reach room temperature approximately 30 minutes before mixing. Cold ingredients resist proper incorporation and can result in dense, uneven muffins that lack the light, fluffy texture we desire.
Mastering the Mixing Technique
Overmixing ranks as the most common mistake when baking cherry muffins. We separate our wet and dry ingredients completely before combining them with gentle folding motions. The batter should appear slightly lumpy rather than perfectly smooth. This technique preserves the tender crumb structure that distinguishes bakery-quality muffins from heavy, tough ones.
Cherry Preparation Strategies
Fresh or frozen cherries require careful handling to prevent sinking during baking. We pit and halve our 300g of cherries before patting them dry with paper towels. Coating the cherry pieces lightly with flour helps them suspend evenly throughout the batter rather than settling at the bottom of each muffin cup.
Optimal Baking Specifications
| Baking Parameter | Standard Oven | Fan Oven |
|---|---|---|
| Temperature | 375°F (190°C) | 200°C (390°F) |
| Baking Time | 18-22 minutes | 20 minutes |
| Visual Cues | Golden brown tops | Cooked centers |
Professional Finishing Touches
We enhance our muffins with flaked almonds or coarse sugar sprinkled on top before baking. This creates an appealing bakery-style appearance and adds textural contrast. Using a cookie scoop ensures consistent portion sizes while filling alternating muffin cups allows proper expansion space for dramatic domed tops.
Proper cooling technique preserves muffin structure. We cool our finished muffins in the pan for 5 minutes before transferring them to wire racks. This brief resting period prevents collapse while ensuring the bottoms don’t become soggy from trapped steam.
Storage and Make-Ahead Instructions
 8")
We understand that planning ahead makes baking more enjoyable and less stressful. Our cherry muffins store beautifully and maintain their fresh taste when properly handled.
Room Temperature Storage
Store your freshly baked cherry muffins in an airtight container at room temperature for optimal freshness. We recommend placing paper towels at both the bottom and top of the container to absorb excess moisture and prevent sogginess.
| Storage Method | Duration | Temperature |
|---|---|---|
| Room Temperature | 2-5 days | 68-72°F |
| Refrigerator | 3-5 days | 35-40°F |
| Freezer | 1-3 months | 0°F |
Refrigerator Storage
Place your muffins in an airtight container and refrigerate for extended freshness. This method works particularly well during warm weather when room temperature storage might compromise quality. We find that refrigerated muffins maintain their texture and flavor for up to 5 days.
Freezer Storage
Wrap each muffin individually in plastic wrap or aluminum foil before placing them in freezer bags. Layer separation using parchment or wax paper prevents sticking and makes individual removal easier. Frozen cherry muffins retain their quality for up to 3 months when properly stored.
Make-Ahead Preparation
Prepare the muffin batter in advance and store it in the refrigerator overnight. This technique saves time during busy mornings while allowing flavors to develop. We also recommend baking muffins completely ahead of time and storing them using the methods outlined above.
Refreshing Tips
Toast stored muffins in a 350°F oven for 3 to 5 minutes to restore their original texture and warmth. Use frozen cherries if fresh ones are unavailable, but remember to defrost and drain them thoroughly before incorporating into the batter. This prevents excess moisture from affecting the final texture of your muffins.
Variations and Substitutions
 10")
We can easily customize our basic cherry muffin recipe to suit different tastes and dietary needs. These simple adjustments allow us to create unique flavor profiles while maintaining the delicious essence of our original recipe.
Different Cherry Types
Fresh cherries remain our top choice for these muffins. We can use sweet varieties like Bing or Rainier for a milder flavor or tart cherries for a more pronounced tartness. Pitting and halving or chopping fresh cherries gives us the best texture and flavor distribution throughout each muffin.
Dried cherries offer a completely different experience with their chewy texture and concentrated flavor. These provide more intense sweetness compared to fresh cherries and won’t add extra moisture to our batter. We should note that dried cherries differ significantly from freeze-dried versions which deliver a crunchy texture instead.
Cherry pie filling makes an excellent substitute when fresh or dried cherries aren’t available. This option creates sweeter and slightly saucier muffins with a more dessert-like quality. We need to drain excess syrup before folding the filling into our batter to prevent overly wet muffins.
Gluten-Free Option
Creating gluten-free cherry muffins requires substituting our all-purpose flour with a quality gluten-free flour blend. We must ensure our chosen blend contains a binding agent like xanthan gum or add it separately if the blend lacks this crucial ingredient.
The flour blend should maintain similar properties to regular flour for best results. We recommend measuring the gluten-free flour by weight rather than volume for more consistent outcomes. Our mixing technique remains the same but we should be extra gentle to avoid overworking the gluten-free batter.
When adding streusel toppings we need certified gluten-free oats to maintain the recipe’s gluten-free status. Regular oats may contain cross-contamination from wheat processing facilities.
Sugar-Free Alternative
We can replace both granulated and brown sugars with suitable sugar-free baking sweeteners like erythritol or stevia blends. These substitutes maintain sweetness while reducing the overall sugar content of our muffins.
Different sugar substitutes require varying quantities to match traditional sugar’s sweetness level. We should follow the conversion guidelines on our chosen sweetener’s packaging and adjust to taste during testing. Some sugar alternatives may slightly alter the texture so we might need to make minor adjustments to our liquid ingredients.
The natural sweetness from our cherries helps balance any potential aftertaste from sugar substitutes. We can also add a touch more almond extract to enhance the overall flavor profile when using sugar alternatives.
Serving Suggestions
 12")
We recommend serving our warm cherry muffins with a generous spread of your favorite jam to complement the sweet-tart cherry flavor. Strawberry or apricot jam creates a delightful contrast while raspberry jam enhances the fruity notes already present in each bite.
Our homemade cinnamon honey butter transforms these muffins into an indulgent breakfast treat. Simply mix softened butter with a drizzle of honey and a pinch of ground cinnamon for a spread that melts beautifully on warm muffin tops.
Coffee pairs exceptionally well with cherry muffins as the rich roasted notes balance the fruit’s natural sweetness. We also love serving them alongside hot tea or fresh orange juice for a complete breakfast or afternoon snack experience.
These muffins shine when presented on a tiered serving stand for brunch gatherings or special occasions. Dust them lightly with powdered sugar just before serving to add an elegant finishing touch that guests will appreciate.
Room temperature serving brings out the best flavors in our cherry muffins. We suggest removing them from storage about 15 minutes before serving to allow the cherries to reach their optimal taste profile.
For a dessert presentation we recommend warming individual muffins for 10-15 seconds in the microwave and serving with a small scoop of vanilla ice cream. The temperature contrast creates an irresistible combination that elevates the simple muffin into something special.
Picnic baskets benefit from individually wrapped cherry muffins that travel well without losing their moisture or flavor. Pack them in parchment paper or small containers to maintain their fresh-baked texture during outdoor adventures.
Conclusion
We’ve covered everything you need to create bakery-quality cherry muffins in your own kitchen. From selecting the right cherries to mastering the perfect batter consistency these techniques will help you achieve consistently delicious results.
The beauty of this recipe lies in its versatility and simplicity. Whether you’re hosting a weekend brunch or satisfying a midweek craving these muffins deliver every time. The combination of proper technique and quality ingredients ensures you’ll never have to settle for store-bought again.
Now it’s time to preheat that oven and start baking. Your kitchen will soon be filled with the irresistible aroma of fresh cherry muffins and your family will be asking for the recipe. Happy baking!
Frequently Asked Questions
What makes these cherry muffins special compared to regular muffins?
These cherry muffins balance the natural tartness of fresh cherries with vanilla and almond extract, creating a complex flavor profile. The recipe uses common pantry ingredients and includes specific techniques like coating cherries in flour to prevent sinking, ensuring perfectly distributed fruit in every bite.
What equipment do I need to make cherry muffins?
You’ll need a standard 12-hole muffin tin, mixing bowls (glass or stainless steel preferred), a sturdy whisk, and cooling racks. A cherry pitter is highly recommended for efficiently removing pits from fresh cherries, though it’s not absolutely essential if you’re comfortable pitting by hand.
How do I prevent cherries from sinking to the bottom of the muffins?
Pat the cherries completely dry after pitting and quartering them. Then coat them lightly in flour before folding them into the batter. This technique helps the cherries stay suspended throughout the muffin during baking rather than settling at the bottom.
Can I use frozen cherries instead of fresh ones?
Yes, frozen cherries work well as a substitute. Make sure to thoroughly defrost them first and drain all excess liquid. Pat them completely dry and coat with flour just like fresh cherries to prevent sinking and maintain proper muffin texture.
What’s the ideal oven temperature and baking time for cherry muffins?
Bake at 400°F (200°C) for conventional ovens or 390°F for fan-assisted ovens. Baking time is typically 18-22 minutes. The muffins are done when they’re golden brown on top and a toothpick inserted in the center comes out clean or with just a few moist crumbs.
How should I store leftover cherry muffins?
Store in an airtight container at room temperature for 2-5 days, placing paper towels inside to absorb moisture. For longer storage, refrigerate for 3-5 days or freeze for 1-3 months when properly wrapped in plastic wrap and aluminum foil.
Can I make the muffin batter ahead of time?
Yes, you can prepare the batter in advance and store it in the refrigerator overnight. This actually saves time for morning baking. Just remember to bring the batter closer to room temperature before baking for best results.
What are some good variations for this cherry muffin recipe?
Try different cherry varieties like sweet Bing or Rainier cherries, or use tart cherries for more pronounced flavor. You can also substitute dried cherries, use cherry pie filling, or create gluten-free versions with quality gluten-free flour blends.
How do I know when the muffins are perfectly baked?
Look for golden brown tops and use the toothpick test – insert a toothpick in the center and it should come out clean or with just a few moist crumbs. The muffins should also spring back lightly when touched on top.
What are the best ways to serve cherry muffins?
Serve slightly warmed with strawberry or apricot jam, or try homemade cinnamon honey butter. Pair with coffee, tea, or fresh orange juice. For elegant presentation, dust with powdered sugar and arrange on a tiered stand for brunch gatherings.


