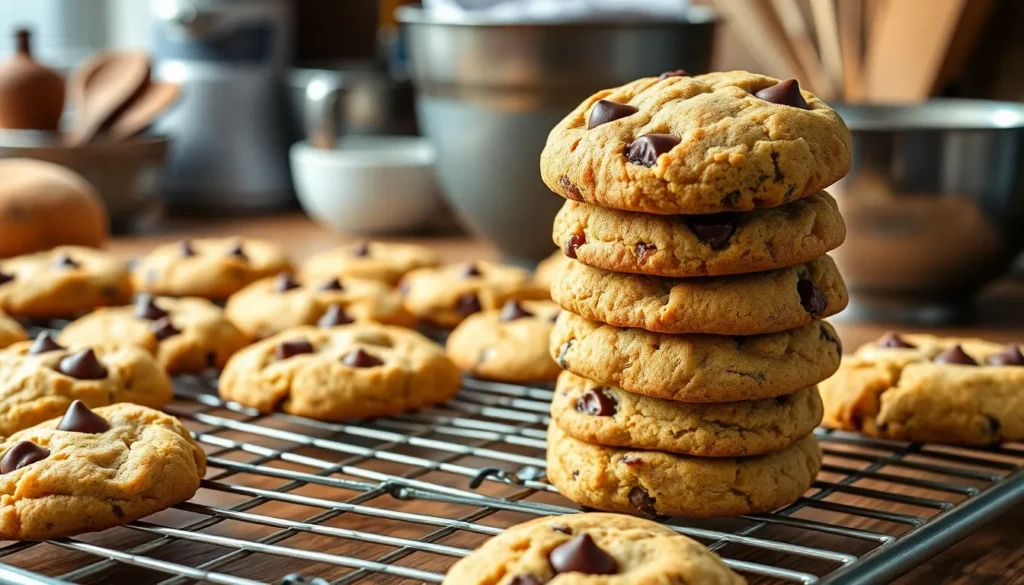
We’ve discovered the secret to the most irresistibly soft and chewy chocolate chip cookies you’ll ever taste – cream cheese. This game-changing ingredient transforms ordinary cookies into pillowy clouds of sweetness that’ll have everyone begging for the recipe.
The magic happens when cream cheese meets butter and sugar creating an incredibly tender crumb that stays soft for days. These aren’t your typical crispy-edged cookies. Instead they’re thick bakery-style treats with perfectly gooey centers and chocolate chips in every single bite.
What makes these cream cheese chocolate chip cookies truly special is their foolproof nature. They won’t spread too thin won’t burn easily and deliver consistent results every time. Whether you’re a seasoned baker or just starting out these cookies will make you look like a pro in the kitchen.
Ingredients
We’ve carefully selected each ingredient to create the perfect balance of cream cheese richness and chocolate chip indulgence. These measurements will yield approximately 24 thick and chewy cookies that stay soft for days.
For the Cookies
- 8 oz cream cheese, softened to room temperature
- 1/2 cup (1 stick) unsalted butter, softened
- 3/4 cup light brown sugar, packed
- 1/4 cup granulated sugar
- 1 large egg, room temperature
- 1 teaspoon vanilla extract
- 2 cups all-purpose flour
- 1/2 teaspoon baking soda
- 1/2 teaspoon salt
- 1 1/2 cups semi-sweet chocolate chips
- 1/2 cup mini chocolate chips (for extra chocolate distribution)
For Optional Glaze
- 1 cup powdered sugar, sifted
- 2-3 tablespoons heavy cream or milk
- 1/4 teaspoon vanilla extract
- Pinch of salt


Equipment Needed

We recommend gathering all your equipment before starting to ensure a smooth baking process. Our cream cheese chocolate chip cookies require several essential tools that most home bakers already have in their kitchens.
Large mixing bowls serve as the foundation for combining our ingredients properly. We suggest using at least two bowls to keep wet and dry ingredients separate initially.
A hand mixer or stand mixer makes creaming the butter and cream cheese effortless. Electric mixers ensure we achieve that light and fluffy texture that creates the perfect cookie base.
Rubber spatula helps us scrape down bowl sides and fold in chocolate chips without overmixing the dough. This tool ensures every ingredient gets properly incorporated.
Cookie scoop or tablespoon creates uniformly sized cookies that bake evenly. We prefer a medium cookie scoop for consistent portioning.
Baking sheets should be heavy duty to prevent hot spots and ensure even browning. Light colored pans work best for these cookies.
Parchment paper provides the ideal nonstick surface for our cookies. Alternatively we can use baking spray or lightly butter the pans.
Wire cooling rack allows proper air circulation around cooling cookies. This prevents soggy bottoms while maintaining that perfect chewy texture we want.
Having these tools ready before we begin mixing makes the entire process more enjoyable and efficient.


Instructions

These step-by-step instructions will guide you through creating the most tender and flavorful cream cheese chocolate chip cookies. We’ll walk you through each stage to ensure your cookies turn out perfectly soft and chewy every time.
Prep the Dough
Beat the softened cream cheese and butter together in a large mixing bowl until the mixture becomes completely smooth and fluffy. Add both the granulated sugar and packed light brown sugar to the cream cheese mixture, beating until well combined. Crack the large egg into the bowl and pour in the vanilla extract, mixing until fully incorporated.
Whisk together the all-purpose flour, baking soda, and salt in a separate bowl. Gradually add these dry ingredients to the wet mixture, beating on low speed until just combined. Fold in the semi-sweet chocolate chips using a rubber spatula, ensuring they’re evenly distributed throughout the dough.
Chill the Dough
Transfer the prepared dough to the refrigerator and chill for at least 2 hours. This crucial step allows the flavors to meld together while firming up the dough for easier handling. We recommend chilling overnight for the best texture and flavor development.
Shape and Bake
Preheat your oven to 350°F and line heavy-duty baking sheets with parchment paper. Remove the chilled dough from the refrigerator and use a cookie scoop to form uniform balls of dough. Space the dough balls about 2 inches apart on the prepared baking sheets to allow for slight spreading.
Bake the cookies for 10-12 minutes or until the edges are lightly golden brown. The centers should still appear slightly soft and underbaked when you remove them from the oven.
Cool and Finish
Allow the cookies to cool on the baking sheets for 5 minutes before carefully transferring them to a wire cooling rack. This brief cooling period on the hot pan helps set the cookies while maintaining their chewy texture. Sprinkle with flaky sea salt or press additional chocolate chips on top while the cookies are still warm for an extra special touch.


Directions for Perfect Results

We’ve perfected these cream cheese chocolate chip cookies through countless batches and testing. Following our proven techniques ensures you’ll achieve the ideal texture and flavor every time.
Mixing Tips
We start by beating the cream cheese and butter together at medium-high speed until the mixture becomes light and fluffy, which takes about 3-4 minutes. This crucial step creates the foundation for our cookies’ tender texture. After adding the vanilla extract, we continue beating for another minute to ensure complete incorporation.
When combining the dry ingredients, we mix the flour, baking soda, and salt just until everything comes together. Overmixing at this stage can lead to tough cookies, so we stop as soon as we no longer see streaks of flour. Room temperature ingredients blend more easily and create a smoother dough, so we always ensure our cream cheese and butter are properly softened before beginning.
Baking Guidelines
We preheat our oven to 350°F and always chill our dough for at least 2 hours before baking. This chilling period allows the flavors to develop while preventing the cookies from spreading too much during baking. Our baking sheets get lined with parchment paper for easy removal and even browning.
The perfect bake time is exactly 10 minutes. We watch carefully to avoid overbaking since the cookies continue cooking slightly after removal from the oven. The edges should appear set while the centers remain soft and slightly underdone when we pull them out.
Storage Instructions
We let our cookies cool on the baking sheet for a few minutes before transferring them to a wire rack. This brief cooling period prevents them from breaking apart while still warm. Once completely cooled, we store the cookies in an airtight container at room temperature.
| Storage Method | Duration | Notes |
|---|---|---|
| Room Temperature | Up to 5 days | Store in airtight container |
| Refrigerated | Up to 1 week | Bring to room temperature before serving |
| Frozen | Up to 3 months | Wrap individually for best quality |
Properly stored cookies maintain their soft, chewy texture for days. We never refrigerate them unless necessary, as room temperature storage preserves their ideal consistency.


Make-Ahead Instructions

We love preparing cream cheese chocolate chip cookies ahead of time for busy weekends or unexpected guests. These make-ahead techniques allow us to enjoy fresh-baked cookies whenever we want without starting from scratch.
Refrigerating Cookie Dough
Our cookie dough stores beautifully in the refrigerator for up to 3 days when tightly covered. We shape the dough into a ball and wrap it securely in plastic wrap before storing. This extended chilling time actually enhances the flavor development and makes the cookies even more tender.
When we’re ready to bake, we remove the dough from the refrigerator and let it soften for 5-10 minutes before scooping. The slightly chilled dough holds its shape better during baking and creates those perfect thick edges we love.
Freezing Cookie Dough Balls
For longer storage, we roll our chilled dough into individual cookie balls and freeze them on a parchment-lined baking sheet. Once the dough balls are completely frozen (about 2 hours), we transfer them to a freezer-safe container or bag where they keep for up to 2 months.
| Storage Method | Duration | Temperature |
|---|---|---|
| Refrigerated dough | 3 days | 35-40°F |
| Frozen dough balls | 2 months | 0°F |
| Baking from frozen | Add 1-2 minutes | 350°F |
Baking frozen dough balls requires no thawing time. We place them directly on our prepared baking sheets and add an extra 1-2 minutes to the standard baking time. This method produces cookies with the same soft, chewy texture as freshly made dough.
Pre-Baked Cookie Storage
We can also bake our cookies completely and store them for later enjoyment. Cooled cookies stay fresh at room temperature for up to 5 days in an airtight container. For extended storage, we wrap individual cookies in plastic wrap and freeze them for up to 3 months.
These make-ahead strategies ensure we always have delicious cream cheese chocolate chip cookies ready when cravings strike or company arrives unexpectedly.


Variations and Substitutions

We love experimenting with our cream cheese chocolate chip cookies to create exciting new flavors and accommodate different dietary needs. These simple modifications allow us to customize our cookies while maintaining their signature soft and chewy texture.
Flavor Variations
Transform our basic recipe into exciting new treats with these delicious mix-ins. We can add 1/2 cup of rolled oats for a heartier texture or swap chocolate chips for peanut butter chips, M&M’s, butterscotch chips, or chopped mini Snickers bars. Our favorite indulgent variation involves wrapping cookie dough balls around frozen scoops of peanut butter, caramel candy, or extra chocolate for a stuffed cookie surprise.
For a sophisticated twist, we sprinkle fleur de sel on top of our cookies before baking to create that perfect salty-sweet balance. Adding 1/2 cup of chopped walnuts or pecans gives our cookies a delightful nutty crunch. We also love incorporating 1/3 cup of dried cranberries or cherries for a fruity burst that complements the cream cheese beautifully.
Adventurous bakers can add a pinch of cayenne pepper to the dough for an unexpected spicy kick that enhances the chocolate flavor. Using different chocolate varieties like milk chocolate, dark chocolate, or a combination of bittersweet and semi-sweet chips creates unique flavor profiles for every preference.
Dietary Modifications
Creating inclusive versions of our cream cheese chocolate chip cookies ensures everyone can enjoy these treats. We substitute all-purpose flour with certified gluten-free flour blends cup for cup to accommodate gluten-free diets without compromising texture.
For vegan modifications, we replace butter with plant-based alternatives and use vegan cream cheese in equal amounts. These substitutions maintain the cookies’ signature softness while making them suitable for plant-based diets.
Reducing sugar content becomes simple by cutting the total sugar by 1/4 cup or using natural sweeteners like stevia or honey. We adjust liquid ingredients slightly when using honey to maintain proper dough consistency.
| Substitution Type | Original Ingredient | Alternative Options |
|---|---|---|
| Starch | Cornstarch | Tapioca starch or omit entirely |
| Sugar | Light brown sugar | Dark brown sugar for robust flavor |
| Flour | All-purpose flour | Gluten-free flour blend |
| Butter | Unsalted butter | Vegan butter alternative |
| Cream Cheese | Regular cream cheese | Vegan cream cheese |
We find that dark brown sugar creates a more robust molasses flavor compared to light brown sugar. When cornstarch is unavailable, we substitute with tapioca starch or simply omit it from the recipe without affecting the final texture significantly.


Troubleshooting Tips

Even with our foolproof cream cheese chocolate chip cookie recipe, we sometimes encounter baking challenges that can affect the final results. Understanding these common issues helps us achieve consistently perfect cookies every time we bake.
Cookies Spread Too Much or Are Flat
When our cookies turn out flatter than expected, the culprit is usually overly soft butter and cream cheese. We need to ensure both ingredients reach room temperature naturally rather than rushing the process with heat. Over-creaming the mixture can also cause excessive spreading, so we should beat the ingredients just until they combine smoothly. Also, placing dough on a hot baking sheet can cause immediate spreading, so we always use cooled pans between batches.
Cookies Are Not Baking Evenly
Uneven baking typically results from hot spots in our oven or inconsistent dough portions. We recommend rotating our baking sheets halfway through the baking time to ensure even heat distribution. Using high-quality, heavy-duty baking sheets prevents hot spots that can cause uneven browning. Creating uniform dough balls with our cookie scoop ensures each cookie bakes at the same rate.
Cookies Are Too Crumbly
Crumbly cookies often indicate insufficient mixing or an imbalanced ratio of dry to wet ingredients. We should mix our dough thoroughly to ensure all ingredients bind properly. When cookies still crumble after proper mixing, adding an extra egg can provide the additional moisture and binding power needed for cohesive cookies.
Cookies Are Too Hard or Dry
Overbaking remains the primary cause of hard, dry cookies. We monitor our cookies closely and remove them when edges appear golden while centers still look slightly underbaked. Too much flour can also create dry texture, so we measure flour by spooning it into our measuring cup and leveling it off. Insufficient fat or liquid in our recipe can contribute to dryness, making it important to follow measurements precisely.
Cookies Are Burnt on the Bottom
Dark nonstick pans absorb more heat and can burn cookie bottoms before the tops finish baking. We prefer light-colored, heavy-duty baking sheets for even heat distribution. Positioning our oven rack in the middle ensures optimal heat circulation around our cookies. Checking cookies frequently during the final minutes of baking prevents burning and helps us achieve perfect golden edges.


Conclusion
We’ve shared everything you need to master these incredibly soft cream cheese chocolate chip cookies. From the foolproof recipe to expert techniques and make-ahead strategies we’ve covered all the essentials for bakery-quality results at home.
These cookies deliver that perfect combination of tender texture and rich chocolate flavor that keeps everyone coming back for more. Whether you’re baking for family gatherings or treating yourself to something special you now have all the tools and knowledge to create consistently amazing cookies.
Don’t forget to experiment with our suggested variations and troubleshooting tips to make this recipe truly your own. We’re confident these cream cheese chocolate chip cookies will become your new go-to treat for any occasion.
Frequently Asked Questions
What makes these chocolate chip cookies different from regular ones?
The secret ingredient is cream cheese, which creates incredibly soft and chewy cookies with a tender crumb. Unlike traditional crispy-edged cookies, these stay thick and bakery-style with gooey centers that remain soft for days. The cream cheese adds richness and helps prevent the cookies from spreading too thin.
How long should I chill the cookie dough?
Chill the dough for at least 2 hours before baking. This step is crucial for enhancing flavor and texture while preventing excessive spreading. For make-ahead convenience, you can refrigerate the dough for up to 3 days or freeze individual cookie balls for up to 2 months.
What temperature and time should I bake these cookies?
Bake at 350°F for 10-12 minutes until the edges are golden and centers remain soft. The cookies will look slightly underbaked in the center, which is perfect for achieving that chewy texture. Let them cool on the baking sheet for a few minutes before transferring.
Can I make these cookies gluten-free or vegan?
Yes! For gluten-free cookies, substitute all-purpose flour with a 1:1 gluten-free flour blend. For vegan options, replace cream cheese with vegan cream cheese, use plant-based butter, and substitute the egg with a flax egg or commercial egg replacer while maintaining the same measurements.
How should I store these cookies to keep them fresh?
Store baked cookies in an airtight container at room temperature for up to 5 days. For longer storage, freeze cookies for up to 3 months. The cream cheese helps maintain moisture, keeping them soft longer than traditional chocolate chip cookies without any special storage requirements.
Why are my cookies spreading too much during baking?
Excessive spreading usually occurs when the dough isn’t chilled long enough or the butter is too warm. Ensure your cream cheese and butter are softened but not melted, chill the dough for at least 2 hours, and avoid placing dough on warm baking sheets.
What equipment do I need to make these cookies?
Essential tools include large mixing bowls, a hand or stand mixer, rubber spatula, cookie scoop for uniform sizing, heavy-duty baking sheets, parchment paper, and a wire cooling rack. Having the right equipment ensures smooth preparation and consistent results for perfect cookies every time.
Can I add different mix-ins to customize the recipe?
Absolutely! Try adding rolled oats, peanut butter chips, dried fruits, or nuts. You can also experiment with different chocolate types like dark chocolate or white chocolate chips. Just maintain the same total amount of mix-ins to preserve the cookie’s structure and texture.


