We’ve discovered the secret to creating cookies that are both indulgent and surprisingly light – olive oil cookies! These Mediterranean-inspired treats swap traditional butter for premium olive oil, resulting in a tender crumb and subtle fruity notes that’ll revolutionize your cookie game. The best part? They’re incredibly versatile and work beautifully with both sweet and savory flavor profiles.
What makes olive oil cookies truly special is their unique texture – they’re soft and chewy with delicate edges that practically melt in your mouth. Unlike their butter-heavy counterparts, these cookies stay moist for days and offer a sophisticated flavor that pairs perfectly with everything from citrus zest to fresh herbs.
We’re excited to share this foolproof recipe that’ll become your new go-to for impressive entertaining or everyday indulgence. Whether you’re looking for a healthier cookie option or simply want to try something deliciously different, these olive oil cookies deliver exceptional results every single time.
Ingredients
Our olive oil cookies require simple pantry staples that combine to create these delightfully tender treats. We’ve organized the ingredients by their use to make your baking process seamless and efficient.
For the Cookies
- 2 cups all-purpose flour
- 1/2 cup granulated sugar
- 1/4 cup brown sugar, packed
- 1/2 cup extra virgin olive oil (fruity variety preferred)
- 2 large eggs, room temperature
- 1 teaspoon vanilla extract
- 1 teaspoon baking powder
- 1/2 teaspoon salt
- 2 tablespoons whole milk
- 1 tablespoon lemon zest (optional for citrus notes)
For Optional Glaze
- 1 cup powdered sugar, sifted
- 2-3 tablespoons fresh lemon juice
- 1 teaspoon vanilla extract
- Pinch of salt
- 1-2 tablespoons milk (as needed for consistency)
Equipment Needed

Before we begin making our olive oil cookies, let’s gather the essential tools that will ensure perfect results every time. Having the right equipment ready makes the baking process smooth and enjoyable.
We recommend starting with a large mixing bowl for combining our wet and dry ingredients. A medium-sized bowl works as well, though a larger vessel gives us more room to mix without spillage. An electric mixer or sturdy whisk proves invaluable for achieving the proper texture when creaming our olive oil with sugars.
Measuring cups and spoons are crucial for accuracy in baking. We suggest using both liquid and dry measuring cups to ensure precise measurements, especially when working with olive oil. Baking sheets form the foundation of our cookie baking setup. Two sheets allow us to work efficiently, preparing one batch while another bakes.
Parchment paper lines our baking sheets and prevents sticking while ensuring even browning. This simple addition makes cleanup effortless and protects our cookies from burning on the bottom. A cookie scoop creates uniform cookies that bake evenly, though we can certainly use a spoon if preferred.
Oven mitts protect our hands when handling hot baking sheets. We always keep a pair nearby throughout the baking process. Finally, a wire cooling rack allows our cookies to cool properly and maintains their perfect texture.
| Equipment | Purpose | Alternative Option |
|---|---|---|
| Large mixing bowl | Combining ingredients | Medium bowl |
| Electric mixer | Creaming mixture | Sturdy whisk |
| Measuring tools | Accurate portions | Kitchen scale |
| Cookie scoop | Uniform shapes | Large spoon |
| Wire cooling rack | Proper cooling | Clean kitchen towel |
These tools work together to create the ideal environment for crafting our Mediterranean-inspired olive oil cookies with consistent results.
Instructions

We’re ready to transform our premium ingredients into these delightful Mediterranean cookies. Following these detailed steps ensures perfectly tender cookies with that distinctive olive oil flavor.
Prep the Dough
We begin by combining the wet ingredients in our large mixing bowl. Pour the extra virgin olive oil, granulated sugar, and brown sugar together. Using an electric mixer or sturdy whisk, beat the mixture until well combined and slightly lightened in color.
Add the eggs one at a time, beating well after each addition. Pour in the vanilla extract and mix until the mixture appears smooth and glossy. If using lemon zest, incorporate it now by whisking it directly into the sugar mixture for maximum flavor distribution.
In a separate bowl, we sift together the all-purpose flour, baking powder, and salt. This ensures even distribution of leavening agents throughout our dry ingredients. Gradually add the flour mixture to our wet ingredients, mixing just until combined. Avoid overmixing to maintain the tender texture that makes these cookies special.
Shape the Cookies
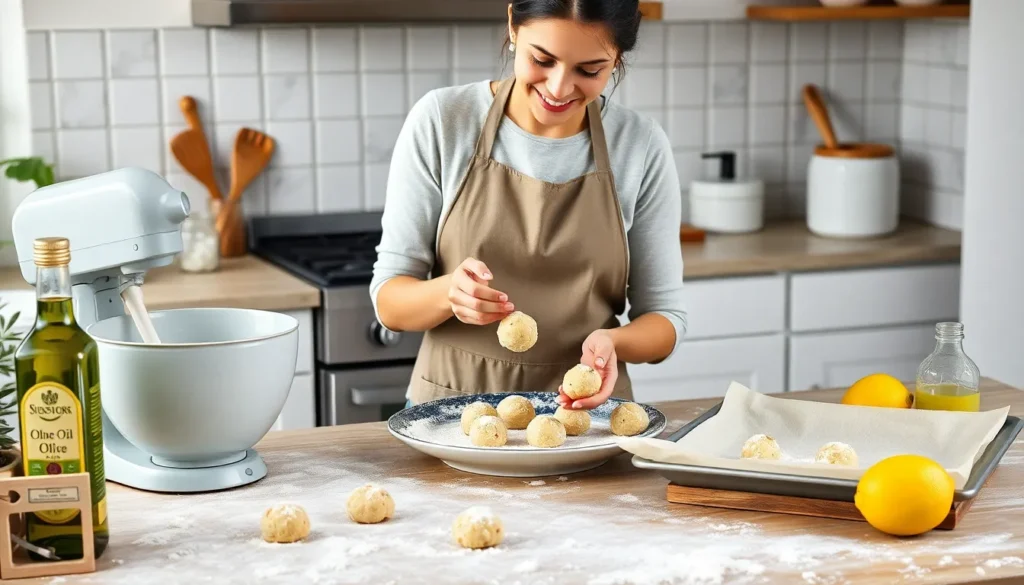
Using a cookie scoop or tablespoon, we portion the dough into uniform balls approximately 1.5 inches in diameter. This ensures even baking and professional appearance. Roll each portion between your palms to create smooth, round balls.
Place the shaped dough balls on our parchment-lined baking sheets, spacing them about 2 inches apart. The cookies will spread slightly during baking, so adequate spacing prevents them from merging together. Gently flatten each ball with your fingertips to create a slightly flattened dome shape.
Bake the Cookies
Preheat the oven to 350°F before placing our prepared baking sheets inside. Bake for 10 to 13 minutes, watching carefully for the edges to turn golden brown while the centers remain set but still soft. The cookies should appear slightly underbaked in the center when we remove them.
Rotate the baking sheets halfway through the baking time if your oven has hot spots. This ensures even browning and consistent texture across all cookies. The olive oil creates a unique baking environment that produces tender cookies with crisp edges.
Cool and Finish
Allow the cookies to rest on the baking sheet for 5 minutes immediately after removing from the oven. This brief cooling period helps them firm up without becoming too hard. Transfer the cookies to a wire cooling rack using a spatula to prevent breaking.
Let the cookies cool completely before applying the optional lemon glaze or storing them. Once cooled, these olive oil cookies maintain their moisture and flavor for up to three days when stored in an airtight container. The Mediterranean inspired treats are ready to serve and enjoy.
Directions for Storage

We want to ensure your olive oil cookies maintain their delightful texture and Mediterranean flavor for as long as possible. Proper storage techniques will keep these tender treats fresh and delicious well beyond the initial baking day.
Room Temperature Storage
Place your cooled cookies in an airtight container for optimal freshness at room temperature. These cookies will stay fresh for up to 5 days when stored this way. We recommend separating layers with parchment paper to prevent sticking and maintain their delicate texture.
| Storage Method | Duration | Container Type |
|---|---|---|
| Room Temperature | 5 days | Airtight container |
| Refrigeration | 10 days | Airtight container |
| Freezing (baked) | 2-3 months | Airtight container or freezer bag |
| Freezing (dough) | 2 months | Sealed container or freezer bag |
Refrigerated Storage
We can extend the storage life by refrigerating our olive oil cookies in an airtight container. This method preserves freshness for up to 10 days while maintaining their tender crumb and subtle olive oil flavor.
Freezing Baked Cookies
Long term storage becomes simple when we freeze our finished cookies. Transfer completely cooled cookies to an airtight container or freezer bag for storage up to 2 to 3 months. Label containers with the date to track freshness and ensure we enjoy them at peak quality.
Freezing Cookie Dough
We can prepare cookie dough in advance for fresh baked treats anytime. Form dough into balls and place them on a parchment lined plate in a single layer. Freeze for one hour until firm before transferring to a sealed container or freezer bag.
Store frozen dough balls for up to 2 months in the freezer. When ready to bake we can place frozen dough directly on prepared baking sheets and bake as usual. Add one to two extra minutes to the original baking time to account for the frozen dough temperature.
Make-Ahead Tips

Our olive oil cookies offer exceptional flexibility for advance preparation, making them perfect for busy bakers and entertainment planning. We can prepare these Mediterranean treats in several ways to fit any schedule.
Dough Preparation and Chilling
We recommend chilling the cookie dough for 1 to 2 hours before baking to help the cookies maintain their shape and achieve optimal texture. This chilling period allows the flavors to meld while making the dough easier to handle during shaping.
For extended preparation, we can roll the prepared dough into uniform balls and store them in an airtight container in the refrigerator for several days. When ready to bake, we simply place the chilled dough balls on our prepared baking sheets and proceed with the standard baking instructions.
Freezing Cookie Dough
Freezing offers the most convenient make-ahead option for our olive oil cookies. We shape the dough into balls and place them on a parchment-lined baking sheet, freezing until solid before transferring to freezer-safe containers or bags.
Frozen dough balls can be baked directly from the freezer without thawing. We add only 1 to 2 minutes to our standard baking time of 10 to 13 minutes at 350°F to account for the frozen temperature.
Storage for Baked Cookies
| Storage Method | Duration | Container Type |
|---|---|---|
| Room Temperature | Up to 7 days | Airtight container |
| Refrigerated | 10-12 days | Airtight container |
| Frozen (baked) | 2-3 months | Freezer-safe container |
Properly stored baked cookies maintain their tender texture and rich olive oil flavor throughout these timeframes. We always ensure our containers are completely airtight to prevent moisture loss and maintain freshness.
Flavor Enhancement Strategies
Adding toasted nuts, fresh citrus zest, or extra chocolate chips and pistachios on top before baking enhances both the visual appeal and flavor complexity of our make-ahead cookies. These additions work particularly well when we prepare the dough in advance, as the flavors have time to develop during storage.
Serving Suggestions

Our olive oil cookies deliver exceptional versatility when it comes to serving options. We recommend enjoying them as an elegant dessert paired with your favorite coffee or tea, as the Mediterranean flavors complement both beverages beautifully.
Serving these cookies warm directly from the oven creates the most indulgent experience. The gentle heat enhances the olive oil’s fruity notes while maintaining that perfect tender texture we’ve worked to achieve. For afternoon entertaining, we suggest arranging the cookies on a rustic wooden board alongside fresh fruit and artisanal cheeses.
Coffee enthusiasts will appreciate how our cookies pair with espresso or cappuccino during morning hours. The subtle olive oil flavor doesn’t compete with coffee’s boldness but rather enhances the overall tasting experience. Tea lovers can enjoy them with Earl Grey or chamomile for a more delicate afternoon pairing.
We find these cookies work exceptionally well for casual gatherings and formal events alike. Their sophisticated Mediterranean profile makes them suitable for dinner parties, while their approachable sweetness appeals to children and adults during family gatherings.
Temperature flexibility makes our olive oil cookies particularly appealing for entertaining. Room temperature cookies maintain their moist texture for hours, eliminating the need for last-minute preparation. Guests can enjoy them throughout the day without any loss in quality or flavor.
Creating a dessert platter becomes effortless when we include these cookies alongside seasonal fruits like fresh berries or sliced pears. The olive oil’s natural richness complements fruit’s acidity, creating a balanced finish to any meal. For special occasions, we recommend drizzling our optional lemon glaze just before serving to add visual appeal and bright citrus notes.
Recipe Variations

Our olive oil cookie base transforms beautifully with simple additions that showcase the Mediterranean versatility of this recipe. Each variation builds on our foundational technique while introducing distinct flavor profiles.
Lemon Olive Oil Cookies
We create these bright, aromatic cookies by incorporating fresh lemon zest into our base recipe. Start by combining 1/2 cup extra virgin olive oil with 3/4 cup granulated sugar and the zest of 2 large lemons. Mix in 2 large eggs and 1 teaspoon vanilla extract until the mixture becomes smooth and emulsified.
Fold in 2 cups all-purpose flour, 1 teaspoon baking soda, and 1/2 teaspoon baking powder to create a soft, slightly oily dough. Roll each portion of dough in granulated sugar before placing on our prepared baking sheets. The sugar coating creates a delightful crackly exterior during baking.
Bake at 350°F for 10 to 12 minutes until the edges set but centers remain tender. These cookies develop a puffy texture with distinctive cracks across the surface. The bright lemon aroma fills our kitchen while they bake, and the finished cookies deliver a pronounced citrus flavor that balances the fruity notes of our olive oil.
Orange Olive Oil Cookies
Orange zest replaces lemon in this variation to create cookies with a warm, sweet citrus profile. We rub the zest of 2 large oranges directly into our granulated sugar before adding the olive oil. This technique releases the essential oils from the orange peel and distributes the flavor throughout our dough.
Follow the same mixing method as our lemon version, incorporating the orange sugar mixture with olive oil, eggs, and vanilla. The dry ingredients remain identical, creating the same tender texture we love in our base recipe. Roll the shaped dough balls in sugar for that signature crackled appearance.
These cookies emerge from the oven with a fragrant orange perfume and a slightly sweeter flavor than their lemon counterparts. The orange essence complements the peppery notes of extra virgin olive oil particularly well, creating a sophisticated Mediterranean treat.
Herb Infused Olive Oil Cookies
We elevate our cookies to gourmet status by gently infusing our olive oil with aromatic herbs before mixing the dough. Heat 1/2 cup extra virgin olive oil with 2 tablespoons fresh rosemary, thyme, or lavender over low heat for 5 minutes. Strain out the herbs and allow the infused oil to cool completely.
Use this fragrant oil in place of regular olive oil in our base recipe. The cookie base remains unchanged, but the infused oil adds unexpected savory or floral notes that transform these treats into sophisticated accompaniments for wine or cheese boards.
Rosemary creates an earthy, pine-like essence that pairs beautifully with our olive oil’s natural grassiness. Thyme offers a more subtle herbaceous quality, while lavender introduces delicate floral undertones. These herb infused cookies represent the pinnacle of Mediterranean baking, showcasing how simple ingredients can create extraordinary flavors.
Conclusion
These olive oil cookies represent the perfect marriage of Mediterranean tradition and modern baking convenience. We’ve shown you how simple ingredients can create something truly special – cookies that are both indulgent and surprisingly light.
The beauty of this recipe lies in its adaptability. Whether you’re serving them alongside your morning coffee or presenting them at an elegant dinner party they’ll never disappoint. The make-ahead options ensure you can enjoy fresh-baked cookies whenever the craving strikes.
We’re confident these cookies will become a staple in your baking repertoire. Their unique texture and subtle complexity prove that sometimes the most memorable treats come from the simplest techniques. Your kitchen will smell like the Mediterranean and your guests will be asking for the recipe.
Frequently Asked Questions
What makes olive oil cookies different from regular butter cookies?
Olive oil cookies have a tender, moist texture and subtle fruity flavor that distinguishes them from butter cookies. The olive oil creates a lighter consistency while keeping the cookies fresh for days. They offer a Mediterranean-inspired taste profile that’s both indulgent and healthier than traditional butter-based cookies.
How long do olive oil cookies stay fresh?
When stored properly in an airtight container at room temperature, olive oil cookies stay fresh for up to 5 days. Refrigeration extends their freshness to 10 days, while frozen baked cookies can be stored for 2 to 3 months without losing their flavor or texture.
Can I make the cookie dough ahead of time?
Yes, olive oil cookie dough is perfect for make-ahead preparation. You can chill the dough for 1-2 hours before baking, refrigerate rolled dough balls for several days, or freeze the dough for up to 2 months. Frozen dough can be baked directly with just a slight increase in baking time.
What equipment do I need to make olive oil cookies?
Essential equipment includes a large mixing bowl, electric mixer or sturdy whisk, measuring cups and spoons, parchment-lined baking sheets, a cookie scoop for uniform sizing, oven mitts, and a wire cooling rack. These tools ensure smooth preparation and consistent baking results.
What are some popular variations of olive oil cookies?
Popular variations include Lemon Olive Oil Cookies with fresh lemon zest, Orange Olive Oil Cookies featuring warm orange zest, and Herb Infused Olive Oil Cookies using rosemary, thyme, or lavender. You can also add toasted nuts, chocolate chips, or pistachios for enhanced flavor and visual appeal.
How should I serve olive oil cookies?
Olive oil cookies are versatile and can be enjoyed warm from the oven, paired with coffee or tea, or arranged on boards with fresh fruit and cheese for entertaining. They complement espresso perfectly and work well for both casual gatherings and formal events throughout the day.
What type of olive oil should I use for baking cookies?
Use extra virgin olive oil for the best flavor and quality results. Premium olive oil provides the subtle fruity notes that make these Mediterranean-inspired cookies special. The olive oil replaces butter entirely, creating the cookies’ signature tender texture and distinctive taste profile.
Can I freeze olive oil cookies?
Yes, you can freeze both baked cookies and raw dough. Baked cookies freeze well for 2-3 months in airtight containers. Cookie dough can be frozen for up to 2 months – either as a ball of dough or pre-portioned into individual cookie sizes for convenient baking later.


