We’ve all been there – craving something rich, chocolatey, and absolutely irresistible. That’s exactly why we’re obsessed with this Nutella cake that transforms the beloved hazelnut spread into pure dessert magic. This isn’t just any chocolate cake; it’s a moist, decadent masterpiece that captures everything we love about Nutella in every single bite.
What makes this recipe truly special is how it maximizes Nutella’s creamy texture and intense flavor. We’ve perfected the balance between rich chocolate and smooth hazelnut notes, creating a cake that’s incredibly tender yet satisfying. The best part? It’s surprisingly simple to make, requiring just basic ingredients you likely already have in your pantry.
Whether you’re planning a birthday celebration, weekend treat, or just need to satisfy that chocolate craving, this Nutella cake delivers every time. Get ready to fall in love with the most indulgent homemade cake you’ll ever make.
Ingredients
We’ve carefully selected each ingredient to create the perfect balance of rich chocolate and nutty hazelnut flavors. Our recipe uses simple pantry staples that work together to deliver that signature Nutella taste in every bite.
For the Cake
- 1¾ cups all-purpose flour
- ¾ cup unsweetened cocoa powder
- 2 cups granulated sugar
- 2 teaspoons baking soda
- 1 teaspoon baking powder
- 1 teaspoon salt
- 2 large eggs, room temperature
- 1 cup buttermilk
- 1 cup strong black coffee, cooled
- ½ cup vegetable oil
- ½ cup Nutella, warmed slightly
- 2 teaspoons vanilla extract
For the Nutella Frosting
- 1 cup unsalted butter, softened
- 1 cup Nutella
- 4 cups powdered sugar, sifted
- ¼ cup heavy cream
- 1 teaspoon vanilla extract
- ¼ teaspoon salt
For the Garnish
- ½ cup chopped hazelnuts, toasted
- 2 tablespoons Nutella, melted
- Chocolate shavings or cocoa powder for dusting
Equipment Needed

Creating our perfect Nutella cake requires exact baking tools that ensure optimal results. We recommend gathering these essential items before beginning our recipe preparation.
Essential Baking Pans
- 9-inch round cake pan for traditional layer cake presentation
- 8×8-inch square pan as an alternative option for different serving styles
Mixing Equipment
- Stand mixer with beater attachments for effortless batter preparation
- Hand mixer as a suitable alternative for smaller kitchens
- Large mixing bowls for combining ingredients thoroughly
Measuring and Preparation Tools
- Measuring cups for accurate ingredient portions
- Measuring spoons for precise small quantities
- Wire whisk for smooth batter consistency
- Rubber spatula for folding ingredients gently
Cooling and Finishing Equipment
- Wire cooling rack for proper cake cooling
- Offset spatula for smooth frosting application
- Parchment paper for easy pan release
We find that having all equipment ready before starting prevents interruptions during the mixing process. Our stand mixer recommendation stems from its ability to create the perfect creamy texture when incorporating warmed Nutella into the batter. The wire cooling rack proves essential for achieving the ideal cake structure before applying our rich Nutella frosting.
Quality baking pans distribute heat evenly and prevent sticking when properly prepared. We suggest greasing and flouring your chosen pan size to ensure clean cake removal after baking.
Instructions

Follow these detailed steps to create your perfect Nutella cake from start to finish. We’ll guide you through each stage to ensure bakery-quality results.
Prep the Pans and Oven
Preheat your oven to 350°F (200°C) and position the rack in the center. Generously grease your 9-inch round cake pan with butter or cooking spray. Line the bottom with parchment paper for easy removal. Dust the greased pan with cocoa powder instead of flour to enhance the chocolate flavor and prevent any white residue on your finished cake.
Make the Cake Batter
Combine the flour, cocoa powder, baking powder, baking soda, and salt in a medium bowl and whisk thoroughly. In your stand mixer bowl, cream the butter and granulated sugar on medium speed until the mixture becomes light and fluffy, about 3-4 minutes. Add the warmed Nutella, eggs one at a time, and vanilla extract, mixing until well incorporated after each addition.
Reduce the mixer speed to low and alternately add the dry ingredients and buttermilk to the wet mixture. Begin with one-third of the flour mixture, followed by half the buttermilk, then another third of flour, remaining buttermilk, and finish with the remaining flour. Beat just until combined after each addition to avoid overmixing, which can result in a tough cake.
Bake the Cake Layers
Pour the batter evenly into your prepared pan and smooth the top with a spatula. Bake for 25-35 minutes, checking for doneness by inserting a toothpick into the center. The cake is ready when the toothpick comes out with just a few moist crumbs attached. Allow the cake to cool in the pan for exactly 10 minutes, then carefully turn it out onto a wire rack to cool completely before frosting.
Prepare the Nutella Frosting
Beat the unsalted butter in a clean mixer bowl until smooth and creamy, about 2 minutes. Gradually add the powdered sugar, vanilla extract, and salt, mixing on low speed initially to prevent a sugar cloud. Increase speed to medium and beat until light and fluffy. Add the Nutella and mix until the frosting becomes uniformly colored and creamy. If the consistency seems too thick, add heavy cream one tablespoon at a time until you reach your desired spreading consistency.
Assemble the Cake
Place your completely cooled cake layer on a serving plate or cake stand. Using an offset spatula, spread approximately one-third of the Nutella frosting evenly across the top of the cake layer. If making a two-layer cake, add the second layer and repeat the process. Apply the remaining frosting to the top and sides of the cake, working from the center outward for even coverage.
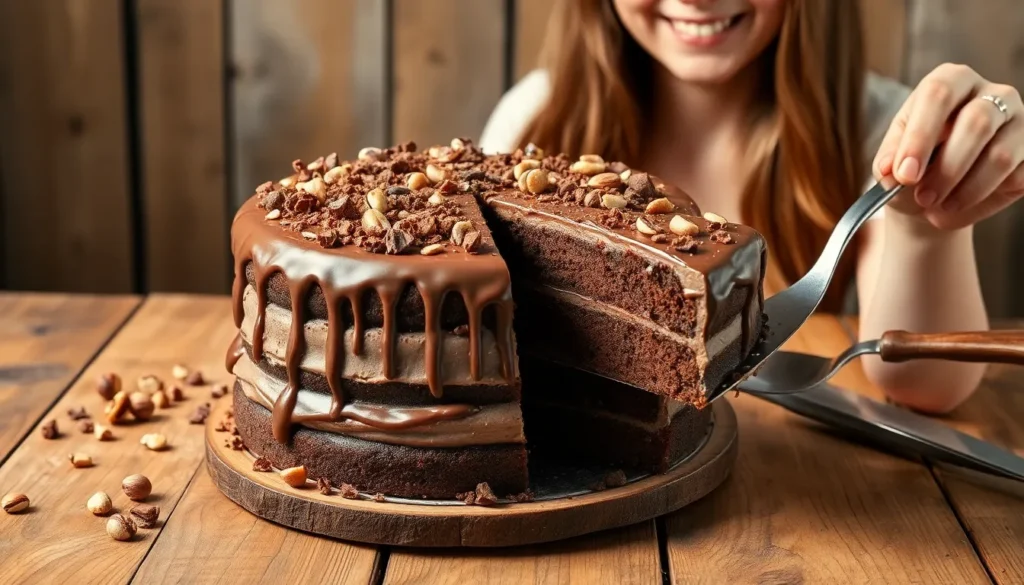
Add Final Touches
Smooth the frosting using a bench scraper or offset spatula for a professional finish. Create decorative swirls in the frosting if desired using the tip of your spatula. Sprinkle toasted chopped hazelnuts around the top edge or all over the surface for added texture and visual appeal. Drizzle with melted Nutella or dust lightly with cocoa powder for an elegant finishing touch.
Make-Ahead Instructions

Planning ahead transforms our Nutella cake preparation into a stress-free experience for any special occasion. We can prepare multiple components in advance while maintaining the cake’s signature moist texture and rich chocolate hazelnut flavor.
Preparing Cake Layers in Advance
Our chocolate Nutella cake layers store beautifully when properly wrapped. Once the layers cool completely, we wrap each one tightly in plastic wrap to preserve moisture and prevent freezer burn. Room temperature storage works perfectly for up to two days, while freezing extends storage for several weeks without compromising quality.
Frozen cake layers actually provide an advantage during assembly. We recommend stacking and storing wrapped layers in the freezer, as they become easier to handle and decorate when slightly frozen. Before assembly, we allow frozen layers to thaw completely at room temperature to ensure proper texture.
Make-Ahead Nutella Buttercream
Our Nutella buttercream preparation offers exceptional flexibility for advance planning. The frosting stores in the refrigerator for up to one month when properly covered. We bring refrigerated buttercream to room temperature and re-whip it before use to restore its smooth, spreadable consistency.
| Storage Method | Duration | Temperature |
|---|---|---|
| Room Temperature | 2 days | 68-72°F |
| Refrigerated | 1 month | 35-40°F |
| Frozen Layers | Several weeks | 0°F |
Assembling and Storing Complete Cakes
Complete cake assembly works wonderfully ahead of serving time. We can frost and decorate our Nutella cake up to two days before the event. Refrigerated storage keeps the assembled cake fresh when tightly covered to prevent drying.
Professional finishing techniques enhance our make-ahead process. We apply a thin crumb coat of frosting first, then chill the cake before adding the final frosting layer for a perfectly smooth finish. Warming Nutella slightly before drizzling creates attractive swirls and ensures easy application over the finished cake.
Serving preparation requires minimal effort when we plan ahead. We remove the completed cake from refrigeration at least 30 minutes before serving to achieve optimal texture and flavor. This resting period allows the cake layers to soften while maintaining the frosting’s structure.
Storage Tips

Proper storage ensures our Nutella cake maintains its moist texture and rich flavor for days after baking. We recommend storing this decadent dessert using methods that preserve both taste and quality.
Room Temperature Storage
We can keep our Nutella cake at room temperature for up to 2 days when stored properly. Place the cake under a cake dome or wrap it securely in plastic wrap to prevent air exposure. This method works best in cool environments away from direct sunlight and heat sources.
Refrigeration Guidelines
Our cake stores beautifully in the refrigerator for up to 5 days when placed in an airtight container or covered with plastic wrap. We should note that some bakers avoid refrigeration as it may cause the cake to become hard. Allow refrigerated cake to come to room temperature for 30 minutes before serving for optimal texture.
Freezing Options
Unfrosted Cake Layers: We can freeze cake layers without frosting for up to 3 months. Wrap each layer in a double layer of clingfilm followed by a layer of foil for maximum protection. Thaw frozen layers at room temperature for approximately 4 hours before frosting.
Complete Frosted Cake: Our finished Nutella cake with buttercream frosting freezes well for up to 1 month. Wrap the entire cake carefully to prevent freezer burn and maintain frosting integrity.
Nutella Buttercream Storage
We can store leftover Nutella buttercream separately for future use. Refrigerate buttercream for up to 1 month or freeze for up to 3 months. After thawing frozen buttercream, stir well to restore smooth consistency before using.
Make Ahead Strategy
Planning ahead becomes effortless when we prepare cake layers in advance. Bake layers up to several weeks before needed and freeze using proper wrapping techniques. This approach simplifies our baking process for special occasions and reduces last minute preparation stress.
| Storage Method | Duration | Best Practices |
|---|---|---|
| Room Temperature | 2 days | Cake dome or plastic wrap |
| Refrigeration | 5 days | Airtight container |
| Frozen (unfrosted) | 3 months | Double clingfilm + foil |
| Frozen (frosted) | 1 month | Careful wrapping |
| Buttercream (fridge) | 1 month | Airtight container |
| Buttercream (freezer) | 3 months | Stir after thawing |
Serving Suggestions

We recommend presenting our Nutella cake with traditional Nutella buttercream between layers for the most authentic flavor experience. The rich frosting complements the moist chocolate cake perfectly while maintaining the signature hazelnut taste throughout each bite.
Classic Presentation Options
Our favorite approach involves assembling the cake with generous amounts of Nutella buttercream or whipped cream between each layer. We suggest decorating the top with additional Nutella swirls using an offset spatula to create beautiful patterns. Dusting the finished cake with powdered sugar adds an elegant touch that contrasts beautifully with the dark chocolate layers.
Enhanced Texture with Garnishes
We love sprinkling chopped hazelnuts between layers and on top of the cake for added crunch and authentic hazelnut flavor. Chopped Ferrero Rocher chocolates work exceptionally well as an alternative or additional garnish. These chocolates provide extra texture while reinforcing the Nutella theme with their hazelnut centers and chocolate coating.
Lighter Assembly Alternative
For those preferring a lighter touch we recommend using whipped cream between layers instead of buttercream. Simply spread Nutella over the bottom cake layer first then add the whipped cream on top. This combination creates a mousse-like texture that balances the rich chocolate cake beautifully.
Moisture Enhancement Technique
We suggest brushing cooled chocolate simple syrup onto each cake layer before assembly for extra moisture. This technique prevents the cake from drying out and intensifies the chocolate flavor throughout each slice.
Quick Single-Serving Options
Our microwavable single-portion Nutella cake recipes offer perfect answers for fast desserts. We recommend serving these individual cakes with whipped cream or vanilla ice cream as toppers for an indulgent treat.
Meal Pairing Recommendations
We find Nutella cake serves beautifully as dessert after hearty Italian dinners or rich main courses. When using whipped cream fillings we recommend serving the cake chilled to maintain the proper texture and prevent melting.
Conclusion
We’ve shared everything you need to create an irresistible Nutella cake that’ll become your go-to dessert recipe. From gathering the right equipment to mastering the perfect Nutella buttercream this comprehensive guide ensures your success every time.
The beauty of this recipe lies in its versatility – whether you’re planning ahead for a special celebration or craving a spontaneous sweet treat you’ll have all the tools and techniques at your fingertips. With proper storage methods and creative serving suggestions you can enjoy this decadent cake whenever the mood strikes.
Your kitchen adventure awaits and we’re confident this Nutella cake will exceed your expectations. The combination of rich chocolate layers and creamy hazelnut frosting creates a dessert that’s truly worth every delicious bite.
Frequently Asked Questions
What ingredients do I need to make a Nutella cake?
For the cake, you’ll need all-purpose flour, unsweetened cocoa powder, granulated sugar, baking soda, baking powder, salt, eggs, buttermilk, strong black coffee, vegetable oil, warmed Nutella, and vanilla extract. For the frosting, gather unsalted butter, Nutella, powdered sugar, heavy cream, vanilla extract, and salt. Optional garnishes include toasted hazelnuts, melted Nutella, and chocolate shavings.
What equipment is essential for making this Nutella cake?
You’ll need a 9-inch round cake pan or 8×8-inch square pan, stand mixer with beater attachments, large mixing bowls, measuring cups and spoons, wire whisk, rubber spatula, wire cooling rack, and offset spatula. Make sure to grease and flour your baking pans for easy cake removal. Having all equipment ready before starting prevents interruptions during the baking process.
How long can I store a Nutella cake?
At room temperature, the cake stays fresh for up to 2 days. Refrigerated, it lasts up to 5 days. For longer storage, freeze unfrosted cake layers for up to 3 months or the complete frosted cake for up to 1 month. Leftover Nutella buttercream can be refrigerated for up to a month or frozen for up to 3 months.
Can I make the Nutella cake ahead of time?
Yes! Cake layers can be stored at room temperature for up to 2 days or frozen for several weeks. Nutella buttercream can be refrigerated for up to a month. You can also assemble the complete cake ahead of time and store it properly. This makes it perfect for stress-free preparation for special occasions and gatherings.
What are some serving suggestions for Nutella cake?
Use traditional Nutella buttercream between layers for authentic flavor. Decorate with Nutella swirls, powdered sugar, chopped hazelnuts, or Ferrero Rocher chocolates. For a lighter option, try whipped cream instead of buttercream. Brush cake layers with chocolate simple syrup for extra moisture. The cake pairs beautifully with hearty Italian dinners or rich main courses.
How do I prevent the cake from sticking to the pan?
Grease your cake pan thoroughly with butter or cooking spray, then dust with cocoa powder instead of flour to enhance the chocolate flavor. This combination creates a non-stick barrier that helps the cake release easily. Allow the cake to cool in the pan for about 10 minutes before turning it out onto a wire cooling rack.


