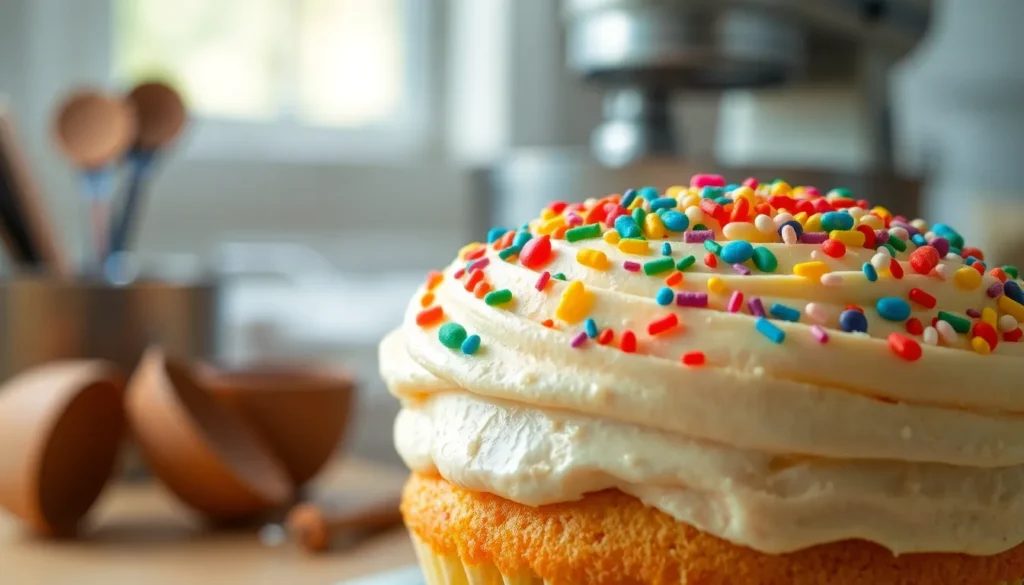
Nothing says celebration quite like funfetti frosting! This colorful, sprinkle-studded buttercream transforms any ordinary cake or cupcake into a party-worthy masterpiece. We’ve perfected this recipe to deliver that nostalgic birthday cake flavor that instantly brings back childhood memories.
The secret to incredible funfetti frosting lies in the perfect balance of buttery smoothness and vanilla sweetness, enhanced by those iconic rainbow sprinkles. Unlike store-bought versions that often taste artificial, our homemade approach creates a rich, creamy texture that pipes beautifully and tastes even better.
Whether you’re decorating birthday cupcakes or finishing off a vanilla layer cake, this funfetti frosting adds that extra touch of whimsy and joy that makes desserts truly special. We’ll show you exactly how to achieve that signature funfetti flavor and the ideal consistency for spreading or piping.
Ingredients
We need simple pantry staples to create this bakery-quality funfetti frosting. Our ingredient list divides into two essential components: the rich buttercream base and the colorful funfetti additions.
For The Base Frosting
- 1 cup (2 sticks) unsalted butter, softened to room temperature
- 4 cups powdered sugar, sifted
- 1/4 cup heavy cream or whole milk
- 2 teaspoons pure vanilla extract
- 1/2 teaspoon almond extract
- 1/4 teaspoon salt
For The Funfetti Mix-Ins
- 1/3 cup rainbow sprinkles (jimmies work best)
- 2 tablespoons additional rainbow sprinkles for decorating
- 1 tablespoon cake mix powder (optional, for enhanced funfetti flavor)
Equipment Needed
 2")
Creating our perfect funfetti frosting requires exact tools that ensure we achieve that bakery-quality texture and smooth consistency. We recommend gathering these essential pieces of equipment before starting our frosting preparation.
Stand mixer or hand mixer serves as our most crucial tool for this recipe. We need this equipment to cream the butter properly and blend the powdered sugar for 7-8 minutes to achieve optimal fluffiness. A stand mixer offers hands-free operation and consistent results, while a hand mixer provides more control for smaller batches.
Measuring cups and spoons ensure accurate ingredient proportions throughout our frosting process. We use these tools to measure our butter, powdered sugar, extracts, and liquid ingredients precisely. Accurate measurements directly impact our frosting’s final texture and sweetness level.
Large mixing bowls accommodate all our ingredients comfortably during the mixing process. We prefer using bowls with high sides to prevent powdered sugar from creating a mess during the initial mixing stages. Multiple bowls help us organize ingredients and maintain our workspace efficiently.
Fine-mesh sieve eliminates lumps from our powdered sugar before mixing. We sift the sugar to ensure our frosting achieves that smooth, professional texture without any grittiness. This step prevents lumps that could compromise our final product’s consistency.
Large pastry tip (optional) enables beautiful piping for decorating our cakes and cupcakes. We recommend using larger tips since smaller ones may clog from the rainbow sprinkles mixed throughout our frosting. This tool transforms our simple frosting into professional-looking decorative elements.
Rubber spatula helps us fold in the rainbow sprinkles at the end of our preparation process. We use this tool to gently incorporate the sprinkles while maintaining their vibrant colors and preventing them from breaking during mixing.
| Equipment | Purpose | Essential Level |
|---|---|---|
| Stand/Hand Mixer | Creaming and whipping | Essential |
| Measuring Tools | Accurate proportions | Essential |
| Mixing Bowls | Ingredient combination | Essential |
| Fine-mesh Sieve | Sugar preparation | Recommended |
| Large Pastry Tip | Decorative piping | Optional |
| Rubber Spatula | Gentle folding | Recommended |
Instructions
 4")
Follow these detailed steps to create perfectly smooth and colorful funfetti frosting that delivers bakery-quality results. We’ll guide you through each stage to ensure your frosting achieves the ideal texture and vibrant appearance.
Prep The Butter
Remove the unsalted butter from the refrigerator and place it at room temperature for 1-2 hours until it becomes very soft and easy to mix. The butter should yield easily when pressed but not be melted or overly warm. Properly softened butter creates the foundation for smooth, creamy frosting that whips to perfection.
Make The Base Frosting
Beat the softened butter using a stand mixer or hand mixer until it reaches a light, whipped texture, approximately 2 minutes. Gradually add the sifted powdered sugar, heavy cream, and vanilla extract while mixing on low speed. Scrape down the bowl sides to ensure all powdered sugar clumps dissolve completely and continue beating until the mixture becomes smooth and creamy.
| Mixing Stage | Time Required | Speed Setting |
|---|---|---|
| Butter whipping | 2 minutes | Medium |
| Sugar incorporation | 3-4 minutes | Low to medium |
| Final blending | 2-3 minutes | Medium |
Add The Funfetti Elements
Gently fold rainbow sprinkles into the prepared frosting using a rubber spatula or the lowest setting on your stand mixer. This careful technique prevents the sprinkles from breaking and maintains their vibrant colors throughout the frosting. Add sprinkles gradually until you achieve your desired level of colorful distribution.
Achieve Perfect Consistency
Add more heavy cream if your frosting appears too thick or additional powdered sugar if it seems too thin until you reach the desired spreading consistency. Beat the frosting for 2-3 additional minutes to ensure it becomes perfectly smooth and even throughout. The final texture should be creamy enough to spread easily yet firm enough to hold decorative peaks when piped.
Tips For The Best Funfetti Frosting
 6")
Creating the perfect funfetti frosting requires attention to several key details that make the difference between amateur and bakery quality results. We’ll share our expert techniques to ensure your frosting achieves the ideal balance of flavor, texture, and visual appeal.
Choosing The Right Sprinkles
We recommend using jimmies sprinkles for the most vibrant and colorful appearance in your funfetti frosting. These longer sprinkles maintain their shape better during mixing and provide superior visual impact compared to other varieties.
Nonpareils can work as an alternative, but their smaller size creates a more subtle effect that may not deliver the classic funfetti look we’re aiming for. Stick with smaller sprinkles overall since larger varieties tend to break down during the mixing process and lose their appealing texture.
Our experience shows that rainbow colored jimmies offer the best combination of durability and visual appeal for this frosting style.
Getting The Perfect Texture
Achieving silky smooth funfetti frosting starts with properly softened butter that has been left at room temperature for 1 to 2 hours. We cannot stress enough how crucial this step is for preventing lumps and achieving that coveted fluffy consistency.
Beat the butter for at least 2 minutes before adding any other ingredients to create the light and airy base your frosting needs. This extended whipping time transforms regular butter into the perfect foundation for our recipe.
Add powdered sugar gradually rather than dumping it all at once to prevent clumps from forming. We always beat the mixture thoroughly after each addition to ensure complete incorporation.
Heavy cream or whole milk helps adjust the consistency and creates a lighter texture in the final product. Start with small amounts and add more as needed to reach your desired spreading consistency.
Color Coordination Tips
We suggest selecting sprinkles that complement or match the colors of your cake or cupcakes for the most cohesive presentation. This creates a professional look that ties all elements of your dessert together beautifully.
Consider adding a subtle hint of food coloring to your frosting base if you want to enhance the overall color scheme. Choose tints that work harmoniously with your chosen sprinkle colors rather than competing with them.
Fold sprinkles into the finished frosting using gentle motions to preserve their shape and prevent color bleeding. We mix just until evenly distributed to maintain the distinct rainbow effect that makes funfetti frosting so appealing.
Storage Instructions
 8")
Proper storage ensures our homemade funfetti frosting maintains its creamy texture and vibrant appearance for future use. We’ve compiled comprehensive storage guidelines to help preserve the quality and freshness of both homemade and store-bought varieties.
Short-Term Storage
Unopened Commercial Frosting
We recommend storing unopened containers of funfetti frosting at room temperature in a cool, dry location away from heat sources and warm environments.
Opened and Homemade Frosting
After opening or making homemade funfetti frosting, we store it in an airtight container in the refrigerator where it remains fresh for up to one week. The frosting may stiffen during refrigeration, but we can easily restore its creamy consistency by allowing it to reach room temperature or giving it a brief whip before use.
Frosted Cakes and Cupcakes
Cakes decorated with funfetti frosting should be stored loosely covered at room temperature. We place frosted desserts containing perishable ingredients in the refrigerator to maintain food safety standards.
Long-Term Storage Options
Freezing Homemade Frosting
For extended storage, we transfer our funfetti frosting to an airtight container or heavy-duty freezer bag, removing excess air to prevent freezer burn. Properly stored frosting maintains its quality for up to three months in the freezer.
| Storage Method | Duration | Temperature |
|---|---|---|
| Refrigerated (opened/homemade) | Up to 1 week | 35-40°F |
| Frozen (homemade) | Up to 3 months | 0°F or below |
| Room temperature (unopened commercial) | Check expiration date | 68-72°F |
Thawing and Reconditioning
When ready to use frozen frosting, we thaw it overnight in the refrigerator. After thawing, we bring the frosting to room temperature and rewhip it to restore the original creamy texture before applying to our desserts.
Commercial Frosting Considerations
Store-bought funfetti frosting typically doesn’t require freezing and performs best when stored according to package directions. We refrigerate any leftover commercial frosting after opening, though freezing isn’t recommended unless specifically indicated on the product label.
Serving Suggestions
 10")
Our vibrant funfetti frosting transforms ordinary desserts into celebration-worthy treats with its colorful sprinkles and creamy texture. We love how versatile this frosting proves to be across different dessert applications.
Best Cakes To Pair With
Vanilla Cake creates the perfect foundation for our funfetti frosting since the classic combination enhances the cake’s natural sweetness without competing flavors. We recommend this pairing for birthdays and special occasions when you want the frosting to be the star.
Funfetti Cake doubles down on the festive fun by creating a completely cohesive dessert experience. Our frosting amplifies the cake’s existing sprinkle appeal while adding extra creamy richness that balances the cake’s lighter texture.
Red Velvet Cake benefits from our funfetti frosting’s bright pop of color that contrasts beautifully with the traditional deep red layers. We find this unexpected combination creates visual drama while the vanilla base complements red velvet’s subtle cocoa notes.
Yellow Cake serves as another excellent canvas since its buttery flavor profile harmonizes perfectly with our frosting’s rich base. The golden cake layers provide a warm backdrop that makes the rainbow sprinkles appear even more vibrant.
White Cake offers the cleanest palette for showcasing our funfetti frosting’s colorful elements. We particularly love this pairing for weddings or elegant celebrations where you want festive touches without overwhelming sweetness.
Creative Decorating Ideas
Sprinkle Patterns allow us to create custom designs on cake surfaces using extra rainbow sprinkles beyond what’s mixed into the frosting. We recommend pressing sprinkles gently into the frosting while it’s still soft to ensure they adhere properly.
Ombre Effects become possible when we divide our base frosting and tint portions with food coloring before adding sprinkles. This technique creates beautiful gradient layers that transition from light to dark while maintaining the funfetti elements throughout.
Piped Borders showcase our frosting’s perfect consistency for decorative work using star tips or round tips. We suggest practicing pressure control to achieve uniform rosettes or shell borders that highlight the sprinkles within each piped element.
Textured Finishes emerge when we use offset spatulas or bench scrapers to create ridges and swirls in the frosting surface. These techniques catch light differently and create visual interest while allowing sprinkles to settle into the texture naturally.
Fondant Shape Accents provide dimensional elements when placed strategically over our funfetti frosting base. We recommend choosing shapes that complement your celebration theme while ensuring they don’t overshadow the frosting’s inherent charm.
Edible Glitter Applications add shimmer and sparkle when dusted lightly over the finished frosting surface. We prefer applying glitter after the frosting has set slightly to prevent it from sinking into the surface and losing its reflective quality.
Troubleshooting Common Issues
 12")
Even experienced bakers encounter challenges when making funfetti frosting. We’ll walk you through the most common problems and provide practical answers to achieve perfect results every time.
Fixing Grainy Frosting
Grainy texture often stems from inadequate mixing or using old powdered sugar that has developed clumps. We recommend continuing to mix the frosting until it becomes completely smooth – this process can take longer than expected but yields superior results.
Sifting powdered sugar before adding it to your butter mixture prevents graininess from developing in the first place. We always keep a fine-mesh sieve handy for this crucial step. Fresh powdered sugar also makes a important difference in achieving that silky smooth texture we’re after.
| Problem | Cause | Solution |
|---|---|---|
| Grainy texture | Inadequate mixing | Continue mixing until smooth |
| Lumpy appearance | Old powdered sugar | Sift powdered sugar before use |
| Persistent grittiness | Poor quality ingredients | Use fresh powdered sugar |
Dealing With Color Bleeding
Color bleeding occurs when sprinkles lose their vibrant hues and create muddy streaks throughout the frosting. We prevent this issue by ensuring sprinkles are completely incorporated without overmixing.
Chilling your frosted cake firms up the buttercream and prevents color bleeding during handling and presentation. We recommend placing decorated desserts in the refrigerator for at least 30 minutes before serving to maintain those beautiful rainbow colors.
Temperature control plays a vital role in preventing bleeding. Room temperature frosting is more susceptible to color transfer than properly chilled frosting. We always test a small batch first when working with new sprinkle varieties to ensure color stability.
Make-Ahead Instructions
 14")
We love how versatile our funfetti frosting proves when it comes to advance preparation. This delightful buttercream base allows us to streamline our baking schedule without compromising on flavor or texture.
Preparation Timing
Our funfetti frosting comes together quickly in just 8 minutes of active mixing time. We recommend preparing the frosting base completely before adding the sprinkles to ensure optimal storage results.
Short-Term Storage Options
Room Temperature Storage: We can safely store our finished funfetti frosting at room temperature for up to 2 days in a cool dry place. Cover the frosting tightly with plastic wrap pressed directly onto the surface to prevent a skin from forming.
Refrigerator Storage: Our buttercream base stores beautifully in the refrigerator for 1 to 2 weeks when kept in an airtight container. We always label containers with preparation dates to track freshness effectively.
Long-Term Freezer Storage
Freezing Process: We transfer our cooled frosting into freezer-safe bags or airtight containers for storage up to 3 months. Remove as much air as possible from bags to prevent freezer burn and texture changes.
Thawing Instructions: We thaw frozen frosting overnight in the refrigerator before use. Never rush this process with room temperature thawing as it can cause separation and texture issues.
Revival Techniques
Re-whipping Process: After thawing or refrigerating we always re-whip our frosting using an electric mixer. Beat for 2 to 3 minutes on medium speed until the original creamy consistency returns.
Consistency Adjustments: We add small amounts of heavy cream or powdered sugar as needed during re-whipping to achieve our desired spreading consistency. Test the frosting on a small area first to ensure proper texture restoration.
| Storage Method | Duration | Temperature Requirements |
|---|---|---|
| Room Temperature | 2 days | Cool, dry place |
| Refrigerated | 1-2 weeks | 35-40°F |
| Frozen | 3 months | 0°F or below |
Conclusion
We’ve shown you how to create bakery-quality funfetti frosting that’ll transform your desserts into celebration-worthy treats. With just a few simple ingredients and the right techniques you can achieve that perfect balance of creamy texture and festive appearance that makes every bite special.
The versatility of this frosting means you’re never limited to just one decorating style or flavor pairing. Whether you’re preparing for a last-minute celebration or planning ahead for a special occasion this recipe adapts to your timeline and storage needs.
Most importantly you now have the troubleshooting knowledge to handle any challenges that might arise during the mixing process. Your homemade funfetti frosting will consistently deliver the nostalgic birthday cake flavor and vibrant visual appeal that makes every dessert feel like a party.
Frequently Asked Questions
What is funfetti frosting?
Funfetti frosting is a homemade buttercream frosting that combines a rich, creamy vanilla base with colorful rainbow sprinkles. It delivers a nostalgic birthday cake flavor that’s perfect for decorating cakes and cupcakes. Unlike store-bought versions, this homemade recipe offers superior texture and taste with a perfect balance of buttery smoothness and vanilla sweetness.
What ingredients do I need for funfetti frosting?
You’ll need unsalted butter, powdered sugar, heavy cream or whole milk, pure vanilla extract, almond extract, and salt for the base. For the funfetti mix-ins, use rainbow sprinkles (jimmies work best) and optionally cake mix powder. These simple ingredients create a bakery-quality frosting with vibrant colors and rich flavor.
What equipment is essential for making funfetti frosting?
Key equipment includes a stand or hand mixer for proper creaming, measuring cups and spoons for accuracy, and large mixing bowls. A fine-mesh sieve helps eliminate lumps from powdered sugar, while a rubber spatula is perfect for gently folding in sprinkles. A large pastry tip is optional for decorative piping.
How long does it take to make funfetti frosting?
Funfetti frosting can be made in just 8 minutes. The process involves softening butter, beating it with powdered sugar and other ingredients until smooth, then gently folding in the rainbow sprinkles. The quick preparation time makes it perfect for last-minute dessert decorating.
How should I store funfetti frosting?
Store homemade funfetti frosting in an airtight container in the refrigerator for up to one week. For longer storage, freeze for up to three months. Thaw frozen frosting in the refrigerator and re-whip to restore consistency. Frosted cakes can be kept at room temperature, loosely covered, for short periods.
What cakes pair best with funfetti frosting?
Funfetti frosting pairs excellently with vanilla, funfetti, red velvet, yellow, and white cakes. The vanilla-forward flavor complements these cake bases while the colorful sprinkles add festive visual appeal. The frosting enhances both the taste and presentation of these classic dessert combinations.
How do I prevent sprinkles from bleeding color?
To prevent color bleeding, use high-quality jimmies sprinkles and fold them in gently. Chill frosted cakes before serving and test new sprinkle varieties for color stability. Avoid overmixing and store frosted desserts properly to maintain the sprinkles’ vibrant appearance without color transfer.
Can I make funfetti frosting ahead of time?
Yes, funfetti frosting is perfect for advance preparation. Make the base frosting ahead and add sprinkles just before use for best results. Store at room temperature for up to 2 days or refrigerate for 1-2 weeks. For longer storage, freeze for up to 3 months and re-whip after thawing.
Why is my funfetti frosting grainy or lumpy?
Grainy or lumpy frosting typically results from insufficiently softened butter or lumpy powdered sugar. Ensure butter is properly softened and sift powdered sugar through a fine-mesh sieve. Beat the mixture longer and add liquid gradually to achieve a smooth, silky texture.
What creative decorating ideas work with funfetti frosting?
Try sprinkle patterns, ombre effects, piped borders, or textured finishes for creative presentations. Add fondant shapes, edible glitter, or coordinate sprinkle colors with your dessert theme. The versatile frosting holds decorative peaks well when piped and creates stunning visual effects with proper technique.


