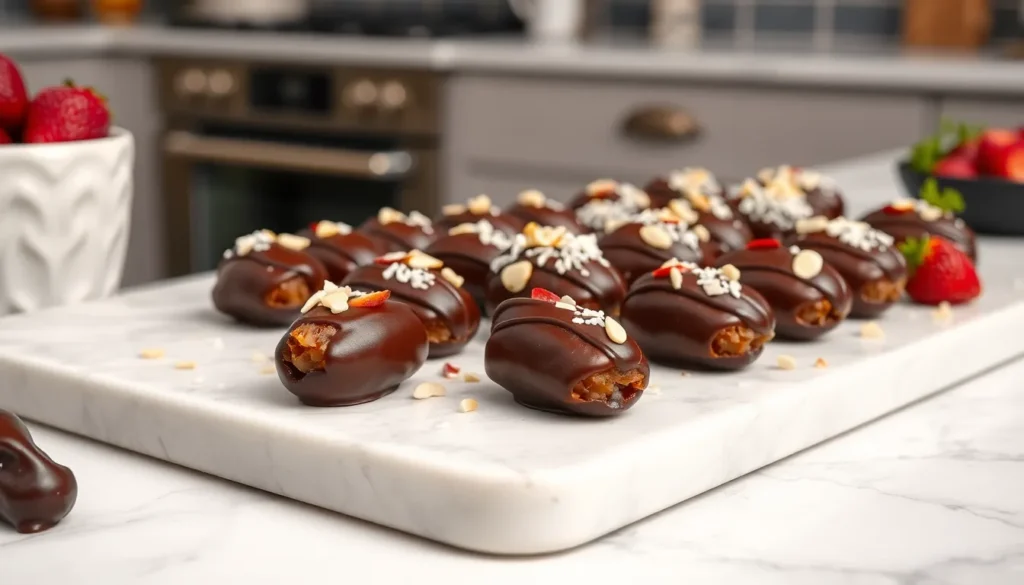
We’ve discovered the perfect sweet treat that’ll satisfy your dessert cravings without the guilt – chocolate covered dates! These naturally sweet gems wrapped in rich chocolate create an irresistible combination that’s both indulgent and surprisingly healthy.
Dating back thousands of years in Middle Eastern cuisine, dates have been prized for their natural sweetness and incredible nutritional benefits. When we coat them in smooth chocolate, we’re creating a dessert that’s packed with fiber, potassium, and antioxidants while still feeling like a decadent treat.
What makes chocolate covered dates truly special is their versatility. We can stuff them with nuts, roll them in coconut, or simply enjoy them plain. They’re perfect for entertaining, gift-giving, or satisfying that 3 PM sweet tooth. Best of all, they take just minutes to prepare and require no baking – making them our go-to recipe when we need something impressive but effortless.
Ingredients
Creating these indulgent chocolate covered dates requires just a handful of quality ingredients that work together to deliver the perfect balance of sweetness and richness. We’ve organized our ingredient list by component to make preparation seamless and efficient.
For the Dates
- 20 large Medjool dates, pitted
- 1/4 teaspoon vanilla extract (optional, for enhanced flavor)
For the Chocolate Coating
- 8 ounces dark chocolate (70% cocoa or higher), chopped
- 2 tablespoons coconut oil or butter
- 1 tablespoon honey or maple syrup (optional, for added sweetness)
- 1/4 teaspoon sea salt
Optional Toppings and Fillings
For Fillings:
- 1/2 cup raw almonds, whole
- 1/2 cup walnuts, halved
- 4 ounces cream cheese, softened
- 2 tablespoons peanut butter or almond butter
- 1/4 cup pistachios, chopped
- 1/2 cup shredded coconut, toasted
- 1/4 cup crushed freeze-dried strawberries
- 2 tablespoons sesame seeds
- 1/4 cup chopped hazelnuts
- 1 tablespoon flaky sea salt
- 2 tablespoons cocoa powder for dusting
Equipment Needed

Creating chocolate covered dates requires minimal equipment that most home cooks already have in their kitchen. We recommend gathering these essential tools before starting to ensure a smooth and efficient preparation process.
Sheet pan or plate serves as our primary workspace for the chocolate coating process. We always line it with parchment paper to prevent the dates from sticking and make cleanup effortless.
Microwave-safe bowl becomes indispensable for melting chocolate chips quickly and safely. We prefer using a medium-sized bowl that allows easy stirring without overflow during the melting process.
Fork or toothpicks help us achieve perfectly coated dates with minimal mess. We use these tools to dip each date into the melted chocolate while maintaining control and ensuring even coverage.
Parchment paper or silicone baking mat provides the ideal non-stick surface for placing our freshly coated dates. We find that parchment paper works exceptionally well for easy removal once the chocolate sets.
Spatula or spoon assists in stirring the melted chocolate to maintain smooth consistency throughout the coating process. We recommend using a heat-resistant spatula for the best results when working with warm chocolate.
These basic kitchen tools transform simple ingredients into elegant chocolate covered dates that rival any gourmet confection. Having everything prepared and within reach makes the entire process enjoyable and stress-free.
Instructions

Creating chocolate covered dates requires careful attention to timing and technique. We’ll guide you through each step to ensure perfectly coated treats that rival any gourmet confection.
Prep the Dates
We start by examining our Medjool dates for quality and removing any that feel overly dry or hard. Using a sharp knife, we carefully slice each date lengthwise about three-quarters of the way through, keeping the date intact while creating an opening. Remove the pit completely by gently pulling it out with your fingers or a small spoon.
For stuffed variations, we open each date wider and fill with your chosen ingredients like almond butter, chopped nuts, or cream cheese. Press the dates closed gently to seal the filling inside. Place prepared dates on a clean plate and chill them in the refrigerator for 15 minutes to firm up the filling and make dipping easier.
Prepare the Chocolate
We melt our dark chocolate using the microwave method for convenience and control. Chop 8 ounces of dark chocolate into small, uniform pieces and place them in a microwave-safe bowl. Heat in 20-second intervals, stirring thoroughly between each heating to prevent burning.
Add 1 tablespoon of coconut oil or butter to the melted chocolate and stir until smooth and glossy. The mixture should coat the back of a spoon evenly. If using optional sweeteners like honey or maple syrup, we incorporate them now along with a pinch of sea salt to enhance the chocolate flavor.
Dip the Dates
We work quickly while the chocolate remains warm and fluid for the best coating results. Using a fork or toothpick, we pierce each date gently and dip it completely into the melted chocolate, turning to ensure even coverage on all sides.
Lift the date out of the chocolate and tap the fork against the bowl’s edge to remove excess coating. This prevents pooling and creates a professional-looking finish. Place each dipped date immediately onto parchment-lined baking sheets, leaving space between each piece to prevent sticking.
Add Toppings
We apply toppings immediately while the chocolate coating remains wet and tacky. Sprinkle flaky sea salt, chopped nuts, or toasted coconut over each date using a light hand to avoid overwhelming the chocolate flavor.
For citrus zest or finely chopped herbs, we use a microplane grater to achieve the perfect texture. Press toppings gently into the chocolate surface to ensure they adhere properly during the setting process.
Set the Chocolate
We transfer our topped dates to the refrigerator for a minimum of 30 minutes to allow the chocolate to harden completely. The coating should feel firm to the touch and have a satisfying snap when bitten.
For a firmer texture that holds up better at room temperature, we recommend freezing the dates for at least one hour. Store finished chocolate covered dates in an airtight container in the refrigerator for up to one week or freeze for up to three months.
Storage Instructions

Proper storage ensures your chocolate covered dates maintain their delicious texture and flavor for maximum enjoyment. We recommend refrigerator storage as the best method for keeping these treats fresh and preventing the chocolate coating from becoming too soft.
Refrigerator Storage
Place your chocolate covered dates in an airtight container and store them in the refrigerator immediately after the chocolate has set. This method keeps them fresh for up to one week, though dates with nut butter or cream cheese fillings can last up to 10 days when properly sealed. The cool temperature prevents moisture from affecting the chocolate while maintaining the ideal texture of both the dates and coating.
Freezer Storage for Extended Freshness
Freezing offers an excellent option when you need longer storage times. Transfer your chocolate covered dates to an airtight container and freeze for up to 3 weeks, though well-protected dates can remain suitable for up to 2 months. Allow the dates to freeze completely solid before sealing the container to prevent ice crystals from forming on the chocolate surface.
| Storage Method | Shelf Life | Container Type |
|---|---|---|
| Refrigerator | 7–10 days | Airtight |
| Freezer | 3 weeks–2 months | Airtight |
Serving from Storage
Remove frozen dates from the freezer and thaw them in the refrigerator for about one hour before serving. This gradual thawing process prevents condensation from forming on the chocolate surface. If your dates feel too firm after refrigeration, let them sit at room temperature briefly to soften, or soak very firm dates in warm water for a few moments.
Storage Tips for Best Results
Avoid storing chocolate covered dates at room temperature, as this causes the chocolate to become overly soft and can make any fillings sticky or runny. For dates with liquid fillings like honey or soft nut butters, freezing them before dipping helps set the filling and creates a cleaner appearance when coated with chocolate.
Serving Suggestions

We love showcasing chocolate covered dates in elegant ways that highlight their natural beauty and rich flavors. These versatile treats shine brightest when presented thoughtfully and paired with complementary elements.
Presentation Ideas
Arrange chocolate covered dates on a marble serving board alongside fresh berries and artisanal cheeses for an sophisticated dessert platter. We recommend grouping them by topping variations to create visual interest and allow guests to sample different flavor combinations. Small dessert spoons or decorative picks make serving easier while maintaining the elegant presentation.
For intimate gatherings we place individual dates in mini paper cups or small ceramic bowls. This approach prevents sticky fingers while adding a refined touch to dinner parties or special occasions. Dust the serving area lightly with cocoa powder or powdered sugar for an extra professional appearance.
Flavor Pairings
We enhance the chocolate date experience by serving them alongside complementary beverages and accompaniments. Rich espresso or Turkish coffee creates an ideal contrast to the sweet dates while highlighting the chocolate coating. Red wine particularly Cabernet Sauvignon or Port pairs beautifully with dark chocolate covered varieties.
Fresh fruits like sliced pears or figs provide a refreshing counterpoint to the dense sweetness. We often include a small bowl of crushed pistachios or toasted almonds on the side allowing guests to add extra crunch to each bite.
Occasion Exact Serving
During holiday gatherings we arrange chocolate covered dates on tiered serving stands mixed with other finger foods and petit fours. The natural elegance of these treats makes them perfect for wedding receptions baby showers or anniversary celebrations.
For casual entertainment we serve them straight from a beautiful bowl allowing guests to help themselves. This relaxed approach works well for movie nights book clubs or afternoon tea gatherings. We always provide small napkins since the chocolate coating can transfer to fingers.
Temperature Considerations
We serve chocolate covered dates at room temperature for optimal texture and flavor release. Remove them from refrigeration 15 to 20 minutes before serving to allow the chocolate to soften slightly and the dates to return to their naturally chewy consistency.
During warmer months we keep them chilled until the last possible moment to prevent chocolate melting. A small ice pack hidden beneath the serving tray helps maintain the perfect temperature during outdoor events or summer gatherings.
Recipe Variations

Our chocolate covered dates recipe can be customized in countless ways to suit different tastes and occasions. We love experimenting with various fillings, chocolate types, and flavor combinations to create unique treats.
Stuffed Chocolate Covered Dates
We recommend using Medjool dates as our base since their soft texture and rich sweetness make them perfect for stuffing. The most popular combination features peanut butter and peanuts, creating a homemade version that rivals Snickers bars in both flavor and satisfaction.
Almond butter and almonds offer a more sophisticated twist that appeals to health-conscious dessert lovers. For those seeking indulgence, hazelnut butter and hazelnuts provide a Nutella-inspired experience that melts beautifully on the tongue.
Simple plain almonds or other nuts work wonderfully when we want the date’s natural sweetness to shine through without competing flavors. Mediterranean-inspired versions incorporate cinnamon-spiced chocolate and are garnished with pistachios and almonds for an exotic flavor profile.
| Filling Type | Main Ingredients | Flavor Profile |
|---|---|---|
| Snickers Style | Peanut butter + peanuts | Sweet, salty, crunchy |
| Sophisticated | Almond butter + almonds | Nutty, refined |
| Indulgent | Hazelnut butter + hazelnuts | Rich, creamy |
| Simple | Plain nuts | Clean, natural |
| Mediterranean | Cinnamon chocolate + pistachios + almonds | Exotic, spiced |
Different Chocolate Types
Dark chocolate remains our top choice for its robust flavor that perfectly balances the dates’ intense sweetness. We typically use varieties with 70% cocoa content or higher to achieve the ideal contrast between bitter and sweet notes.
Semi-sweet chocolate chips provide convenience without sacrificing taste, especially when combined with olive oil and ground cinnamon for enhanced Mediterranean flavors. This combination creates a silky coating that hardens beautifully after chilling.
Milk chocolate appeals to those who prefer milder flavors, while white chocolate creates stunning visual contrast and offers the sweetest option. Both work exceptionally well for special occasions or when serving children.
We melt our chocolate using either a double boiler method for precise temperature control or the microwave for quick preparation. The key lies in maintaining smooth consistency throughout the dipping process.
Flavor Combinations
Sweet and salty combinations create the most addictive results. We sprinkle sea salt or crushed salted nuts on top while the chocolate remains warm, allowing the crystals to adhere perfectly and provide delightful contrast with each bite.
Spiced chocolate variations incorporate ground cinnamon directly into melted chocolate, adding warmth and complexity that transforms simple dates into sophisticated confections. This approach works particularly well with dark chocolate bases.
Nutty combinations featuring almonds, peanuts, hazelnuts, and pistachios provide essential crunch and additional flavor layers. We often roll our chocolate-coated dates in finely chopped nuts before the coating sets completely.
After coating, we chill our dates in the freezer for 20 to 60 minutes to achieve the perfect chocolate shell texture. Proper storage in airtight containers keeps them fresh in the refrigerator for up to one week, ensuring we can enjoy these versatile treats whenever cravings strike.
Tips for Perfect Results

We’ve discovered several key techniques that transform ordinary chocolate covered dates into professional-quality confections. Getting these details right makes all the difference between good and exceptional results.
Temperature control remains the most critical factor for success. We recommend working with chocolate that’s heated to exactly 88-90°F for optimal coating consistency. When dates are too cold from refrigeration they can cause the chocolate to seize or develop white streaks. Allow dates to reach room temperature before dipping for the smoothest chocolate shell.
Managing excess chocolate requires the right technique to prevent messy drips and uneven coating. We use a fork to lift each date from the melted chocolate then gently tap the fork against the bowl’s edge three to four times. This removes surplus chocolate while maintaining an even layer. Rolling the date slightly on the fork helps achieve complete coverage without thick spots.
Timing your toppings ensures they adhere properly to the chocolate surface. We sprinkle sea salt, crushed nuts, or coconut flakes immediately after dipping while the chocolate remains warm and tacky. Waiting too long results in toppings that fall off once the chocolate hardens.
Creating the perfect workspace streamlines the entire process and prevents common mishaps. We line our parchment paper with a light dusting of cocoa powder to prevent sticking. Having all toppings measured and within arm’s reach allows us to work quickly before the chocolate begins to set.
Preventing chocolate bloom keeps our dates looking professional for days. We ensure dates are completely dry before dipping since any moisture causes unsightly white spots on the finished chocolate. Storing them in a cool, dry environment away from temperature fluctuations maintains that glossy appearance.
Achieving consistent sizing creates an elegant presentation that rivals store-bought confections. We select dates of similar size and shape for uniform results. When stuffing dates with fillings we use a small spoon to portion exactly one teaspoon of nut butter or cream cheese for each date.
Conclusion
We’ve shown you how chocolate covered dates can transform your dessert game while keeping things simple and healthy. These naturally sweet treats offer the perfect balance of indulgence and nutrition that’s hard to find in other confections.
Whether you’re hosting a dinner party or looking for a thoughtful homemade gift chocolate covered dates deliver elegance without the complexity. The endless customization options mean you’ll never run out of ways to make them uniquely yours.
With just a few quality ingredients and basic kitchen tools you can create gourmet-quality treats that rival expensive chocolatiers. Give this recipe a try and discover why chocolate covered dates have become our go-to dessert for every occasion.
Frequently Asked Questions
What are chocolate covered dates?
Chocolate covered dates are Medjool dates dipped in melted chocolate, creating a naturally sweet treat that combines the rich flavor of dates with indulgent chocolate. They can be enjoyed plain or stuffed with nuts, nut butter, or cream cheese for added flavor and texture.
Are chocolate covered dates healthy?
Yes, chocolate covered dates offer several health benefits. Dates are rich in fiber, potassium, and antioxidants, while dark chocolate provides additional antioxidants. They’re a guilt-free alternative to traditional candy, offering natural sweetness with nutritional value.
How long do chocolate covered dates last?
When stored properly in an airtight container in the refrigerator, chocolate covered dates last up to one week. Those filled with nut butter or cream cheese can last up to ten days. For longer storage, freeze them for up to three weeks.
What type of chocolate works best for coating dates?
Dark chocolate with 70% cocoa or higher is recommended for the best flavor and health benefits. However, semi-sweet, milk, or white chocolate can also be used based on personal preference. The key is using quality chocolate for optimal results.
Do I need special equipment to make chocolate covered dates?
No special equipment is required. You only need basic kitchen tools: a sheet pan with parchment paper, microwave-safe bowl for melting chocolate, forks or toothpicks for dipping, and a spatula for stirring. Most home cooks already have these items.
Can I make chocolate covered dates ahead of time?
Yes, chocolate covered dates are perfect for advance preparation. Make them up to a week ahead and store in the refrigerator. For best results, allow them to come to room temperature before serving for optimal flavor and texture.
What are some popular filling options for stuffed dates?
Popular fillings include almond butter with almonds, peanut butter with peanuts for a Snickers-style treat, cream cheese for richness, hazelnut butter for a Nutella-inspired flavor, or simply chopped nuts like pistachios, walnuts, or pecans.
How do I prevent the chocolate from being too thick or thin?
Maintain chocolate temperature between 88-90°F for optimal coating consistency. Add a small amount of coconut oil or butter if the chocolate is too thick. If too thin, let it cool slightly before dipping the dates.