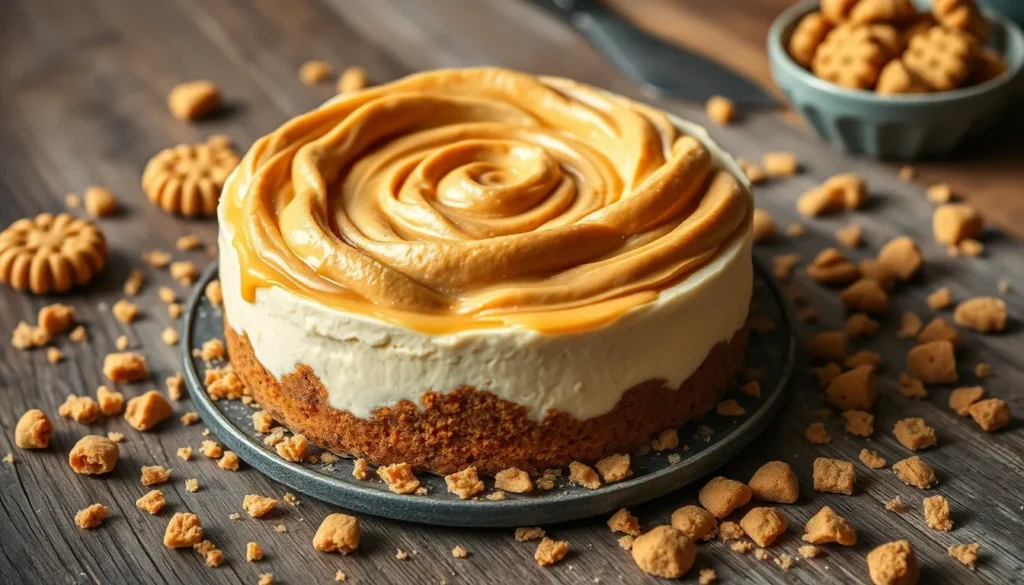
We’re absolutely obsessed with this Biscoff cheesecake that combines two of our favorite desserts into one show-stopping creation. The rich caramelized cookie butter flavor transforms an ordinary cheesecake into something extraordinary that’ll have your guests begging for the recipe.
What makes this dessert so irresistible is how the warm spiced notes of Biscoff cookies complement the creamy tang of classic cheesecake. We’ve perfected the balance between that signature cookie crunch and silky smooth filling that melts on your tongue. The golden swirls of cookie butter create both visual appeal and bursts of concentrated flavor in every bite.
Whether you’re planning a special celebration or simply want to treat yourself to something indulgent we guarantee this Biscoff cheesecake will become your new go-to dessert. It’s surprisingly simple to make yet delivers restaurant-quality results that look as impressive as they taste.
Ingredients
Our Biscoff cheesecake requires three distinct components that work together to create this spectacular dessert. We’ve organized the ingredients by preparation stage to streamline your baking process.
For the Crust
- 25 Biscoff cookies
- 4 tablespoons unsalted butter, melted
- 2 tablespoons granulated sugar
- 1/4 teaspoon salt
For the Cheesecake Filling
- 24 oz cream cheese, room temperature
- 3/4 cup granulated sugar
- 1/3 cup Biscoff cookie butter, smooth
- 3 large eggs, room temperature
- 1/2 cup sour cream
- 1 teaspoon vanilla extract
- 1/4 cup heavy cream
- 2 tablespoons all-purpose flour
For the Topping
- 1/4 cup Biscoff cookie butter, smooth
- 2 tablespoons heavy cream
- 6 Biscoff cookies, roughly chopped
- 1 tablespoon powdered sugar for dusting
Equipment Needed

Creating our perfect Biscoff cheesecake requires exact tools to achieve professional results. We recommend gathering all equipment before starting to ensure a smooth baking process.
9-inch Springform Pan serves as the foundation for our cheesecake success. This specialized pan features removable sides that make releasing the finished dessert effortless without damaging the delicate texture. The springform design prevents cracking and ensures clean presentation.
Electric Mixer becomes essential for achieving the silky smooth filling texture we desire. Stand mixers work best for thorough incorporation of ingredients, though handheld mixers provide adequate results with careful attention to mixing times.
Food Processor transforms whole Biscoff cookies into perfectly fine crumbs for our crust base. Rolling pin and sealed plastic bag offer an alternative crushing method for those without food processors, requiring gentle but firm pressure to achieve uniform texture.
Large Roasting Pan accommodates the water bath technique that prevents cracking during baking. The pan must be large enough to hold the springform pan while allowing hot water to reach halfway up the sides.
Mixing Bowls in various sizes organize our ingredient preparation efficiently. We suggest having at least three bowls available for separating crust mixture, filling preparation, and topping components.
Measuring Tools ensure accuracy in our recipe execution. Digital kitchen scale provides the most precise measurements, while standard measuring cups and spoons work effectively for volume measurements.
Offset Spatula creates smooth surfaces and helps spread toppings evenly across the cheesecake surface. This tool proves invaluable for achieving the professional appearance we want in our final presentation.
Instructions

Follow these step-by-step instructions to create our show-stopping Biscoff cheesecake. Each stage builds upon the previous one to ensure perfect texture and flavor.
Prep the Crust
Crush Biscoff Cookies: Break 25 Biscoff biscuits into pieces and grind them finely in a food processor until you achieve consistent crumbs.
Add Melted Butter: Pour the melted butter over the crushed cookies and mix thoroughly until the mixture resembles wet sand and holds together when pressed.
Press into Pan: Transfer the cookie mixture to your 9-inch springform pan and press it evenly across the bottom using the back of a measuring cup or your fingers.
Make the Cheesecake Filling
Beat Cream Cheese: Use an electric mixer to beat the room temperature cream cheese on medium speed for 2-3 minutes until completely smooth and fluffy.
Add Sugar: Continue beating while gradually incorporating the sugar until the mixture becomes light and well combined.
Add Biscoff Spread: Beat in the Biscoff cookie butter until the mixture turns smooth and develops a beautiful caramel color.
Add Remaining Ingredients: Beat in eggs one at a time followed by sour cream heavy cream vanilla extract and flour until the mixture becomes thick and glossy.
Bake the Cheesecake
Preheat Oven: Set your oven to 325°F and position the rack in the center.
Prepare Water Bath: Place your filled springform pan inside a large roasting pan and pour hot water halfway up the sides of the cheesecake pan.
Pour Filling: Carefully pour the cheesecake batter over the prepared crust and gently tap the pan to release air bubbles.
Bake: Bake for 30 minutes then reduce the temperature to 300°F and continue baking for an additional 15 minutes until the center is almost set but still slightly jiggly.
Cool and Chill
Gradual Cooling: Turn off the oven and crack the door open slightly allowing the cheesecake to cool slowly in the oven for 1 hour.
Room Temperature: Remove from the oven and let the cheesecake cool completely at room temperature for another hour.
Chill: Cover with plastic wrap and refrigerate for 6-8 hours or overnight until completely set and chilled through.
Add the Topping
Microwave Biscoff Spread: Heat 1 cup of Biscoff spread in the microwave for 30-45 seconds until it becomes easily spreadable.
Pour Over Cheesecake: Remove the cheesecake from the springform pan and pour the warmed spread over the top spreading it evenly with an offset spatula.
Decorate: Sprinkle chopped Biscoff cookies around the edges and dust lightly with powdered sugar before serving.
Make-Ahead Instructions

Planning ahead transforms this Biscoff cheesecake into the perfect stress-free dessert for entertaining. We recommend preparing this indulgent treat up to several days before your event to allow flavors to meld beautifully.
Advance Preparation Timeline
| Timeframe | Preparation Method | Storage Instructions |
|---|---|---|
| 1-2 days ahead | Full cheesecake preparation | Refrigerate in airtight container |
| Up to 3 months | Freeze individual slices | Wrap tightly in freezer-safe containers |
| 6+ hours ahead | No-bake version setup | Refrigerate until fully set |
Refrigeration Storage
We find that storing your completed Biscoff cheesecake in the refrigerator for one to two days actually enhances its flavor profile. Wrap the entire cheesecake tightly with plastic wrap or place it in an airtight container to prevent the surface from drying out. The cream cheese filling develops a richer taste as it rests while the Biscoff flavors become more pronounced throughout the dessert.
Freezing for Long-Term Storage
Freezing individual slices provides the ultimate convenience for future entertaining. Allow your cheesecake to cool completely before cutting into portions. Wrap each slice individually in plastic wrap then place them in airtight freezer containers. This method preserves the creamy texture for up to three months while preventing freezer burn.
Assembly Timing Considerations
Save the final Biscoff spread topping application until shortly before serving time. We warm the cookie butter slightly to achieve the perfect drizzling consistency then pour it over our chilled cheesecake base. This approach maintains the glossy appearance and prevents the topping from becoming too firm during extended refrigeration.
Critical Preparation Tips
Whip your double cream straight from the refrigerator to ensure maximum stability and volume. Cold cream holds its shape better and creates the ideal light texture we want in our filling. Press the Biscoff cookie crust firmly into your springform pan then refrigerate it while preparing the filling to create a solid foundation that won’t crumble during serving.
Storage Tips

We understand that proper storage is crucial for maintaining your Biscoff cheesecake’s quality and extending its shelf life. Our research shows that following the right storage methods can keep your dessert fresh and delicious for days or even months.
Refrigerator Storage
Store your finished Biscoff cheesecake in the refrigerator using either an airtight container or by tightly covering the springform pan. We recommend consuming the cheesecake within exact timeframes based on your storage conditions:
| Storage Method | Duration | Quality Notes |
|---|---|---|
| Covered springform pan | Up to 3 days | Optimal for decorated toppings |
| Airtight container | 4-5 days | Best texture maintenance |
| Proper refrigeration | Up to 1 week | Recipe dependent |
| Extended storage | Up to 2 weeks | Check freshness before serving |
Keep the cheesecake refrigerated until you’re ready to serve it to maintain the best texture and flavor. We find that decorative cookie crumb toppings soften quickly during storage, so consuming within 3 days ensures the crunchiest experience.
Freezer Storage
Freezing extends your Biscoff cheesecake’s life significantly when done correctly. Wrap the cheesecake tightly with plastic wrap and place it in an airtight container to prevent freezer burn.
| Freezer Duration | Quality Level | Recommended Use |
|---|---|---|
| Up to 2 months | Best texture and flavor | Optimal consumption window |
| Up to 6 months | Good quality | Extended storage option |
We suggest consuming frozen cheesecake within the first 2 months for the best taste experience, though properly stored cheesecake remains safe for up to 6 months.
Serving Recommendations
Add crunchy Biscoff cookie crumbs or melted Biscoff butter just before serving rather than during initial preparation. These decorative elements soften during storage and lose their appealing texture. We always remove the cheesecake from refrigeration or freezer storage only when ready to serve to preserve its creamy consistency and rich flavor profile.
Serving Suggestions

We recommend pairing our Biscoff cheesecake with complementary flavors that enhance its rich cookie butter taste. A coffee shot or Biscoff latte makes an exceptional accompaniment as it amplifies the coffee notes naturally present in the Biscoff cookies. The warm beverage creates a delightful temperature contrast against the cool creamy cheesecake.
Fresh sliced bananas provide a sweet and refreshing counterpoint to the dense richness of the dessert. We suggest arranging thin banana slices in an overlapping pattern around the edge of each slice or fanning them across the top for an elegant presentation.
Crushed roasted pecans add textural interest and a nutty depth that complements the cookie butter flavors beautifully. We sprinkle these generously over the surface just before serving to maintain their crunch. The pecans can be roughly chopped or finely crushed depending on your preference for texture.
Additional Biscoff crumbs serve as both decoration and flavor enhancement. We crush extra Biscoff cookies and dust them over the finished cheesecake to reinforce the cookie theme and add visual appeal. This technique creates layers of Biscoff flavor from the crust through the filling to the final garnish.
For special occasions we create individual dessert presentations by serving the cheesecake in small portions alongside these suggested accompaniments. Each element can be adjusted to personal taste preferences while maintaining the core Biscoff experience that makes this dessert so memorable.
Recipe Variations

We love experimenting with different versions of our beloved Biscoff cheesecake to suit various occasions and preferences. These creative adaptations maintain the signature cookie butter flavor while offering unique textures and presentation styles.
No-Bake Biscoff Cheesecake
This refreshing variation delivers all the creamy indulgence without turning on your oven. We create the base using crushed Lotus biscuits mixed with melted butter, pressing the mixture firmly into our springform pan for stability. The filling combines cream cheese, whipped cream, and generous amounts of Biscoff spread to achieve that signature cookie butter taste.
Our no-bake version offers a lighter, mousse-like texture that feels perfect during warmer months or when we want a less dense dessert. We recommend chilling the cheesecake for at least 4 hours, though overnight setting produces the best results. The creamy Lotus filling sets beautifully without baking, creating smooth slices that hold their shape when served.
This method works exceptionally well when we want to avoid heating up the kitchen during summer gatherings. We often top our no-bake version with additional whipped cream and crushed Biscoff cookies for extra texture and visual appeal.
Mini Biscoff Cheesecakes
Individual portions transform our classic recipe into perfect party treats that guests can easily enjoy. We use standard muffin tins to create these bite-sized desserts, adjusting our crust and filling quantities accordingly. Each mini cheesecake receives about 2 tablespoons of cookie crust mixture and approximately 1/4 cup of filling.
The smaller size means faster baking times, typically requiring only 15-18 minutes at 325°F compared to our full-size version. We find these mini versions ideal for gatherings where guests prefer smaller portions or when we want to offer multiple dessert options.
These individual treats eliminate the need for slicing and serving, making them particularly convenient for outdoor events or buffet-style entertaining. We can even customize toppings for different mini cheesecakes, creating variety within a single batch. The presentation looks professional and allows each guest to enjoy their own perfectly portioned dessert without any mess.
Troubleshooting Tips

Even experienced bakers encounter challenges when making Biscoff cheesecake. We have compiled answers to the most common issues to help you achieve perfect results every time.
Preventing Cracks in Your Cheesecake
Avoiding Over-baking
Your cheesecake should remain slightly jiggly in the center when you remove it from the oven. Over-baking causes the edges to stick to the pan and creates unsightly cracks as the dessert cools. We recommend checking for doneness by gently shaking the pan – the center should wobble slightly while the edges remain set.
Proper Cooling Technique
Gradual cooling prevents thermal shock that leads to cracking. After baking, let your cheesecake sit in the oven for one hour with the door slightly ajar. This gentle cooling process allows the temperature to decrease slowly before you move it to room temperature for additional cooling.
Mixing Method Matters
Over-mixing the batter traps excess air bubbles that expand during baking and cause surface cracks. Beat ingredients just until combined, especially after adding eggs. We suggest using low speed on your electric mixer once the eggs are incorporated.
Fixing Crust Problems
Preventing Crumbly Texture
A properly chilled crust creates the foundation for your cheesecake. Press the Biscoff cookie mixture firmly into your springform pan and refrigerate for at least 30 minutes before adding the filling. This chilling time allows the butter to solidify and bind the crumbs together.
Using Water Bath Technique
A water bath ensures even baking and prevents your crust from becoming overly dry or crumbly. Wrap your cheesecake pan in aluminum foil and place it in a roasting pan filled with boiling water. The steam creates gentle, consistent heat that protects both the filling and crust.
Temperature Control Answers
| Issue | Solution | Prevention Method |
|---|---|---|
| Cracking from temperature shock | Let cool in oven for 1 hour | Avoid opening oven door during baking |
| Uneven baking | Use water bath | Maintain consistent oven temperature |
| Sticking to pan | Grease springform pan sides | Use parchment paper for extra protection |
Maintaining Consistent Heat
Opening the oven door during baking disrupts the temperature balance and can cause sudden cooling that leads to cracks. Resist the urge to check on your cheesecake until the minimum baking time has elapsed.
Professional Tips for Success
Room Temperature Ingredients
Cold cream cheese creates lumps that are difficult to eliminate even with extended mixing. Remove your cream cheese, eggs, and sour cream from the refrigerator at least one hour before beginning preparation.
Pan Preparation
Grease the sides of your springform pan thoroughly to prevent the cheesecake from sticking as it cools and contracts. This simple step makes removal much easier and helps maintain clean edges on your finished dessert.
Equipment Considerations
Your springform pan choice affects the final result. We recommend using a 9-inch pan for optimal thickness and even baking. Smaller pans require longer baking times while larger pans may result in a thin cheesecake that bakes too quickly.
Conclusion
We’ve shared everything you need to create this showstopping Biscoff cheesecake that’ll have your guests asking for the recipe. With our detailed guide and troubleshooting tips you’re equipped to tackle any challenges that might arise during the baking process.
This dessert truly delivers on both flavor and presentation making it worth every step of preparation. The combination of techniques we’ve covered ensures you’ll achieve that perfect creamy texture with beautiful golden swirls every time.
Whether you choose the classic version or experiment with our suggested variations you’re guaranteed a dessert that stands out from ordinary cheesecakes. Start gathering your ingredients and get ready to impress with this irresistible Biscoff creation.
Frequently Asked Questions
What makes Biscoff cheesecake different from regular cheesecake?
Biscoff cheesecake combines the spiced cookie flavor of Biscoff cookies with creamy cheesecake filling. The crust is made from crushed Biscoff cookies instead of graham crackers, and cookie butter is swirled throughout the filling for enhanced flavor and visual appeal.
What equipment do I need to make Biscoff cheesecake?
Essential equipment includes a 9-inch springform pan, electric mixer, food processor for cookie crumbs, large roasting pan for water bath, mixing bowls, measuring tools, and an offset spatula. These tools ensure smooth mixing and professional presentation.
Can I make Biscoff cheesecake ahead of time?
Yes, Biscoff cheesecake is perfect for make-ahead preparation. It can be refrigerated for up to 3 days before serving. The flavors actually improve overnight, making it an ideal dessert for special occasions and entertaining.
How do I prevent my Biscoff cheesecake from cracking?
Use room temperature ingredients, avoid overmixing, bake in a water bath, and cool gradually. Don’t open the oven door during baking, and allow the cheesecake to cool completely at room temperature before refrigerating.
Are there variations of Biscoff cheesecake I can try?
Yes, you can make a no-bake version using gelatin instead of baking, or create individual mini Biscoff cheesecakes in muffin tins. Both variations maintain the signature cookie butter flavor while offering different presentation options.
How should I store leftover Biscoff cheesecake?
Store covered in the refrigerator for up to 5 days. For longer storage, wrap tightly and freeze for up to 3 months. Thaw overnight in the refrigerator before serving. Keep the springform pan base underneath for easy handling.
What’s the best way to achieve smooth cheesecake filling?
Use room temperature cream cheese and mix on low speed to avoid incorporating air bubbles. Scrape the bowl frequently and mix just until ingredients are combined. Strain the filling if lumps remain for ultra-smooth results.


