We’ve cracked the code for the ultimate almond flour chocolate cake that’ll make you forget all about traditional wheat-based desserts. This decadent treat delivers intense chocolate flavor while staying naturally gluten-free and surprisingly moist – perfect for anyone following a low-carb lifestyle or dealing with gluten sensitivities.
What makes this cake truly special isn’t just its rich cocoa depth but how the almond flour creates an incredibly tender crumb that melts in your mouth. We’ve tested countless variations to bring you a recipe that’s foolproof whether you’re a baking novice or seasoned pro.
The best part? You probably have most ingredients sitting in your pantry right now. This cake comes together in just one bowl with minimal cleanup required. Get ready to impress your family and friends with a dessert that tastes absolutely indulgent while being surprisingly wholesome.
Ingredients
We’ve carefully selected each ingredient to create the perfect balance of rich chocolate flavor and tender almond flour texture. These simple pantry staples come together to make an extraordinary gluten-free dessert.
For the Cake
- 2 cups superfine almond flour
- 3/4 cup unsweetened cocoa powder
- 1 1/2 cups granulated sugar
- 1 1/2 teaspoons baking powder
- 1 teaspoon baking soda
- 1 teaspoon salt
- 2 large eggs at room temperature
- 1 cup buttermilk at room temperature
- 1/2 cup melted coconut oil or vegetable oil
- 2 teaspoons pure vanilla extract
- 1 cup hot brewed coffee or hot water
For the Chocolate Frosting
- 1/2 cup unsalted butter softened to room temperature
- 2/3 cup unsweetened cocoa powder
- 3 cups powdered sugar
- 1/3 cup whole milk
- 1 teaspoon pure vanilla extract
- 1/4 teaspoon salt


Essential Equipment
 1")
Creating our almond flour chocolate cake requires exact tools that ensure professional results every time. We recommend gathering these essential pieces of equipment before starting our baking process.
Mixing bowls serve as our foundation for combining ingredients properly. Large stainless steel or glass bowls work best for mixing dry ingredients while medium bowls handle wet ingredients effectively.
Electric hand mixer or stand mixer becomes crucial for achieving the smooth batter texture our recipe demands. Stand mixers offer consistent results when creaming butter for frosting while hand mixers provide adequate power for cake batter preparation.
Measuring cups and spoons guarantee accuracy in our ingredient ratios. We suggest using separate sets for dry and wet ingredients to maintain precision throughout the baking process.
Cake pans determine our final presentation and baking success. Two 9-inch round pans create the classic layer cake appearance while 6-inch springform pans offer elegant individual serving options.
Parchment paper prevents sticking and ensures easy cake removal from pans. We recommend cutting circles to fit pan bottoms perfectly while leaving slight overhang for lifting assistance.
| Equipment Type | Primary Function | Alternative Options |
|---|---|---|
| Mixing Bowls | Ingredient combination | Glass, stainless steel, ceramic |
| Mixer | Batter preparation | Stand mixer, hand mixer, whisk |
| Measuring Tools | Ingredient accuracy | Digital scale, nested cups |
| Cake Pans | Baking vessel | Round, springform, bundt |
| Parchment Paper | Non-stick surface | Cooking spray, butter |
Wire cooling racks allow proper air circulation around our finished cake layers. Elevated cooling prevents soggy bottoms while maintaining structural integrity for frosting application.
Offset spatula makes frosting application smooth and professional looking. This specialized tool creates even layers and decorative finishes that elevate our cake presentation significantly.


Instructions
 2")
We’ll guide you through each step to create this magnificent almond flour chocolate cake. Follow these detailed instructions for bakery-quality results every time.
Prep the Pan and Oven
We start by preheating our oven to 350°F (180°C) to ensure even baking. Generously grease a 9-inch round cake pan with butter, making sure to coat every corner and edge. Line the bottom with parchment paper for easy release, then dust the sides with cocoa powder to prevent sticking and add extra chocolate flavor. This preparation step ensures our cake will unmold perfectly without any frustrating breaks or tears.
Mix the Dry Ingredients
We combine all our dry ingredients in a large mixing bowl for even distribution. Whisk together 1½ cups superfine almond flour, ⅓ cup unsweetened cocoa powder, 1 cup granulated sugar, ¾ teaspoon baking powder, and ½ teaspoon kosher salt. Make sure to break up any lumps in the almond flour or cocoa powder with our whisk. This thorough mixing creates the foundation for our cake’s tender crumb and rich chocolate flavor.
Prepare the Wet Ingredients
We whisk our liquid ingredients in a separate medium bowl to create a smooth mixture. Beat together 3 large eggs, 3 ounces vegetable oil, and 2 teaspoons vanilla extract until well combined. The eggs should be at room temperature for easier incorporation and better texture. This wet mixture will provide moisture and structure to our final cake.
Combine and Create the Batter
We pour the wet ingredients into our dry ingredient mixture and stir until just combined. Avoid overmixing, which can make our cake dense and tough. Fold in ½ cup chocolate chips, distributing them evenly throughout the batter. The finished batter will be thick and rich, which is exactly what we want for a moist, fudgy texture.
Bake the Cake
We pour our batter into the prepared pan and spread it evenly with a spatula. Bake for 25 minutes, checking for doneness by gently pressing the center of the cake. The top should feel springy and bounce back when touched. Insert a cake tester or toothpick into the center; it should come out with just a few moist crumbs attached for the perfect texture.
Make the Chocolate Frosting
We can choose from several frosting options to complement our cake. For a simple finish, dust the cooled cake with powdered sugar. For a richer option, we create chocolate buttercream by melting chocolate and mixing it with softened butter, whipping until smooth and fluffy. Gradually add powdered sugar to achieve our desired sweetness and consistency.
Cool and Assemble
We remove our cake from the oven and let it cool in the pan for 5-10 minutes on a wire rack. This brief cooling prevents the cake from breaking when we turn it out. Carefully flip the cake onto a serving platter, removing the parchment paper. Allow the cake to cool completely before frosting to prevent melting. Apply our chosen frosting with an offset spatula for professional-looking results.


Storage and Make-Ahead Tips
 3")
Proper storage techniques ensure our almond flour chocolate cake maintains its moist texture and rich flavor for days. Planning ahead allows us to enjoy this decadent dessert with minimal last-minute preparation.
Storing the Cake
Our almond flour chocolate cake stays fresh at room temperature for 2-3 days when stored in an airtight container. This storage method preserves the cake’s original texture and prevents it from drying out.
Refrigeration extends the cake’s lifespan significantly. We can store our cake in the refrigerator for up to one week in an airtight container. Keep in mind that refrigeration makes the cake denser and fudgier in texture.
| Storage Method | Duration | Container Type | Texture Changes |
|---|---|---|---|
| Room Temperature | 2-3 days | Airtight container | Original texture maintained |
| Refrigeration | Up to 1 week | Airtight container | Denser and fudgier |
| Freezing | Up to 3 months | Plastic wrap + ziplock bag | Texture preserved when thawed |
Freezing offers the longest storage option for our chocolate cake. Slice the cooled cake and wrap individual pieces in plastic wrap before placing them in ziplock bags. Frozen cake maintains its quality for up to three months.
Make-Ahead Instructions
We can bake our almond flour chocolate cake 1-2 days in advance for convenient entertaining. Cool the cake completely and wrap it in plastic before refrigerating it unfrosted.
Buttercream preparation requires special timing considerations. Prepare the chocolate buttercream ahead of time but ensure it reaches room temperature before applying it to our cake for smooth spreading.
Frosted cakes store beautifully in airtight containers in the refrigerator for up to 4 days. Bring the assembled cake to room temperature before serving to restore its optimal texture and flavor. Frosted cakes can also be frozen for up to three months when properly wrapped to prevent freezer burn.
Serving Suggestions
 4")
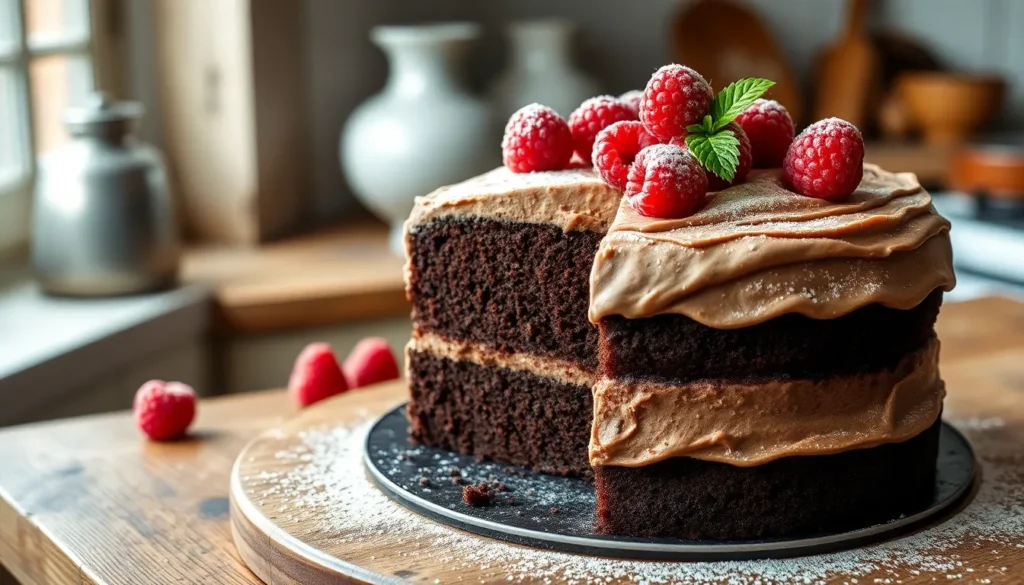
Our almond flour chocolate cake shines brightest when paired with complementary flavors and textures that enhance its rich chocolate profile. Fresh berries create a perfect balance to the cake’s intensity while adding natural sweetness and vibrant color to each plate.
We recommend serving generous slices topped with fresh strawberries, raspberries, or blackberries for a classic presentation. The tartness of the berries cuts through the richness beautifully while providing a refreshing contrast that guests absolutely love.
Maple whipped cream elevates this dessert to restaurant quality levels. We whip heavy cream with pure maple syrup until soft peaks form, creating a luxurious topping that complements the nutty almond flour base perfectly. This combination brings out the cake’s natural sweetness without overwhelming the chocolate flavors.
Chocolate frosting transforms our cake into an indulgent showstopper for special occasions. We spread our rich chocolate buttercream between layers and across the surface, creating a dessert that satisfies even the most devoted chocolate enthusiasts.
Dusting with powdered sugar offers an elegant finishing touch for those who prefer subtler presentations. We use a fine mesh sieve to create an even coating that adds visual appeal while maintaining the cake’s natural chocolate character.
Temperature plays a crucial role in serving this cake at its best. We serve it at room temperature to showcase the moist, tender crumb that almond flour creates. Chilled slices from refrigerated storage offer a denser, fudgier texture that many find irresistible.
Portion sizes work best when cut into generous wedges that highlight the cake’s beautiful crumb structure. We find that 8-10 slices per cake provide satisfying portions that allow guests to fully appreciate the complex flavors and textures we’ve carefully developed.


Tips for Perfect Results
 5")
Measuring your almond flour by weight rather than volume ensures consistent results every time we bake this cake. Volume measurements can vary significantly due to how flour settles or gets packed into measuring cups.
| Measurement Method | Almond Flour Amount | Result |
|---|---|---|
| By Weight | 200g | Consistent texture |
| By Volume | 2 cups (packed) | Dense, heavy cake |
| By Volume | 2 cups (loosely filled) | Dry, crumbly texture |
Room temperature eggs blend more easily into our batter and create a smoother final texture. We recommend removing eggs from the refrigerator 30-60 minutes before baking to achieve optimal temperature.
Dutch-processed cocoa powder delivers the richest chocolate flavor in our almond flour cake. This type of cocoa has been treated to neutralize acidity and produces a deeper color and more intense taste than natural cocoa powder.
Dusting our cake pan with cocoa powder instead of flour keeps the recipe completely gluten-free while preventing sticking. We coat the greased pan thoroughly with cocoa powder and tap out any excess before adding our batter.
Baking at 325°F rather than higher temperatures prevents the edges from overcooking while the center finishes baking. Almond flour browns more quickly than wheat flour due to its higher fat content.
Testing for doneness requires a toothpick inserted into the center to come out with just a few moist crumbs attached. Completely clean toothpicks indicate overbaking which results in a dry cake.
We avoid overmixing our batter once we add the wet ingredients to the dry mixture. Gentle folding motions preserve the cake’s tender crumb structure that makes almond flour cakes so appealing.
Hot coffee or water helps bloom the cocoa powder and intensifies the chocolate flavor throughout our cake. The liquid should be just off boiling when we add it to create the most pronounced taste.
Cooling our cake completely before frosting prevents the buttercream from melting and sliding off the surface. We allow at least two hours for proper cooling on wire racks.


Conclusion
We’ve given you everything you need to create this show-stopping almond flour chocolate cake that’ll become your new go-to dessert. This gluten-free masterpiece proves you don’t need traditional flour to achieve incredible results.
The combination of rich chocolate flavor and tender almond flour texture makes this cake special for any occasion. Whether you’re accommodating dietary restrictions or simply want to try something new we’re confident this recipe will exceed your expectations.
Your family and friends won’t believe this indulgent cake is both gluten-free and low-carb. With proper storage techniques and our expert tips you’ll have a bakery-quality dessert that stays fresh for days.
Frequently Asked Questions
What makes this almond flour chocolate cake gluten-free?
This cake uses superfine almond flour instead of traditional wheat flour, making it naturally gluten-free. The recipe also suggests dusting the cake pan with cocoa powder rather than flour to maintain its gluten-free status. This makes it perfect for those with gluten sensitivities or celiac disease.
How long can I store the almond flour chocolate cake?
The cake can be stored at room temperature for 2-3 days in an airtight container, or refrigerated for up to one week. For longer storage, wrap it properly and freeze for up to three months. Frosted cakes can be refrigerated for four days or frozen for three months.
Can I make this cake ahead of time?
Yes, this cake is perfect for make-ahead preparation. You can bake the cake 1-2 days in advance and store it covered. The chocolate buttercream can also be prepared ahead of time. This actually improves the cake’s flavor as it allows the ingredients to meld together.
What’s the best way to measure almond flour for this recipe?
For the most consistent results, measure almond flour by weight rather than volume. This ensures accuracy since almond flour can vary in density. Use superfine almond flour for the best texture, as it creates a more tender crumb compared to coarser almond meal.
Why does the recipe call for hot coffee or water?
Hot coffee or water enhances the chocolate flavor by blooming the cocoa powder, making the chocolate taste more intense and rich. The coffee doesn’t make the cake taste like coffee – it simply amplifies the chocolate notes. You can use hot water if you prefer to avoid coffee completely.
What temperature should I bake the cake at?
Bake the cake at 325°F to prevent overcooking and ensure even baking. This lower temperature helps the almond flour cake bake through properly without becoming dry or overcooked on the outside. Always test for doneness with a toothpick inserted in the center.
How do I know when the cake is properly done?
The cake is done when a toothpick inserted in the center comes out with just a few moist crumbs attached. The cake should spring back lightly when touched and start to pull away slightly from the sides of the pan. Avoid overbaking to maintain the moist texture.
What’s the best way to frost this cake?
Allow the cake to cool completely before frosting to prevent the buttercream from melting. Use an offset spatula for smooth, professional-looking application. If making a layer cake, place the first layer on your serving plate, add frosting, then top with the second layer.