We’ve all fallen head-over-heels for those irresistible Biscoff cookies with their signature caramelized crunch and warm spice blend. Now imagine transforming that beloved flavor into the creamiest, most indulgent ice cream that’ll have you swooning with every spoonful.
Our homemade Biscoff ice cream captures everything we love about these iconic Belgian cookies and elevates it to frozen dessert perfection. The rich, buttery cookie flavor mingles with smooth vanilla base while chunks of actual Biscoff cookies add delightful texture that’ll keep you coming back for more.
This isn’t just any ordinary ice cream – it’s a dessert experience that brings together the nostalgic comfort of your favorite cookies with the cool satisfaction of premium ice cream. Whether you’re hosting a dinner party or simply treating yourself after a long day, this Biscoff ice cream delivers that perfect balance of sweet indulgence and sophisticated flavor that’ll impress everyone who tries it.
Equipment Needed
Creating our signature Biscoff ice cream requires exact equipment to achieve that perfect creamy texture and consistent freezing. We recommend gathering these essential tools before starting the ice cream making process.
Ice Cream Maker
An electric ice cream maker serves as the foundation for our homemade creation. We prefer models with built-in freezer bowls that eliminate the need for rock salt and ice. The churning mechanism incorporates air while freezing the mixture to create that smooth and creamy consistency we desire.
Heavy-Bottomed Saucepan
A medium-sized heavy-bottomed saucepan prevents scorching when we heat the cream mixture. The thick base distributes heat evenly and allows us to create a silky custard base without lumps or burnt flavors.
Fine-Mesh Strainer
We use a fine-mesh strainer to remove any cooked egg bits from our custard base. This tool ensures our ice cream achieves a perfectly smooth texture without any unwanted lumps.
Digital Thermometer
An instant-read digital thermometer helps us monitor the custard temperature precisely. We need to heat the mixture to exactly 170°F to properly cook the eggs without scrambling them.
Large Mixing Bowls
Two large mixing bowls serve different purposes in our process. One bowl holds the ice bath for rapid cooling while the other contains the finished custard mixture.
Whisk and Wooden Spoon
A balloon whisk incorporates ingredients smoothly during the initial mixing phase. We switch to a wooden spoon when stirring the heating custard to prevent scratching our saucepan.
Airtight Container
A freezer-safe airtight container stores our finished ice cream for optimal texture and flavor preservation. We recommend containers that hold at least one quart to accommodate our recipe yield.


Ingredients
 2")
We’ve carefully selected each ingredient to create the perfect balance of creamy texture and rich Biscoff flavor. Our ingredient list focuses on premium components that work together to deliver an authentic cookie butter experience.
For the Ice Cream Base
- 1 (14 oz) can sweetened condensed milk – This essential ingredient provides both sweetness and creaminess that cannot be replaced with sugar when using the no-churn method
- 2 cups heavy whipping cream – Creates the light and fluffy texture when whipped to stiff peaks (coconut cream works as a dairy-free substitute)
- 1/2 cup Biscoff cookie butter – Delivers the signature rich cookie-like flavor (any brand of cookie butter works well)
- 1 teaspoon vanilla extract – Enhances and rounds out the overall flavor profile
For the Biscoff Mix-Ins
- 1 cup Biscoff cookies, roughly chopped – Adds delightful texture contrast and visual appeal throughout each scoop
- 1/4 cup Biscoff cookie butter, melted – Creates beautiful swirls and pockets of concentrated flavor when layered into the ice cream
Instructions
 4")
We’ll guide you through each step to create this decadent Biscoff ice cream that delivers the perfect balance of creamy texture and cookie flavor. Our method ensures consistent results every time.
Prep the Ice Cream Base
We start by combining 3 cups heavy cream, 1 1/2 cups whole milk, 1 cup sugar, and 1 teaspoon vanilla extract in a large mixing bowl. Whisk the mixture thoroughly until the sugar completely dissolves and no granules remain. The base should appear smooth and uniform in color. This foundation creates the creamy texture that makes our Biscoff ice cream irresistible.
Prepare the Biscoff Elements
We need to prepare our Biscoff components while the base chills. Measure out 1 cup of Biscoff spread and soften it slightly at room temperature for easier incorporation. Take 8 to 10 Biscoff cookies and crush them into chunky pieces using a rolling pin or food processor. Keep the pieces varied in size to create interesting texture throughout the finished ice cream.
Churn the Ice Cream
We pour the prepared ice cream base into our ice cream maker and begin churning for 20 minutes. The mixture will gradually thicken as it churns and freezes. Add the softened Biscoff spread while the machine continues running to ensure even distribution throughout the base. The spread will create ribbons of concentrated flavor that enhance every bite.
Add Mix-Ins and Final Churn
We incorporate the crushed Biscoff cookies into the churning mixture during the final stage. Allow the ice cream maker to churn for another 5 to 10 minutes until the cookies distribute evenly and the mixture reaches a soft-serve consistency. The cookies should be well combined but still visible as distinct pieces that provide textural contrast.
Freeze and Set
We transfer the churned ice cream to a 9×9 baking dish for the final freezing stage. Drizzle additional Biscoff spread over the surface and add extra crushed cookies if desired for enhanced flavor and visual appeal. Cover the dish tightly and freeze for at least 1 to 2 hours until the ice cream hardens to scooping consistency. This final step ensures our Biscoff ice cream achieves the perfect firm yet creamy texture.


Storage Tips
 6")
We need to properly store our homemade Biscoff ice cream to maintain its creamy texture and prevent freezer burn. Use a freezer-safe airtight container to preserve the ice cream’s quality and protect it from absorbing other freezer odors.
Our freshly churned ice cream requires complete coverage with plastic wrap or a secure container lid before freezing for at least 8 hours. This extended freezing time ensures the ice cream reaches the ideal consistency for serving.
For those creating Biscoff ice cream sandwiches, we recommend placing them in an airtight container in the freezer where they will stay fresh for up to two weeks. Some recipes allow storage for up to a month, giving us flexibility in our dessert planning.
We suggest using parchment paper to separate individual ice cream sandwiches if stacking them in the container. This prevents the sandwiches from sticking together and makes serving easier.
When using a jar for storage, we place it in the freezer with the lid off until the ice cream freezes completely. Once frozen solid, we secure the jar with its lid to maintain freshness.
| Storage Method | Duration | Additional Notes |
|---|---|---|
| Airtight container | Up to 1 month | Use plastic wrap for extra protection |
| Ice cream sandwiches | Up to 2 weeks | Separate with parchment paper |
| Jar storage | Up to 1 month | Freeze uncovered first, then add lid |
We always allow the ice cream to freeze completely before serving to achieve the optimal texture. This patient approach ensures our Biscoff ice cream maintains its signature creamy consistency with perfectly distributed cookie pieces throughout.


Serving Suggestions
 8")
Our Biscoff ice cream transforms into an extraordinary dessert experience when paired with the right accompaniments and presentation techniques. Each serving method highlights different aspects of the rich cookie butter flavor while creating memorable moments for your guests.
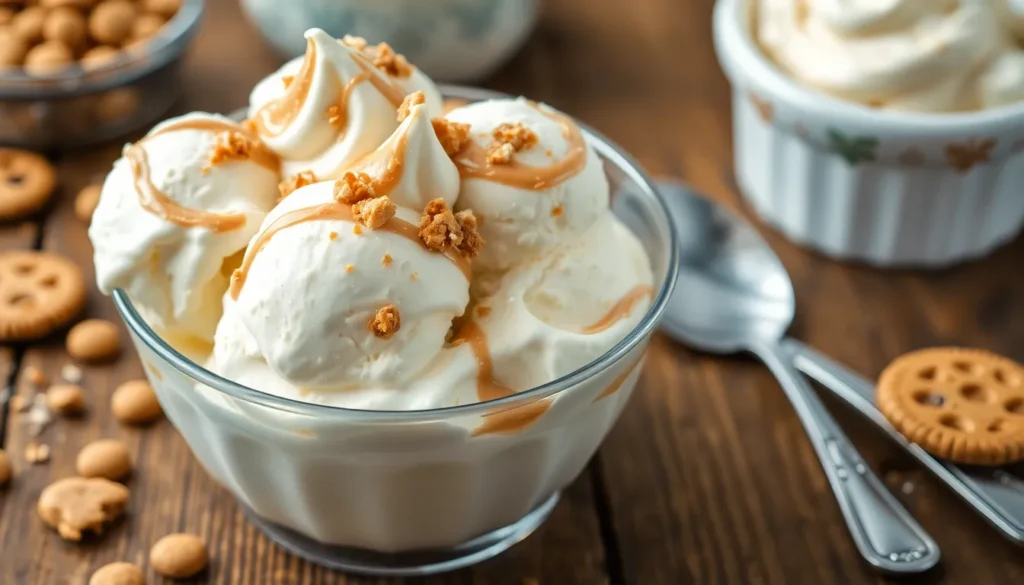
Classic Biscoff Ice Cream Delight
We recommend starting with the simplest yet most elegant presentation. Scoop vanilla or our homemade Biscoff ice cream into attractive serving glasses. Drizzle generously with Biscoff topping to amplify the cookie flavor profile. Crown each portion with freshly whipped cream and finish with a generous sprinkle of Biscoff cookie crumbs for textural contrast.
Gourmet Soft Serve Combination
For an elevated dessert experience, we combine coconut-based vanilla ice cream with crumbled Biscoff biscuits and fresh raspberries. The tartness of the berries creates a beautiful flavor balance against the sweet cookie notes. Top this creation with a crunchy peanut crumble and garnish with additional berries for a restaurant-quality presentation.
Indulgent Ice Cream Log
Transform our Biscoff ice cream into a show-stopping centerpiece by drizzling with complementary sauces. Warm caramel sauce enhances the buttery cookie flavors, while chocolate hot fudge adds richness. Spiced berry coulis provides a fruity contrast that cuts through the sweetness. Complete the presentation with dollops of whipped cream and a generous sprinkle of crushed Biscoff cookies or delicate chocolate shavings.
Coffee Pairing Excellence
Our vegan Biscoff ice cream pairs exceptionally well with freshly brewed coffee or rich espresso shots. The contrasting temperatures and complementary flavors create a sophisticated dessert experience. Serve small scoops alongside demitasse cups for an elegant after-dinner presentation.
Interactive Ice Cream Sandwiches
Create playful handheld treats by sandwiching our Biscoff ice cream between crunchy Biscoff cookies. This format appeals to all ages and provides the perfect balance of creamy ice cream and crispy cookie texture. These portable desserts work wonderfully for casual gatherings and outdoor entertaining.
| Serving Style | Key Components | Best Occasions |
|---|---|---|
| Classic Delight | Ice cream, Biscoff topping, whipped cream, cookie crumbs | Dinner parties, special occasions |
| Soft Serve Combination | Coconut ice cream, Biscoff biscuits, raspberries, peanut crumble | Upscale gatherings, restaurant service |
| Ice Cream Log | Multiple sauce drizzles, whipped cream, various toppings | Holiday celebrations, large groups |
| Coffee Pairing | Ice cream with coffee or espresso | After-dinner service, intimate settings |
| Ice Cream Sandwiches | Ice cream between Biscoff cookies | Casual events, children’s parties |
Each serving suggestion maximizes the unique characteristics of our Biscoff ice cream while providing opportunities to customize the experience based on your audience and occasion.


Make-Ahead Instructions
 10")
Planning ahead transforms our Biscoff ice cream making process into a stress-free experience. We recommend preparing this decadent treat up to one week before serving to allow the flavors to fully develop and meld together.
Prepare the Base 24 Hours Ahead
Chilling the ice cream base overnight ensures proper churning and creates the ideal texture we’re aiming for. We combine our heavy cream, whole milk, sugar, and vanilla extract mixture and refrigerate it for at least 8 hours before churning. This extended chilling period allows the ingredients to fully integrate while keeping our ice cream maker’s bowl frozen and ready for use.
Soften Biscoff Components in Advance
Softening the Biscoff spread before adding it to our mixture helps achieve even distribution throughout the ice cream. We remove the cookie butter from storage 30 minutes before beginning the churning process. During this time we also crush our Biscoff cookies into varied sizes to create the perfect textural contrast in each scoop.
Strategic Freezing Timeline
Our make ahead strategy includes multiple freezing stages for optimal results. After churning we transfer the ice cream to our baking dish and freeze for 2 hours before adding the final Biscoff drizzle and cookie layer. This initial freezing prevents the toppings from sinking into the base while maintaining the distinct ribbon effect we want to achieve.
Long Term Storage Preparation
We can store our finished Biscoff ice cream for up to one month when properly prepared. Covering the surface directly with plastic wrap before sealing the airtight container prevents ice crystals from forming. Labeling containers with preparation dates helps us track freshness and ensures we serve our ice cream at peak quality.
Last Minute Assembly Options
For entertaining purposes we prepare individual serving portions 2 days ahead of time. Scooping the ice cream into serving glasses and covering them individually allows for quick presentation when guests arrive. We keep extra Biscoff spread at room temperature for easy drizzling and maintain a supply of crushed cookies for final garnishing touches.
Conclusion
We’ve walked you through everything you need to create this irresistible Biscoff ice cream at home. From selecting the right equipment to mastering the perfect texture this dessert brings bakery-quality indulgence straight to your freezer.
The beauty of this recipe lies in its versatility – whether you’re crafting elegant dinner party desserts or satisfying midnight cravings the results never disappoint. With proper make-ahead techniques and storage methods you’ll always have this creamy treat ready when inspiration strikes.
Now it’s time to grab your ice cream maker and start churning. Your taste buds will thank you for this perfect marriage of caramelized cookie goodness and silky smooth ice cream that’s destined to become your new favorite frozen dessert.
Frequently Asked Questions
What makes Biscoff ice cream different from regular vanilla ice cream?
Biscoff ice cream features the distinctive caramelized cookie flavor of Biscoff cookies combined with warm spices. It includes Biscoff cookie butter in the base for rich flavor, plus chunks of actual Biscoff cookies for added texture and crunch, creating a more complex taste profile than traditional vanilla.
What equipment do I need to make homemade Biscoff ice cream?
Essential equipment includes an electric ice cream maker, heavy-bottomed saucepan, fine-mesh strainer, and digital thermometer. You’ll also need large mixing bowls, a whisk, wooden spoon, and airtight containers for storage. These tools ensure proper texture, temperature control, and smooth custard consistency.
Can I make the ice cream base ahead of time?
Yes, you can prepare the ice cream base up to 24 hours in advance. This actually improves the final texture as proper chilling enhances creaminess. Store the prepared base in the refrigerator and ensure it’s completely chilled before churning for best results.
How long does homemade Biscoff ice cream last in the freezer?
Homemade Biscoff ice cream stays fresh for up to two weeks when stored properly in an airtight container. Cover with plastic wrap to prevent ice crystals and freezer burn. For ice cream sandwiches, separate with parchment paper and store in airtight containers.
What are the best ways to serve Biscoff ice cream?
Popular serving options include classic scoops with Biscoff topping and whipped cream, gourmet pairings with fresh raspberries and coconut vanilla, indulgent sundaes with warm caramel sauce, coffee pairings with espresso, or fun ice cream sandwiches made with Biscoff cookies for casual gatherings.
How do I prevent ice crystals from forming in my homemade ice cream?
To prevent ice crystals, use an airtight container and cover the ice cream surface directly with plastic wrap before sealing. Ensure your freezer maintains consistent temperature, and allow the ice cream to freeze completely (at least 8 hours) before serving for optimal texture.
Can I customize the Biscoff ice cream recipe with different mix-ins?
Absolutely! While the recipe calls for crushed Biscoff cookies and cookie butter swirls, you can experiment with complementary flavors like chocolate chips, caramel swirls, or nuts. Add mix-ins during the final minutes of churning to maintain proper distribution without over-mixing.


