These brown butter blondies transform the classic vanilla-scented bar cookie into something absolutely extraordinary. We’re talking about nutty brown butter that creates an incredible depth of flavor you simply can’t achieve with regular melted butter.
The magic happens when we cook butter until it turns golden and releases those heavenly toasted notes. This simple technique elevates ordinary blondies into bakery-worthy treats that’ll have everyone asking for your secret. The result? Chewy edges perfectly balanced with a tender center and that distinctive nutty aroma that fills your kitchen.
We’ve perfected this recipe to deliver consistent results every single time. Whether you’re baking for a crowd or treating yourself to homemade goodness these brown butter blondies strike the perfect balance between rich butterscotch flavors and classic comfort food appeal.
Ingredients
We’ve carefully selected each ingredient to create the perfect balance of nutty brown butter flavor and chewy texture in our blondies. The ingredient list remains simple yet strategic for achieving that signature butterscotch taste.
For the Brown Butter:
- 1 cup (2 sticks) unsalted butter
- 1 tablespoon vanilla extract
For the Blondie Base:
- 1 cup packed light brown sugar
- 1/2 cup granulated sugar
- 2 large eggs, room temperature
- 1 1/2 cups all-purpose flour
- 1/2 teaspoon baking powder
- 1/2 teaspoon kosher salt
Optional Mix-ins:
- 3/4 cup white chocolate chips
- 1/2 cup chopped toasted pecans or walnuts
- 1/4 teaspoon cinnamon
Our ingredient preparation follows a exact order to maximize flavor development. We start by browning the butter first since this technique requires active attention and creates the foundation flavor for our entire recipe. Room temperature eggs blend more easily with the warm brown butter mixture without scrambling.
Light brown sugar provides moisture and molasses notes that complement the nutty brown butter perfectly. We combine it with granulated sugar to achieve the ideal texture balance between chewy edges and tender centers. The flour ratio creates structure without making the blondies dense or cakey.
Fresh vanilla extract added directly to the warm brown butter intensifies the overall flavor profile. We recommend using pure vanilla extract rather than imitation for the best taste results in these blondies.
Equipment Needed
 1")
Preparing these brown butter blondies requires exact kitchen tools that ensure success throughout the browning and baking process. We recommend gathering all equipment before starting to create a smooth workflow.
Essential browning equipment includes a heavy-bottomed saucepan or medium frying pan for browning the butter evenly. The heavy bottom prevents hot spots that could burn the butter before it develops that signature nutty aroma. A whisk becomes crucial during this step to stir the butter constantly and monitor its color change.
Mixing and preparation tools streamline the batter creation process. We use medium and large mixing bowls to combine wet and dry ingredients separately before bringing them together. A wooden spoon or rubber spatula works best for folding the browned butter into the sugar mixture without overmixing.
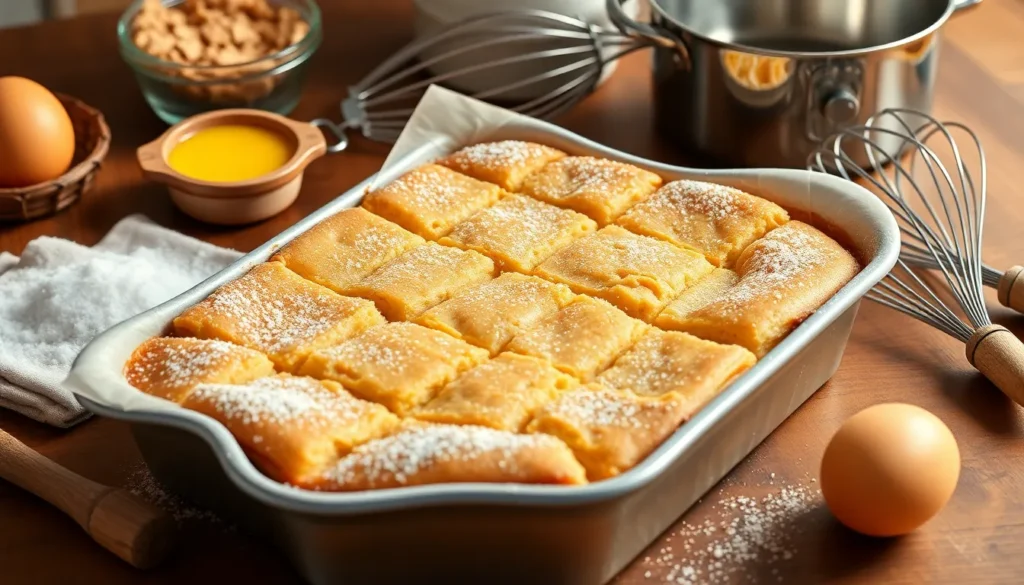
Baking essentials ensure even cooking and easy removal. A quarter sheet pan or 8×8-inch baking pan provides the ideal thickness for these blondies. Parchment paper becomes indispensable for lining the pan, creating easy removal without sticking. We recommend leaving overhang on the parchment for lifting the entire batch out once cooled.
Optional but helpful tools include a fine mesh sieve for sifting flour if you prefer extra smooth texture. A kitchen scale proves valuable for precise measurements, especially when working with the browned butter quantities. An offset spatula helps spread the batter evenly in the pan for consistent baking results.
| Equipment Category | Essential Items | Optional Additions |
|---|---|---|
| Browning | Heavy-bottomed saucepan, whisk | Kitchen thermometer |
| Mixing | Medium/large bowls, wooden spoon | Electric mixer, rubber spatula |
| Baking | 8×8-inch pan, parchment paper | Offset spatula, cooling rack |
| Measuring | Measuring cups/spoons | Kitchen scale, fine mesh sieve |
Instructions
 2")
We’ll walk through the complete process of creating these delicious brown butter blondies step by step. The key to success lies in properly browning the butter and achieving the perfect balance of chewy and tender textures.
Making the Brown Butter
We start by melting the unsalted butter in a heavy-bottomed saucepan or medium frying pan over medium heat. The butter will begin to foam and bubble as the water content evaporates. Continue cooking while stirring frequently with a whisk to prevent any burning on the bottom of the pan.
Watch carefully as the butter transforms from pale yellow to golden amber. The process takes approximately 3 to 5 minutes and you’ll notice a distinctly nutty aroma developing. Small brown bits will form at the bottom of the pan as the milk solids caramelize.
Once the butter reaches a rich golden color and smells wonderfully nutty, we immediately remove it from heat. Pour the entire contents into a mixing bowl, making sure to scrape out all those precious brown bits from the pan as they contain concentrated flavor.
Preparing the Batter
We allow the brown butter to cool slightly before proceeding with the next steps. Whisk the light brown sugar and granulated sugar directly into the warm brown butter until the mixture becomes smooth and well combined.
Add the room temperature eggs one at a time, whisking thoroughly after each addition. Pour in the vanilla extract and continue whisking until the mixture is completely smooth and glossy.
In a separate bowl, we sift together the all-purpose flour, baking powder, and kosher salt. This ensures even distribution and prevents any lumps in our final batter. Gradually fold the dry ingredients into the wet mixture using a wooden spoon, stirring just until the flour disappears.
If we’re adding optional mix-ins like white chocolate chips or chopped nuts, we gently fold them in at this stage. Avoid overmixing to maintain the tender texture we’re aiming for.
Baking the Blondies
We preheat our oven to 350°F (177°C) while preparing the baking pan. Line either an 8×8 inch square pan or a quarter sheet pan with parchment paper, leaving some overhang for easy removal.
Pour the prepared batter into our lined pan and spread it evenly using an offset spatula or the back of a spoon. The batter should reach all corners and maintain a consistent thickness throughout.
| Pan Size | Baking Time | Temperature |
|---|---|---|
| 8×8 inch | 25-28 minutes | 350°F (177°C) |
| Quarter sheet | 18-20 minutes | 350°F (177°C) |
We bake the blondies until they appear slightly underdone in the center with edges that have set and turned golden. The surface should look matte rather than shiny when properly baked.
Remove from the oven and allow the blondies to cool in the pan for at least 15 minutes before cutting. For an extra touch of flavor, we can sprinkle flaky sea salt over the warm surface immediately after removing from the oven.
Directions for Cooling and Cutting
 3")
Proper cooling and cutting techniques are essential for achieving perfectly shaped brown butter blondies with clean edges. We recommend allowing the blondies to cool completely in the pan for at least 4 hours to ensure the crumb sets properly and prevents crumbling during cutting.
Place the hot pan on a wire cooling rack immediately after removing from the oven. The cooling process should not be rushed as warm blondies will tear and create messy edges when cut. Room temperature cooling provides the ideal texture for clean slicing.
Once fully cooled, use a sharp knife for the cleanest possible cuts. We suggest wiping the blade clean between cuts to maintain neat edges. Start by cutting the blondies in half lengthwise, then crosswise to create uniform squares or rectangles.
For storage after cutting, these treats maintain their quality for about 3 days when kept at room temperature in an airtight container. The blondies can also be wrapped individually and frozen for up to 2 months if properly sealed, making them perfect for future enjoyment.
| Storage Method | Duration | Storage Tips |
|---|---|---|
| Room Temperature | 3 days | Store in airtight container |
| Freezer | 2 months | Wrap individually and seal properly |
Lifting the blondies from the pan becomes effortless when using parchment paper overhang as handles. This technique prevents damage to the delicate texture while transferring the entire batch to a cutting board for precise portioning.
Storage Instructions
 4")
We want our brown butter blondies to maintain their perfect chewy texture and rich nutty flavor for as long as possible. Proper storage ensures these delicious treats stay fresh and ready to enjoy whenever cravings strike.
Room Temperature Storage
We recommend storing freshly baked blondies in an airtight container at room temperature for optimal texture and flavor retention. Our blondies will stay fresh for up to 3 days using this method, though some variations can last up to 4 days depending on ingredients used.
Place cooled blondies in a sealed container with parchment paper between layers to prevent sticking. Keep the container away from direct sunlight and heat sources to maintain the perfect chewy consistency we worked so hard to achieve.
Refrigerated Storage
We can extend the freshness of our brown butter blondies by storing them in the refrigerator. This method keeps blondies fresh for up to 1 week, with some recipes maintaining quality for 7 to 8 days.
Wrap individual squares in plastic wrap or store them in an airtight container before refrigerating. Allow refrigerated blondies to come to room temperature for 15 to 20 minutes before serving to restore their ideal texture.
Freezer Storage
We achieve the longest storage life by freezing our brown butter blondies properly. This method preserves both flavor and texture for extended periods.
| Storage Method | Duration | Preparation |
|---|---|---|
| Room Temperature | 3-4 days | Airtight container |
| Refrigeration | 7-8 days | Wrapped or sealed container |
| Freezing | 2-3 months | Double wrapped protection |
Wrap each blondie individually in plastic wrap, then place wrapped pieces in a freezer bag for double protection. Alternatively, we can wrap the entire batch in plastic wrap and aluminum foil before freezing. Our frozen blondies maintain their quality for up to 2 to 3 months when stored correctly.
Thaw frozen blondies at room temperature for 30 to 45 minutes before serving. We avoid using microwave defrosting as it can create uneven textures and compromise the delicate crumb structure we created during baking.
Serving Suggestions
 5")
Our brown butter blondies shine brightest when served at room temperature after cooling completely. The rich nutty flavor and chewy texture reach their peak when the bars have had time to set properly.
Simple Presentation
We recommend cutting these blondies into generous squares for the most satisfying portion size. Each piece showcases the golden color and tender crumb that makes this dessert so appealing. Dusting the tops with a light sprinkle of powdered sugar adds an elegant touch for special occasions.
Enhanced Serving Options
Pairing warm blondies with a scoop of vanilla ice cream creates an irresistible contrast between the chewy bar and cold cream. The vanilla complements the brown butter’s nutty notes without overwhelming the delicate flavor profile. We also love serving them alongside a drizzle of salted caramel sauce for extra indulgence.
Party and Gathering Ideas
These blondies work perfectly as finger food when cut into smaller bite-sized squares. We suggest arranging them on a platter with other dessert bars for variety at cocktail parties or dessert tables. The individual portions make them ideal for buffet-style serving where guests can easily grab and enjoy.
Beverage Pairings
Coffee and tea complement the butterscotch flavors beautifully. We find that the brown butter’s nuttiness pairs exceptionally well with espresso drinks or chai tea. For evening gatherings, consider serving with dessert wine or even a glass of cold milk for a nostalgic touch.
Seasonal Variations
During warmer months, we enjoy serving chilled blondies straight from the refrigerator for a firmer texture. Winter calls for warming individual pieces slightly in the oven and serving with hot cocoa or mulled cider to create a cozy dessert experience.
Tips for Perfect Brown Butter Blondies
 6")
Mastering these essential techniques will elevate your brown butter blondies from good to exceptional. We’ve refined these methods through countless batches to ensure consistent results every time.
Achieving the Perfect Brown Butter
We start by melting unsalted butter in a saucepan over medium heat. The butter will foam initially as the water content evaporates. Continue heating until the foam subsides and you notice brown bits forming at the bottom of the pan.
Watch carefully for the transition from foamy to clear butter. This visual cue signals that browning has begun. The entire process typically takes about 5 minutes from start to finish.
Stir the butter well to incorporate those caramelized milk solids that have settled at the bottom. These golden-brown bits provide the signature nutty flavor that makes brown butter so special. The final result should have a rich amber color and emit a distinctly nutty aroma.
Preventing Overbaking
We recommend baking blondies until the edges are just firming up and the top appears set. The center should still look slightly underdone when you remove them from the oven.
Timing varies based on your chosen pan size. Use an 8×8-inch pan for thicker blondies or opt for a quarter sheet pan to create thinner bars. Thicker blondies require a few extra minutes while thinner ones bake more quickly.
Slightly underbaking ensures that fudgy texture we all crave in perfect blondies. The residual heat will continue cooking the bars as they cool in the pan.
Customization Options
Light brown sugar delivers the ideal balance of flavor and texture for our blondies. Dark brown sugar can be substituted for a more intense molasses flavor but avoid using only granulated sugar as it won’t provide the same chewy texture.
Add chopped nuts like walnuts or chocolate chips after the flour is almost fully incorporated. This timing prevents overmixing while ensuring even distribution throughout the batter.
Choose good-quality chocolate for mix-ins to enhance the overall flavor profile. Caramelized white chocolate creates an especially rich and complex taste that pairs beautifully with the nutty brown butter base.
Conclusion
These brown butter blondies prove that a simple technique can completely transform an ordinary dessert into something extraordinary. The nutty richness of properly browned butter creates a depth of flavor that’ll have everyone asking for your secret.
We’ve walked you through every step to ensure your success – from mastering the brown butter technique to achieving that perfect chewy texture. With the right tools and our detailed instructions you’re equipped to create bakery-quality blondies in your own kitchen.
Whether you’re baking for a special occasion or simply treating yourself these blondies deliver consistent delicious results every time. The combination of technique and quality ingredients makes them a standout addition to any dessert repertoire.
Frequently Asked Questions
What makes brown butter blondies different from regular blondies?
Brown butter blondies use butter that’s been cooked until golden amber, creating a nutty, caramelized flavor that regular melted butter can’t achieve. This technique adds depth and complexity to the classic vanilla bar cookie, resulting in a more sophisticated butterscotch taste with enhanced aroma.
How long does it take to brown butter properly?
The butter browning process typically takes 5-8 minutes over medium heat in a heavy-bottomed pan. Watch for the butter to foam, then turn golden amber while developing a nutty aroma. Constant stirring with a whisk is essential to prevent burning and ensure even browning.
Can I make brown butter blondies ahead of time?
Yes, brown butter blondies store well. Keep them at room temperature in an airtight container for 3-4 days, refrigerate for up to 7-8 days, or freeze for up to 2 months. Wrap individually or use parchment paper between layers to prevent sticking.
What’s the best pan size for brown butter blondies?
A 9×13 inch pan is ideal for standard thickness blondies. Smaller pans like 8×8 inch will create thicker bars that require longer baking time. Always line with parchment paper with overhang for easy removal and clean cutting.
How do I know when brown butter blondies are done baking?
The blondies are done when the edges are set and lightly golden, but the center should still appear slightly underdone. They’ll continue cooking from residual heat. Overbaking results in dry, crumbly texture instead of the desired chewy consistency.
Why do I need to cool blondies completely before cutting?
Cooling for at least 4 hours allows the crumb structure to set properly. Cutting too early causes the blondies to crumble and fall apart. Complete cooling ensures clean cuts and maintains the perfect chewy texture throughout each piece.
What mix-ins work best in brown butter blondies?
White chocolate chips complement the nutty brown butter flavor beautifully. Chopped nuts like pecans or walnuts add texture contrast. Fold mix-ins gently into the batter to avoid overmixing, which can make the blondies tough rather than tender.
Can I double the brown butter blondies recipe?
Yes, the recipe doubles well for larger batches. Use a larger pan or two separate pans, adjusting baking time as needed. The brown butter technique remains the same, though you may need a larger saucepan to accommodate the increased butter quantity.


