We’ve all experienced that perfect weekend morning moment when the aroma of fresh waffles fills the kitchen and everyone gathers around the table with anticipation. Our chocolate chip waffles take this beloved breakfast classic to the next level by combining fluffy golden batter with melted chocolate chips that create pockets of pure indulgence in every bite.
These aren’t your ordinary waffles – they’re a game-changing breakfast treat that transforms any morning into something special. The secret lies in achieving that perfect balance between crispy exterior and tender interior while ensuring the chocolate chips are distributed evenly throughout each waffle square.
Whether you’re hosting a weekend brunch or treating your family to a memorable breakfast, these chocolate chip waffles deliver restaurant-quality results right from your own waffle iron. We’ll show you exactly how to create these irresistible golden beauties that’ll have everyone asking for seconds.
Ingredients
We’ve carefully selected each ingredient to create the perfect balance of fluffy texture and rich chocolate flavor. Our ingredient list ensures these waffles turn out crispy on the outside and tender on the inside every time.
Dry Ingredients
- 2 cups all-purpose flour
- 2 tablespoons granulated sugar
- 2 teaspoons baking powder
- 1/2 teaspoon salt
- 1/4 teaspoon ground cinnamon
Wet Ingredients
- 1 3/4 cups whole milk
- 2 large eggs, separated
- 1/3 cup unsalted butter, melted and cooled slightly
- 1 teaspoon vanilla extract
Mix-ins
- 3/4 cup mini chocolate chips
- 2 tablespoons mini chocolate chips (reserved for sprinkling on top)
Equipment Needed

Making perfect chocolate chip waffles requires the right tools to achieve that ideal combination of crispy exterior and fluffy interior. We recommend gathering these essential pieces of equipment before you begin mixing your batter.
Waffle Iron serves as the most crucial piece of equipment for this recipe. Belgian waffle irons create deeper pockets that hold syrup and toppings beautifully while standard waffle irons produce thinner waffles with a more uniform texture. Both types work excellently for chocolate chip waffles so choose based on your preference for thickness and pocket depth.
Large Mixing Bowls help you properly combine ingredients without making a mess. We suggest using at least two medium to large bowls since you’ll need to keep dry and wet ingredients separate initially. Stainless steel or glass bowls work best as they don’t retain flavors or odors.
Wire Whisk ensures your batter achieves the right consistency without overmixing. A balloon whisk works particularly well for incorporating air into the wet ingredients and creating that light fluffy texture we’re aiming for.
Measuring Cups and Spoons provide accuracy that makes the difference between good and exceptional waffles. Use dry measuring cups for flour and sugar while liquid measuring cups work best for milk and melted butter.
Ladle or Large Spoon helps you portion the batter evenly into your waffle iron. A 1/4 cup ladle typically provides the perfect amount for most standard waffle irons though Belgian models may require slightly more.
Pastry Brush or Cooking Spray prevents sticking and ensures easy release from your waffle iron. Even non-stick surfaces benefit from light greasing between batches.
Wire Cooling Rack keeps finished waffles crisp while you cook additional batches. Placing waffles directly on plates can create steam that softens the bottom and reduces that desirable crunch.
Instructions

We’ll guide you through each step to create perfect chocolate chip waffles with crispy exteriors and fluffy interiors. Follow these detailed instructions for consistent results every time.
Prep the Waffle Iron
Set up your waffle iron according to the manufacturer’s instructions before beginning the batter preparation. Preheat the iron once your batter is ready to ensure optimal cooking temperature.
Lightly grease the waffle iron plates with nonstick cooking spray or butter to prevent the waffles from sticking. This step ensures easy removal and maintains the waffle’s shape.
Mix the Batter
Combine all dry ingredients in a large mixing bowl by whisking together flour, sugar, baking powder, and salt until well blended. This creates an even distribution of leavening agents throughout the mixture.
Whisk together milk, eggs, and melted butter in a separate bowl until fully combined. Add vanilla extract to the wet mixture and stir until incorporated.
Pour the wet ingredients into the dry ingredient mixture and stir gently until just combined. Fold in the chocolate chips last, reserving a small amount for sprinkling on top of each waffle before cooking.
Cook the Waffles
Use a measuring cup or ladle to pour the appropriate amount of batter onto the preheated waffle iron. Spread the batter evenly across the iron surface to ensure uniform cooking.
Sprinkle a few reserved chocolate chips on top of the batter before closing the waffle iron. Close the iron and cook until the steaming slows down significantly and the waffle releases easily from the plates.
Serve and Garnish
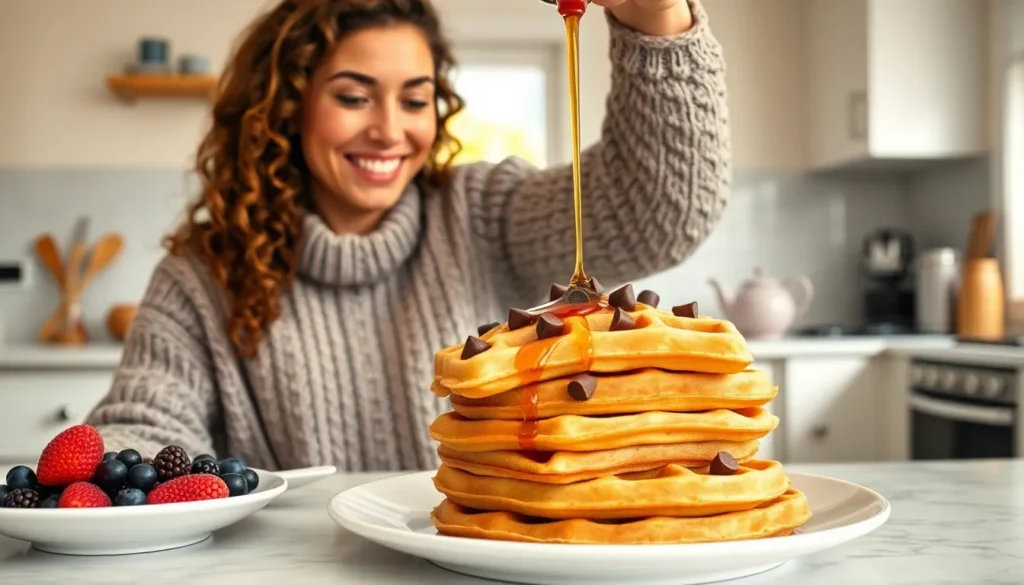
Serve the waffles immediately while warm for the best texture and flavor experience. Top with butter, whipped cream, maple syrup, or fresh berries according to your preference.
Consider adding decorative touches like powdered sugar dusting, chocolate shavings, or a drizzle of chocolate sauce for an elegant presentation. These garnishes enhance both the visual appeal and flavor profile of your chocolate chip waffles.
Tips for Perfect Chocolate Chip Waffles

Mastering the art of chocolate chip waffles requires attention to several key details that transform ordinary batter into extraordinary breakfast treats. We’ve discovered that bringing all ingredients to room temperature creates the foundation for success. Cold ingredients resist proper mixing and can result in lumpy batter that produces uneven waffles.
Temperature Control Makes the Difference
Room temperature ingredients blend more seamlessly and create a smoother consistency. We recommend removing eggs and buttermilk from the refrigerator at least 30 minutes before starting. This simple step ensures our wet ingredients incorporate effortlessly with the dry mixture.
Batter Mixing Technique
Overmixing ranks as the most common mistake we see home cooks make with waffle batter. Gentle folding motions preserve the delicate texture we want in our final product. We stir just until the ingredients come together, leaving small lumps intact rather than pursuing a perfectly smooth mixture.
The wet and dry ingredients should be mixed separately first. We whisk buttermilk, eggs, and vanilla extract in one bowl while combining flour, sugar, baking powder, baking soda, and salt in another. This method prevents overmixing when we bring everything together.
Resting Period Benefits
Allowing our batter to rest for 20 to 30 minutes creates noticeably fluffier waffles. During this time, the gluten relaxes and the flour fully hydrates. We use this waiting period to preheat our waffle iron and prepare any toppings.
Chocolate Chip Distribution
Mini chocolate chips work better than regular sized chips for even distribution. We fold them into the batter last, using gentle motions to avoid breaking them. Some bakers prefer to reserve a handful of chips to sprinkle directly onto the batter once it hits the waffle iron.
Waffle Iron Preparation
Preheating the waffle iron completely before adding batter ensures crispy exteriors. We lightly grease the plates with nonstick spray even when using a nonstick surface. This extra step prevents sticking and makes removal easier.
Consistent Portioning
Using a measuring cup creates uniformly sized waffles every time. We find that a standard ice cream scoop works perfectly for portion control. This technique helps us avoid overfilling the waffle iron while ensuring each waffle cooks evenly.
| Key Factor | Recommended Time/Amount | Benefit |
|---|---|---|
| Resting batter | 20-30 minutes | Fluffier texture |
| Room temperature ingredients | 30 minutes before mixing | Better incorporation |
| Batter portion | 1 measuring cup or ice cream scoop | Consistent size |
Storage and Reheating

Our freshly made chocolate chip waffles deserve proper storage to maintain their delicious taste and texture for future enjoyment. We can preserve these delightful treats using different methods depending on how long we plan to keep them.
Refrigerating Cooked Waffles
We recommend storing cooked waffles in an airtight container in the refrigerator for up to 3 to 4 days. This method works perfectly when we plan to enjoy our leftover waffles within a few days of making them.
Freezing for Long-Term Storage
For longer storage, we can freeze our chocolate chip waffles in an airtight container or freezer-safe bag for up to 2 to 3 months. To freeze them effectively, we should place the waffles on a baking sheet first to freeze solid before transferring them to a container. This prevents the waffles from sticking together and makes it easier to remove individual portions.
| Storage Method | Duration | Container Type |
|---|---|---|
| Refrigeration | 3-4 days | Airtight container |
| Freezing | 2-3 months | Airtight container or freezer-safe bag |
Reheating Methods
We have several excellent options for reheating our stored chocolate chip waffles to restore their warmth and texture.
Toaster Method
We recommend using a toaster to reheat individual waffles until they become warmed and crispy. This method delivers the best results for achieving that desired crispy texture we love in fresh waffles.
Microwave Option
For quick reheating, we can heat a waffle in the microwave for about 30 seconds or until fully heated. While this method is fastest, it may not restore the original crispiness.
Oven Technique
We can place our waffles on a parchment-lined baking sheet or cooling rack and heat them in a preheated oven at 350°F for about 10 minutes or until heated through. This method works especially well when reheating multiple waffles at once.
Variations and Substitutions

We can easily adapt our chocolate chip waffle recipe to accommodate different dietary needs and flavor preferences. These modifications allow everyone to enjoy these delicious waffles regardless of their restrictions or taste preferences.
Gluten-Free Option
We recommend using gluten-free all-purpose flour blends as a direct substitute for regular flour in our recipe. These blends typically contain a mixture of rice flour, potato starch, and tapioca starch that mimics the texture of traditional flour. We maintain the same measurements as the original recipe, ensuring our waffles retain their fluffy texture and delicious taste.
Dairy-Free Alternative
We can make our chocolate chip waffles completely dairy-free with simple substitutions. Replace the whole milk with non-dairy alternatives such as almond milk, soy milk, or coconut milk using the same measurements. We also substitute the melted butter with vegan butter or other plant-based fats like coconut oil. These alternatives deliver the same rich flavor and tender texture we expect from our waffles.
Different Chocolate Options
We have several chocolate varieties to enhance our waffle experience:
Mini Chocolate Chips: We prefer using mini chips for more evenly distributed chocolate flavor throughout each waffle. These smaller pieces integrate better into the batter and provide consistent sweetness in every bite.
Dark Chocolate: We choose dark chocolate chips when we want a richer, more intense chocolate taste. The deeper flavor profile balances beautifully with the sweet waffle batter.
White Chocolate: We substitute white chocolate chips for a sweeter and creamier flavor experience. These chips create a milder chocolate taste that appeals to those who prefer less intense flavors.
Fresh Fruit Alternative: We can replace chocolate chips entirely with fresh berries like blueberries for a completely different flavor profile that adds natural sweetness and bursts of fruit flavor.
Buttermilk Version: We use buttermilk instead of regular milk for a tangier taste. When making this substitution, we adjust our leavening agents by reducing baking powder slightly and adding baking soda for better browning and enhanced flavor development.
Make-Ahead Instructions

Preparing chocolate chip waffles ahead of time transforms busy mornings into effortless breakfast experiences. We recommend making these strategic preparations to ensure fresh waffles whenever you need them.
Storing Waffle Batter
Our waffle batter stores beautifully in the refrigerator for overnight preparation. We combine all ingredients except the chocolate chips and transfer the mixture to an airtight container. The batter maintains its quality for up to 24 hours when properly stored.
Before cooking stored batter we gently fold in the chocolate chips and let the mixture return to room temperature for 10 minutes. This resting period reactivates the leavening agents and ensures fluffy waffles every time.
Refrigerating Cooked Waffles
Leftover waffles stay fresh in the refrigerator for several days when stored correctly. We place completely cooled waffles in an airtight container with parchment paper between layers to prevent sticking. This storage method maintains texture and prevents moisture buildup for 3 to 4 days.
Freezing for Long-Term Storage
Freezing cooked waffles extends their shelf life significantly while preserving quality. We arrange cooled waffles in a single layer on baking sheets and freeze until solid before transferring to freezer-safe bags or containers. Properly frozen waffles maintain their taste and texture for 2 to 3 months.
| Storage Method | Duration | Container Type |
|---|---|---|
| Refrigerated Batter | Up to 1 day | Airtight container |
| Refrigerated Cooked Waffles | 3-4 days | Airtight container |
| Frozen Cooked Waffles | 2-3 months | Freezer-safe bags |
Reheating Instructions
Toasting frozen waffles directly from the freezer works best for individual servings. We set our toaster to medium heat and toast until crispy and heated through. This method restores the original texture perfectly.
For multiple waffles we use the oven method by preheating to 350°F and warming for 5 to 7 minutes on a wire rack. Microwave reheating works for quick warming but produces softer results than other methods.
Serving Suggestions

We believe chocolate chip waffles shine brightest when paired with the right accompaniments that complement their rich chocolate flavor and fluffy texture. These versatile breakfast treats offer endless possibilities for creative presentations that can transform an ordinary morning into something special.
Syrups and Sauces elevate our chocolate chip waffles to new heights of indulgence. Maple syrup remains the classic choice that pairs beautifully with the chocolate chips, while chocolate sauce doubles down on the decadent factor. Homemade berry sauces add a bright acidic contrast that cuts through the richness and creates a more balanced flavor profile.
Fresh Fruit provides a healthier twist that adds natural sweetness and vibrant color to our plates. Fresh berries like strawberries, blueberries, and raspberries offer antioxidants alongside their delicious taste. Sliced bananas bring creamy texture and potassium, while seasonal fruits keep our breakfast exciting throughout the year.
Creamy Toppings transform our waffles into a luxurious treat that feels more like dessert than breakfast. Whipped cream adds light airy sweetness that melts perfectly into the waffle’s crispy exterior. Greek yogurt offers protein and probiotics while maintaining that creamy indulgence we crave.
Nut Butters introduce healthy fats and protein that make our chocolate chip waffles more satisfying and nutritionally complete. Almond butter provides vitamin E and magnesium, while hazelnut butter echoes the flavors found in popular chocolate spreads. Peanut butter remains a crowd favorite that creates an irresistible combination with chocolate chips.
Ice Cream turns our breakfast waffles into an impressive dessert option perfect for special occasions. A scoop of vanilla ice cream creates a classic pairing that highlights the waffle’s warm temperature contrast. Chocolate ice cream intensifies the chocolate experience for true chocolate lovers who want to go all out.
We recommend keeping waffles warm in a preheated oven at 200°F to prevent them from getting soggy while we prepare our chosen toppings. This technique ensures our chocolate chip waffles maintain their ideal crispy exterior and fluffy interior until the moment we serve them.
Conclusion
We’ve covered everything you need to create bakery-quality chocolate chip waffles right in your own kitchen. From selecting the perfect ingredients to mastering the cooking technique these waffles transform any ordinary morning into something special.
The versatility of this recipe means you can adapt it to suit any dietary preference or flavor craving. Whether you’re meal prepping for busy weekdays or hosting a weekend brunch these chocolate chip waffles deliver consistent delicious results.
With proper storage techniques and creative serving suggestions you’ll never run out of ways to enjoy these golden treats. Your family and guests will keep coming back for more once they taste the perfect balance of crispy exterior and fluffy chocolate-studded interior.
Frequently Asked Questions
What makes chocolate chip waffles different from regular waffles?
Chocolate chip waffles combine fluffy waffle batter with melted chocolate chips, creating an indulgent treat that’s crispy on the outside and tender on the inside. The mini chocolate chips distribute evenly throughout the batter, providing bursts of chocolate flavor in every bite, making them perfect for special weekend breakfasts.
What ingredients do I need for chocolate chip waffles?
You’ll need all-purpose flour, granulated sugar, baking powder, salt, ground cinnamon, whole milk, eggs, melted butter, vanilla extract, and mini chocolate chips. These ingredients create the perfect balance of fluffy texture and rich chocolate flavor. Reserve some chocolate chips for sprinkling on top before cooking.
What equipment is essential for making chocolate chip waffles?
Essential equipment includes a waffle iron (Belgian or standard), large mixing bowls, wire whisk, measuring cups and spoons, ladle or large spoon, pastry brush or cooking spray for greasing, and a wire cooling rack. Having the right tools ensures consistent results and perfectly cooked waffles every time.
How do I prevent my waffle batter from being overmixed?
Mix wet and dry ingredients separately, then gently combine them until just incorporated. The batter should still have some lumps – this is normal and desired. Overmixing develops gluten, resulting in tough, dense waffles instead of light and fluffy ones. Stop mixing as soon as ingredients are combined.
How long can I store leftover chocolate chip waffles?
Refrigerate leftover waffles in an airtight container for 3-4 days, or freeze them for 2-3 months in an airtight container or freezer-safe bag. For best results, cool waffles completely before storing to prevent condensation and maintain their texture.
What’s the best way to reheat stored waffles?
For individual servings, use a toaster to restore crispiness. For multiple waffles, reheat in a 350°F oven for 5-10 minutes. Microwave for quick heating but expect softer texture. Frozen waffles can go directly in the toaster or oven without thawing first.
Can I make gluten-free chocolate chip waffles?
Yes, substitute all-purpose flour with a gluten-free flour blend in equal amounts. Most gluten-free flour blends work well for waffles. The texture may be slightly different, but the flavor remains delicious. Ensure your chocolate chips are also certified gluten-free if needed.
What are the best toppings for chocolate chip waffles?
Popular toppings include maple syrup, fresh berries, whipped cream, Greek yogurt, nut butters, and even ice cream for dessert. Homemade berry sauces and chocolate syrup complement the chocolate chips perfectly. Keep waffles warm in the oven while preparing toppings for best results.
Can I make the waffle batter ahead of time?
Yes, you can store waffle batter in the refrigerator for up to 24 hours. Let it come to room temperature and gently stir before using. For best results, add chocolate chips just before cooking to prevent them from sinking or bleeding color into the batter.
Why should I use mini chocolate chips instead of regular-sized ones?
Mini chocolate chips distribute more evenly throughout the batter and are less likely to sink to the bottom. They also provide better chocolate distribution in each bite and are less likely to burn or create hot spots in your waffle iron, ensuring consistent cooking results.


