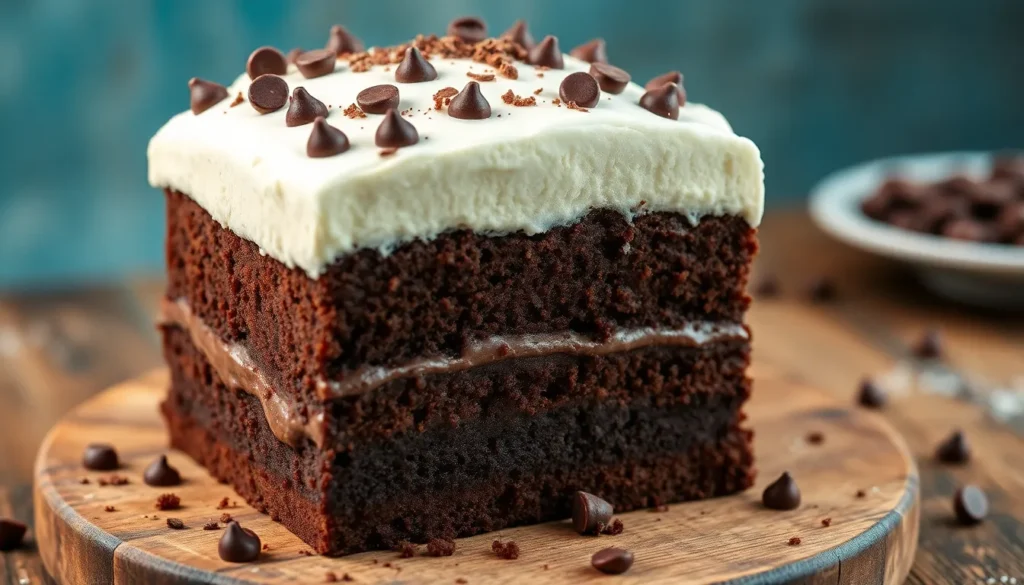
We’ve discovered the ultimate dessert that’ll make your taste buds dance with pure joy – chocolate poke cake! This irresistible treat transforms a simple chocolate cake into something absolutely magical by poking holes throughout and flooding it with rich, creamy goodness. The result? Every single bite bursts with intense chocolate flavor that’ll have your guests begging for the recipe.
What makes this dessert so special is its incredible versatility and foolproof preparation. We love how the poked holes create perfect pockets for delicious fillings like chocolate pudding, caramel, or even peanut butter sauce. The cake stays incredibly moist for days, making it perfect for parties, potlucks, or whenever you’re craving something decadent.
Whether you’re a baking novice or seasoned pro, this chocolate poke cake delivers impressive results every time. It’s the kind of dessert that looks fancy but requires minimal effort – exactly what we need for those moments when we want maximum impact with minimal stress.
Ingredients
We’ll need three distinct components to create this decadent chocolate poke cake. Each element plays a crucial role in building the layers of flavor and texture that make this dessert so irresistible.
One 5.9 oz box of Jell-O Chocolate Artificially Flavored Instant Pudding & Pie Filling Mix

The information below is per-pack only

One 1.4 oz box of Jell-O Zero Sugar Chocolate Fudge Artificially Flavored Instant Reduced Calorie Pudding Mix & Pie Filling
For the Chocolate Cake
- 1¾ cups all-purpose flour
- 2 cups granulated sugar
- ¾ cup unsweetened cocoa powder
- 2 teaspoons baking soda
- 1 teaspoon baking powder
- 1 teaspoon salt
- 2 large eggs at room temperature
- 1 cup buttermilk
- 1 cup strong black coffee cooled
- ½ cup vegetable oil
- 1 teaspoon vanilla extract
For the Poke Filling
- 1 package (3.9 oz) instant chocolate pudding mix
- 2 cups cold whole milk
- 1 jar (12 oz) hot fudge sauce
- ½ cup heavy cream for thinning
For the Topping
- 1 container (8 oz) frozen whipped topping thawed
- ½ cup mini chocolate chips
- ¼ cup crushed chocolate sandwich cookies
- 2 tablespoons chocolate shavings for garnish
Equipment Needed

Creating our chocolate poke cake requires exact kitchen tools that ensure perfect results every time. We recommend gathering all equipment before starting to streamline the baking process.
Essential Baking Equipment:
- 13×9-inch baking pan for the perfect cake size
- Large mixing bowl for combining cake ingredients
- Medium bowl for preparing pudding mixture
- Electric mixer for smooth batter consistency
- Measuring cups and spoons for accurate portions
Specialized Tools for Poking:
- Wooden spoon handle for creating uniform holes
- Fork as an alternative hole-making tool
- Skewer for precise hole placement
Mixing and Preparation Tools:
- Whisk for pudding preparation
- Rubber spatula for folding ingredients
- Wire cooling rack for proper cake cooling
- Offset spatula for smooth topping application
Optional Enhancement Equipment:
- Piping bag for decorative whipped topping
- Fine-mesh sieve for dusting cocoa powder
- Sharp knife for clean cake slicing
We find that using the right equipment makes the difference between a good poke cake and an exceptional one. The 13×9-inch pan provides ideal depth for hole creation while the wooden spoon handle creates perfectly sized openings for maximum pudding absorption. Quality measuring tools ensure our cake maintains consistent moisture and flavor balance throughout.

Contains 1- 11.75 Ounce Jar of Smucker's Hot Fudge Topping

Contains 1- 12 Ounce Jar of Smucker's Chocolate Fudge Topping

Item Package Length: 4.445cm
Instructions

We’ll guide you through each step to create this irresistible chocolate poke cake that delivers maximum flavor with minimal effort. Follow our detailed process to achieve the perfect texture and taste in every bite.
One 8 oz tub of Cool Whip Original Whipped Topping

One 16-ounce container of Frozen Original Whipped Topping
One 8 ounce container of Frozen Original Whipped Topping
Prep the Cake
Preheat your oven to 350°F to ensure even baking throughout the cake. Grease your 13×9-inch baking pan thoroughly with nonstick spray or butter to prevent sticking.
In a large mixing bowl, combine 1¾ cups all-purpose flour, 2 cups granulated sugar, ¾ cup cocoa powder, 2 teaspoons baking soda, 1 teaspoon baking powder, and 1 teaspoon salt. Whisk these dry ingredients until evenly distributed.
Add 2 large eggs, 1 cup buttermilk, 1 cup strong black coffee (cooled), ½ cup vegetable oil, and 2 teaspoons vanilla extract to the dry mixture. Beat with an electric mixer on medium speed for 2 minutes until the batter becomes smooth and well combined.
Bake the Cake
Pour the prepared batter into your greased baking pan, spreading it evenly with a rubber spatula. Bake for 30-35 minutes, or until a toothpick inserted in the center comes out with just a few moist crumbs attached.
Remove the cake from the oven and place it on a wire cooling rack. Allow the cake to cool for 15-20 minutes before proceeding to the next step, as the cake needs to be warm but not hot for optimal poke hole creation.
Create the Poke Holes
Using the handle of a wooden spoon or a thick skewer, poke holes evenly across the entire surface of the warm cake. Space the holes approximately 1 inch apart to ensure even filling distribution throughout the cake.
Make each hole about ¾ inch deep, pressing straight down without twisting to create clean openings. We recommend creating a grid pattern with roughly 48-60 holes across the entire cake surface for maximum filling absorption.
Make the Filling
Prepare the instant chocolate pudding by whisking 1 box of instant chocolate pudding mix with 2 cups cold whole milk in a medium bowl. Beat for 2 minutes until the mixture thickens to a smooth consistency.
In a small saucepan, gently warm ½ cup hot fudge sauce over low heat until it becomes pourable but not hot. Stir in ¼ cup heavy cream to create a smooth, glossy mixture that will flow easily into the poke holes.
Add the Poke Filling
Pour the prepared chocolate pudding slowly over the warm cake, using a rubber spatula to gently spread it across the surface. Allow gravity to help the pudding seep into the poke holes naturally.
Drizzle the warm fudge mixture evenly over the pudding layer, ensuring it reaches into the holes for maximum flavor penetration. Gently tap the pan on the counter to help settle the fillings into all the openings.
Prepare the Topping
Spread the 8 ounces of thawed whipped topping evenly across the filled cake using a rubber spatula or offset spatula. Create smooth, even coverage that seals in all the delicious fillings below.
Sprinkle ½ cup mini chocolate chips evenly over the whipped topping layer. Add ½ cup crushed chocolate sandwich cookies for extra texture and visual appeal.
Assemble and Chill
Cover the assembled cake tightly with plastic wrap, ensuring the covering doesn’t touch the decorated surface. Refrigerate for at least 4 hours or overnight to allow all the flavors to meld together and the cake to set properly.
Before serving, garnish with chocolate shavings using a vegetable peeler on a chocolate bar for an elegant finishing touch. Cut into squares and serve chilled for the best flavor and texture experience.
Directions for Serving

We recommend allowing our chocolate poke cake to chill for at least 4 hours before serving to ensure the filling has fully absorbed into the cake layers. The refrigeration time allows all flavors to meld together perfectly.
Slicing and Portioning
We slice the cake directly in the 9×13-inch pan using a sharp knife or wooden cake slicer for clean cuts. Each piece should be approximately 3×3 inches to provide generous portions that showcase the beautiful layers. We wipe the knife clean between cuts to maintain neat presentation lines.
Temperature and Presentation
We serve our chocolate poke cake chilled straight from the refrigerator for the best texture and flavor experience. The cool temperature enhances the creamy filling while maintaining the cake’s perfect moisture level. We place each slice on individual dessert plates using a wide spatula to preserve the layered appearance.
Garnishing Options
We add final touches just before serving to maintain visual appeal. Chocolate shavings scattered across each slice create an elegant finish. We can also dust lightly with cocoa powder using a fine-mesh sieve for sophisticated presentation. Mini chocolate chips or a drizzle of caramel sauce provide additional flavor and texture contrast.
Storage and Serving Timeline
| Storage Method | Duration | Best Quality |
|---|---|---|
| Refrigerated covered | 3-4 days | First 2 days |
| Room temperature | 2 hours maximum | Immediate consumption |
We keep leftover cake covered in the refrigerator and serve within 3-4 days for optimal freshness. Each slice maintains its rich chocolate flavor and moist texture when properly stored. We avoid leaving the cake at room temperature for more than 2 hours to preserve food safety and quality.

FARBERWARE STRONG: This baking pan's heavy-duty construction resists warping and heats evenly to brown beautifully and help reduce hot spots

Naturals bakeware is made of pure aluminum which will never rust for a lifetime of durability. Foods bake and brown evenly due to aluminum’s superior heat conductivity.

9" x 13" – Versatile size for everyday baking needs
Make-Ahead Instructions

Preparing our chocolate poke cake ahead of time allows the flavors to meld beautifully while making entertaining stress-free. We can complete most of the preparation up to two days before serving.

SET OF FOUR: Create an elegant and chic environment. They are perfect for all your kitchen and preparation needs. From pasta sauce to soup, our collection of wooden utensils for cooking is ideal for stirring, tasting, and mixing.

High quality material: The wooden coffee spoon is made of natural wood, with a smooth and solid surface. The long handle design is easy to operate, not easily deformed, and durable. The natural wood properties of long handle mini wooden mixing spoons give them natural anti sticking properties, making them particularly suitable for stirring viscous substances such as honey, syrup, or molasses, and easy to clean

Long-Handled Wooden Spoons: You will receive 2 large spoon, one 13 inches (approximately 33 cm) long and the other 11 inches (approximately 28 cm) long. The long handles keep your hands away from heat and steam, effectively preventing burns
Advance Preparation Timeline
| Timing | Steps to Complete |
|---|---|
| 2 days ahead | Bake cake, poke holes, add filling, refrigerate |
| Day of serving | Add final toppings and garnishes |
| 4 hours minimum | Chill time for optimal flavor absorption |
Step-by-Step Make-Ahead Process
Bake and Cool the Foundation
We start by preparing our chocolate cake batter and baking it in our greased 9×13-inch pan until a toothpick inserted in the center comes out clean. Allow the cake to cool for about 15 minutes before proceeding to the next step.
Create the Signature Holes
Using the handle of a wooden spoon or a similar utensil, we poke holes evenly across the entire surface of the warm cake. Space these holes approximately 1 inch apart to ensure even distribution of our chocolate filling.
Add the Chocolate Filling
We pour our prepared chocolate pudding mixture and warm chocolate sauce directly over the cake, allowing it to seep into every hole we created. The warm temperature helps the filling flow smoothly into the cake layers.
Initial Refrigeration
Cover the cake tightly with plastic wrap or aluminum foil and refrigerate for at least 4 hours or up to 2 days. This chilling period allows our chocolate filling to fully absorb and the flavors to develop.
Final Assembly Before Serving
Apply Fresh Toppings
Just before serving, we add our whipped cream topping, mini chocolate chips, and crushed chocolate cookies. Adding these elements at the last moment maintains their texture and prevents them from becoming soggy.
Garnish for Presentation
We finish with chocolate shavings or a light dusting of cocoa powder to create an elegant presentation that impresses our guests.
This make-ahead approach ensures our chocolate poke cake remains moist and flavorful while giving us the flexibility to focus on other party preparations when entertaining.
Storage Tips

Proper storage ensures our chocolate poke cake maintains its rich flavor and moist texture for days after preparation. We recommend storing the cake in an airtight container in the refrigerator where it will stay fresh for optimal enjoyment.

EASY AND DELICIOUS: Royal Instant Pudding is a quick and easy snack or dessert to be enjoyed by everyone – just add, pour, refrigerate and enjoy!

SUGAR-FREE DESSERT: Simply Desserts is a simply delish dessert made with clean ingredients. Every creamy spoonful is just as tasty—if not better—than your childhood favorite!

INDULGENT MILK CHOCOLATE PUDDING: Dove Dark Chocolate Pudding Mix features an irresistibly silky smooth and indulgent taste
Refrigerator Storage
We always store our chocolate poke cake in the refrigerator to preserve its creamy filling and prevent spoilage. The cake stays fresh for 3 to 7 days when properly covered in an airtight container. We cover the surface with cling film or plastic wrap to prevent the cake from absorbing other refrigerator flavors that could affect its taste.
Our poke cake actually improves with time as the liquid ingredients like sweetened condensed milk and pudding continue to infuse the cake layers. The dessert becomes increasingly moist and flavorful during refrigerated storage.
Freezer Storage
Long-term storage requires wrapping the cake thoroughly with plastic wrap followed by aluminum foil to prevent freezer burn. We can freeze our chocolate poke cake for up to 6 months while maintaining its quality and taste. When ready to serve we allow the frozen cake to thaw completely at room temperature before removing the wrapping.
Room Temperature Guidelines
Most poke cakes perform best when stored chilled but our chocolate version can sit at room temperature for up to one day if kept in a sealed container. We never leave the cake uncovered at room temperature for extended periods as this affects both texture and food safety.
Optimal Serving Conditions
We serve our chocolate poke cake chilled directly from the refrigerator for the best flavor and texture experience. The cool temperature enhances the contrast between the moist cake layers and creamy filling while maintaining the structural integrity of our carefully crafted dessert.
| Storage Method | Duration | Container Requirements |
|---|---|---|
| Refrigerator | 3-7 days | Airtight container with plastic wrap |
| Freezer | Up to 6 months | Plastic wrap + aluminum foil |
| Room Temperature | 1 day maximum | Sealed container |
Variations and Substitutions

We love how chocolate poke cake adapts to countless flavor combinations and dietary needs. This versatile dessert allows us to experiment with different components while maintaining its signature moist texture and rich taste.


Contains 1- 11.75 Ounce Jar of Smucker's Sugar Free Hot Fudge Topping

DECADENTLY RICH & CREAMY – Indulge in the velvety smooth texture and bold chocolate flavor of Mrs. Richardson’s Premium Hot Fudge. Crafted with real cream and cocoa, it delivers a luxurious dessert experience in every spoonful.
Cake Base Options
Our standard recipe uses boxed chocolate cake mix for convenience, but we can easily substitute homemade chocolate cake batter for more customized flavor control. Devil’s food cake creates an intensely rich chocolate experience, while dark chocolate cake delivers deeper cocoa notes. For those with dietary restrictions, gluten-free chocolate cake mix works seamlessly in place of traditional options.
Filling Variations
The poke filling offers endless creative possibilities beyond our classic chocolate pudding combination. We can create decadent chocolate ganache by melting heavy cream with chocolate chips for an ultra-rich filling that transforms each bite. Instant chocolate pudding mixed with cold milk provides a lighter, creamier texture that many prefer.
Sweetened condensed milk poured directly into the holes creates a sweeter, chewier filling reminiscent of tres leches cake. For chocolate peanut butter lovers, we recommend preparing a smooth peanut butter glaze that adds nutty richness to complement the chocolate base. Caramel sauce offers another popular variation that brings sweet complexity to every forkful.
Topping Transformations
We can customize the final layer to match any preference or occasion. Plain whipped cream serves as a classic choice, while chocolate-flavored whipped cream doubles down on cocoa intensity. Peanut butter whipped cream creates an irresistible combination for those who enjoy nutty desserts.
Store-bought whipped topping provides convenience without sacrificing taste, and chocolate frosting delivers a more traditional cake experience. For dairy-free options, we substitute plant-based whipped toppings that maintain the same light texture.
Creative Add-Ins and Garnishes
| Component | Standard Option | Popular Substitutions |
|---|---|---|
| Cake | Box mix | Homemade, gluten-free, dairy-free |
| Filling | Chocolate pudding | Ganache, caramel, peanut butter glaze |
| Topping | Whipped cream | Frosting, dairy-free alternatives |
| Garnish | Mini chocolate chips | Chopped pecans, caramel drizzle, cookie crumbs |
Chopped pecans add delightful crunch and nutty flavor that pairs beautifully with chocolate. Extra chocolate chips sprinkled on top reinforce the dessert’s chocolate identity, while caramel drizzle creates visual appeal and additional sweetness. Crushed chocolate sandwich cookies provide textural contrast and familiar flavors that appeal to all ages.
Dietary Accommodations
We can modify our chocolate poke cake to accommodate various dietary needs without compromising flavor. Sugar-free cake mix combined with sugar-free pudding creates a diabetic-friendly version that still satisfies chocolate cravings. Dairy-free chocolate and non-dairy whipped alternatives make this dessert accessible to those with lactose intolerance or vegan preferences.
These substitutions ensure everyone can enjoy this beloved dessert regardless of dietary restrictions or personal preferences. Each variation maintains the signature poke cake experience while offering unique flavor profiles that keep this classic dessert exciting and fresh.
Conclusion
We’ve shown you how chocolate poke cake transforms a simple dessert into something truly extraordinary. This versatile treat combines rich chocolate flavors with creamy textures that’ll impress guests at any gathering.
The beauty of this recipe lies in its flexibility and make-ahead convenience. Whether you’re hosting a dinner party or bringing dessert to a potluck we guarantee this cake will be the star of the show.
With proper storage techniques and endless customization options you can adapt this recipe to suit any dietary need or flavor preference. The result is always a moist decadent dessert that gets better with time.
Ready to create your own chocolate poke cake masterpiece? Gather your ingredients and let’s get baking!

Stores dry and with minimal footprint

Contains one 13-ounce can of the Original Reddi-wip Whipped Dairy Cream Topping

Storage and Handling - Thaw in refrigerator overnight. Suitable for use as cake icing or whipped cream alternative.
Frequently Asked Questions

Natural aluminum commercial bakeware is made of pure aluminum which will never rust for a lifetime of durability

RECTANGULAR BAKING PAN: 9 x 13 in. rectangular baking pan for cakes, brownies, and more

9 x 13 inch rectangular cake pan; made from aluminized steel; a mix of steel for strength and durability and aluminum for superior heat conductivity; oven safe to 450°F
What is a chocolate poke cake?
A chocolate poke cake is a dessert made by poking holes in a baked chocolate cake and filling them with rich, creamy ingredients like pudding or fudge sauce. This technique enhances the cake’s flavor and moisture, creating a decadent treat that’s perfect for gatherings and special occasions.
How long does it take to make a chocolate poke cake?
The active preparation time is about 30 minutes for mixing and baking the cake, plus 15 minutes for assembly. However, the cake needs to chill for at least 4 hours (preferably overnight) before serving to allow the filling to absorb properly and flavors to meld together.
What equipment do I need to make this cake?
Essential equipment includes a 13×9-inch baking pan, large mixing bowl, electric mixer, measuring cups, and a tool for poking holes (wooden spoon handle or skewer). Optional items like a piping bag for decorative toppings and a fine-mesh sieve can enhance presentation.
Can I make chocolate poke cake ahead of time?
Yes! You can prepare the cake up to two days in advance. Bake the cake, poke holes, add filling, and refrigerate. Add final toppings and garnishes on serving day to maintain their texture. The cake actually improves in flavor as it sits.
How should I store leftover chocolate poke cake?
Store covered in the refrigerator for 3-7 days for optimal freshness. The cake can be frozen for up to 6 months when properly wrapped. Don’t leave it at room temperature for more than 2 hours to maintain food safety and quality.
What are some popular variations for chocolate poke cake?
Popular variations include different fillings like chocolate ganache, caramel, or peanut butter glaze. You can use homemade or gluten-free cake bases, and customize toppings with whipped cream, chocolate frosting, or dairy-free alternatives to accommodate various dietary needs.
Why do I need to poke holes in the cake?
Poking holes allows the liquid filling to penetrate deep into the cake layers, creating maximum flavor infusion and moisture. This technique transforms a regular cake into an ultra-moist, flavorful dessert where every bite contains the delicious filling.
How do I get clean slices when serving?
Chill the cake for at least 4 hours before cutting. Use a sharp knife and slice directly in the pan for cleanest cuts. Wipe the knife between cuts to prevent the filling from creating messy edges. Serve chilled for best texture.