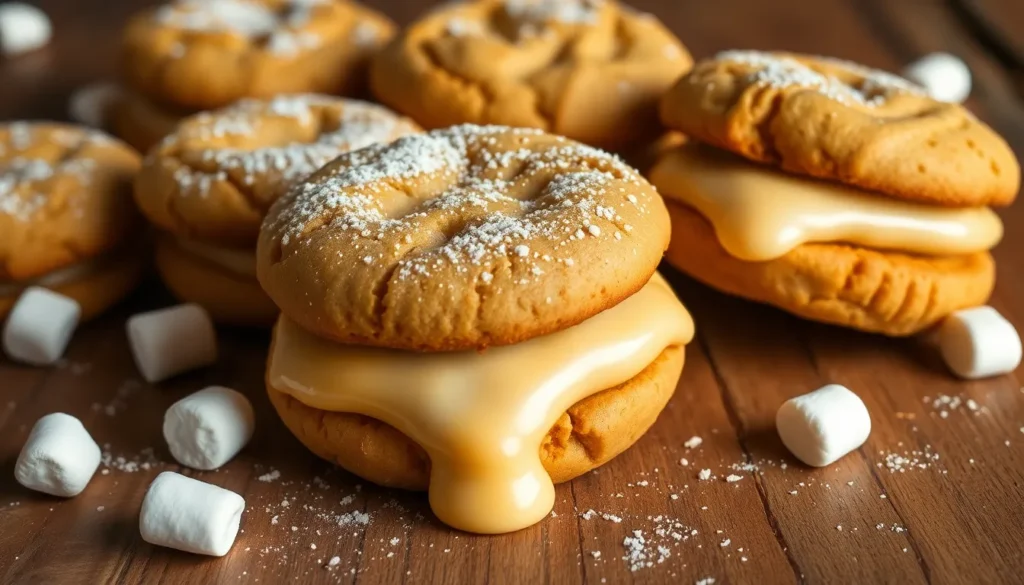
We’ve taken the beloved childhood sandwich and transformed it into something even more magical – fluffernutter cookies that’ll transport you straight back to your elementary school lunchbox days. These soft and chewy treats combine the nutty richness of peanut butter with pillowy marshmallow fluff in every single bite.
The fluffernutter sandwich originated in New England during the early 1900s, and we’re absolutely obsessed with this cookie version that captures all those nostalgic flavors. Each cookie delivers that perfect balance of salty and sweet that made the original sandwich such a hit.
Ingredients
These fluffernutter cookies require simple pantry staples that come together to create the perfect nostalgic treat. We’ve divided the ingredients into two essential components for easy preparation.
For the Peanut Butter Cookie Base
- 2 1/4 cups all-purpose flour
- 1 teaspoon baking soda
- 1 teaspoon salt
- 1 cup unsalted butter, softened to room temperature
- 3/4 cup granulated sugar
- 3/4 cup packed light brown sugar
- 2 large eggs, at room temperature
- 1 cup creamy peanut butter
- 2 teaspoons vanilla extract
For the Marshmallow Fluff Filling
- 1 cup marshmallow fluff (such as Fluff brand)
- 1/4 cup unsalted butter, softened
- 1 cup powdered sugar, sifted
- 1 teaspoon vanilla extract
- 2-3 tablespoons heavy cream or milk, as needed for consistency
Equipment Needed

We need exact kitchen tools to create perfect fluffernutter cookies that capture the nostalgic flavors we love. The right equipment ensures our cookies bake evenly and maintain their signature soft texture.
Large mixing bowl serves as our primary workspace for combining the peanut butter cookie base ingredients. We recommend using a bowl with at least 4-quart capacity to accommodate all ingredients without overflow during mixing.
Electric mixer makes creaming butter and sugars effortless, though we can achieve excellent results with a wooden spoon or rubber spatula if mixing by hand. Stand mixers work best for consistent texture, while hand mixers offer more control over mixing speed.
Baking sheets lined with parchment paper prevent our cookies from sticking and ensure even browning. We suggest using heavy-duty aluminum baking sheets that distribute heat evenly across the surface.
Cookie scoop or spoon helps us portion dough consistently for uniform baking results. A medium cookie scoop creates perfectly sized cookies that bake at the same rate.
Wire cooling racks allow air circulation around our freshly baked cookies, preventing soggy bottoms while maintaining the ideal chewy texture we desire.
Small mixing bowl becomes essential for preparing our marshmallow fluff filling separately from the cookie dough. This dedicated bowl prevents cross-contamination of flavors during preparation.
Rubber spatula assists with folding marshmallow fluff into cookies or spreading filling between cookie layers without deflating the mixture.
Measuring cups and spoons ensure accuracy in our ingredient ratios, which directly impacts the final texture and flavor balance of our fluffernutter cookies.
Instructions

Creating these nostalgic fluffernutter cookies requires precise timing and technique to achieve the perfect balance of peanut butter richness and marshmallow sweetness. Follow these detailed steps to ensure your cookies maintain their signature soft texture and gooey center.
Prep the Cookie Dough
In a large bowl, combine 1 cup peanut butter, ½ cup unsalted butter, ½ cup light brown sugar, and ⅓ cup granulated sugar. Mix using a hand mixer or stand mixer until the mixture becomes smooth and creamy, approximately 2-3 minutes. Add 1 large egg and 1 teaspoon vanilla extract to the creamed mixture and blend until fully incorporated.
Whisk together 1½ cups all-purpose flour, 1 teaspoon baking soda, and ⅛ teaspoon kosher salt in a separate bowl. Gradually incorporate the dry ingredients into the wet mixture, mixing until just combined. Avoid overmixing to maintain the cookies’ tender texture. The finished dough should feel soft and pliable to the touch.
Shape and Bake the Cookies
Line baking sheets with parchment paper and preheat your oven to 350°F. Using a 2-tablespoon cookie scoop, portion the dough onto the prepared baking sheets. Gently flatten each dough ball into a disk measuring approximately 3 inches in diameter using your fingers or the bottom of a glass.
Space the flattened dough disks at least 2 inches apart on the baking sheets to allow for spreading during baking. The uniformly shaped disks will ensure even baking and consistent cookie size throughout the batch.
Prepare the Marshmallow Filling
Select standard-sized marshmallows for optimal filling distribution, using approximately 12 marshmallows per batch. Cut each marshmallow in half using kitchen shears or a sharp knife to create manageable pieces for encasing. Alternatively, measure 1 tablespoon of marshmallow fluff for each cookie if using the spreadable version.
Keep the marshmallow pieces or fluff at room temperature to ensure easy sealing within the cookie dough. This preparation step prevents the marshmallow from becoming too sticky or difficult to work with during assembly.
Assemble the Fluffernutter Cookies
Place one marshmallow half or 1 tablespoon of marshmallow fluff in the center of each flattened dough disk. Carefully bring the edges of the dough up and around the marshmallow filling, ensuring complete enclosure to prevent leakage during baking. Gently reshape each filled cookie into a smooth ball with your hands.
Press a few peanut butter chips into the top of each cookie if desired for extra flavor and visual appeal. Arrange the assembled cookies on your prepared baking sheets and bake for 9-10 minutes, or until the edges appear lightly browned. Transfer the finished cookies to a wire rack and allow them to cool completely before serving for the best texture and flavor development.
Storage and Make-Ahead Tips

Now that we’ve created these delicious fluffernutter cookies, let’s explore the best ways to store them and prepare components ahead of time. Proper storage techniques will help maintain their soft texture and prevent the marshmallow filling from becoming sticky.
Storing Assembled Cookies
We recommend storing our finished fluffernutter cookies in a well-sealed container at room temperature for up to 5 days. The airtight seal prevents the cookies from becoming stale while protecting the marshmallow filling from absorbing moisture. When stacking cookies in the container, place a piece of wax paper between each layer to prevent the marshmallow components from sticking together.
For longer storage, we can freeze assembled cookies in an airtight container or freezer bag for up to 3 months. This method preserves both the cookie texture and marshmallow filling quality. To thaw frozen cookies, let them sit at room temperature for 1 to 3 hours until they reach the desired consistency. We can also briefly warm them in the oven, though we must watch the marshmallow parts carefully to prevent melting.
Make-Ahead Instructions
Our peanut butter cookie dough can be prepared well in advance of the final assembly and baking process. This approach saves time during busy baking sessions while ensuring fresh cookies when needed.
We find the most convenient make-ahead method involves assembling complete dough balls with their marshmallow filling. After shaping the filled cookies, flash freeze them on a baking sheet for 30 minutes until firm. Transfer the frozen dough balls to a zip-top bag or sealed container where they can be stored for up to 2 months.
| Storage Method | Duration | Temperature |
|---|---|---|
| Room Temperature (Assembled) | 5 days | Standard room temp |
| Frozen (Assembled) | 3 months | Freezer |
| Frozen (Dough Balls) | 2 months | Freezer |
When we’re ready to bake frozen dough balls, there’s no need to thaw them first. Simply place the frozen cookies directly into a preheated 350°F oven and bake for 13 to 15 minutes. This technique delivers freshly baked cookies with minimal preparation time while maintaining the same soft texture and balanced flavors as immediate baking.
Serving Suggestions

These delightful fluffernutter cookies shine brightest when we serve them warm and gooey. We recommend letting them cool for just 10-15 minutes after baking to achieve that perfect soft and chewy texture that makes the marshmallow filling irresistibly gooey.
Brunch Pairings: Transform your morning spread by adding these cookies alongside savory breakfast items like breakfast burritos and homestyle potatoes. The sweet marshmallow and peanut butter combination creates a delightful contrast to hearty breakfast flavors. We love how these cookies bring childhood nostalgia to adult brunch gatherings.
Snack Time Companions: Elevate your afternoon treat by pairing fluffernutter cookies with seasonal beverages. An iced gingerbread latte complements the nutty sweetness beautifully during fall months. For summer indulgence we suggest serving them with pumpkin spice latte ice cream for a cool twist on warm cookie comfort.
Dessert Course Excellence: Our fluffernutter cookies pair exceptionally well with homemade ice cream varieties. Vanilla bean ice cream allows the peanut butter and marshmallow flavors to take center stage. Chocolate ice cream creates an indulgent combination reminiscent of campfire s’mores.
Temperature Serving Guide:
| Serving Temperature | Texture | Best Pairing |
|---|---|---|
| Warm (10-15 min cooled) | Soft and gooey | Hot beverages |
| Room temperature | Chewy | Cold beverages |
| Chilled | Firm | Ice cream |
We find these cookies work beautifully for special occasions like birthday parties or family gatherings where guests of all ages can enjoy the familiar flavors. The soft texture makes them perfect for children while the sophisticated flavor balance appeals to adult palates.
Recipe Variations

We love experimenting with the classic fluffernutter cookie to create exciting new flavors and textures. These variations maintain the beloved peanut butter and marshmallow combination while adding unique twists that will surprise your taste buds.
Mini Fluffernutter Bites
Transform our classic recipe into adorable party sized treats perfect for gatherings and snack time. We portion the dough into smaller balls using a small cookie scoop or teaspoon to create uniform bite sized pieces. Each mini cookie requires about half the marshmallow fluff of the original recipe to maintain the proper filling to cookie ratio.
| Variation Detail | Mini Bites |
|---|---|
| Preparation Time | 25-30 minutes |
| Baking Time | 8-10 minutes |
| Portion Size | 1 teaspoon dough |
| Yield | 48-60 mini cookies |
Bake these miniature versions until they turn lightly golden around the edges. The reduced size means they cook faster so we watch them carefully to prevent overbaking. These mini bites are ideal for dessert tables and lunch boxes where portion control matters.
Chocolate Drizzled Version
Elevate our fluffernutter cookies by adding a decadent chocolate finish that creates visual appeal and extra indulgence. We melt chocolate chips using a double boiler or microwave in 30 second intervals until smooth and glossy. Once our cookies cool completely on wire racks we drizzle the melted chocolate over the tops using a fork or piping bag.
The chocolate hardens within 15 minutes at room temperature creating a beautiful contrast against the golden cookie surface. We recommend using semi sweet chocolate chips as they balance the sweetness of the marshmallow fluff perfectly. Dark chocolate works wonderfully for those who prefer a more sophisticated flavor profile.
Graham Cracker Twist
Add delightful crunch and camping nostalgia by incorporating crushed graham crackers directly into our peanut butter cookie dough. We crush about 4-5 whole graham crackers into coarse pieces using a food processor or rolling pin wrapped in a clean kitchen towel. The graham cracker pieces should range from fine crumbs to small chunks for varied texture.
Mix the crushed graham crackers into the dough after combining the wet and dry ingredients but before shaping the cookies. This variation reminds us of s’mores while maintaining the signature fluffernutter flavor combination. The graham crackers add a subtle honey sweetness and satisfying crunch that complements the soft marshmallow center beautifully.
Troubleshooting Tips

Even experienced bakers encounter challenges when making fluffernutter cookies. We’ve compiled the most common issues and their answers to help you achieve perfect results every time.
Butter Temperature Issues
Room temperature butter creates the ideal cookie texture. We recommend testing your butter by gently pressing it with your finger – it should leave an indent without being too soft or melting. Cold butter leads to dense cookies while overly warm butter causes excessive spreading during baking.
Marshmallow Fluff Handling Problems
Marshmallow fluff sticks to everything it touches. We solve this by dipping our spoon in water before scooping the fluff – this simple trick prevents the sticky mess and ensures clean measurements. Keep a small bowl of water nearby throughout the assembly process for easy access.
Cookie Dough Coverage Challenges
The cookie dough must fully cover the marshmallow cream to prevent cracking during baking. We pinch the dough edges together firmly and roll the assembled cookie gently between our palms to seal any gaps. Exposed marshmallow creates unsightly cracks and affects the final texture.
Marshmallow Selection Mistakes
Never substitute regular marshmallows for marshmallow fluff in this recipe. Regular marshmallows melt completely during baking and create a sticky center that never sets properly. Marshmallow fluff maintains its structure and creates the signature chewy texture we want in these cookies.
Baking Time Monitoring
Fluffernutter cookies bake faster than traditional peanut butter cookies due to the marshmallow filling. We check our cookies at 8 minutes instead of the usual 10-12 minutes for regular cookies. The edges should be lightly golden while the centers appear slightly underbaked – they’ll continue cooking on the hot pan.
Cooling and Transfer Issues
Allow cookies to cool on the baking sheet for 3-4 minutes before transferring to prevent the soft centers from falling apart. We use a thin spatula and support each cookie from underneath during the transfer. Moving them too quickly results in broken cookies and messy cleanup.
Conclusion
These irresistible fluffernutter cookies bring childhood nostalgia straight to your kitchen with their perfect blend of creamy peanut butter and gooey marshmallow filling. We’ve covered everything you need to create bakery-quality treats at home from essential ingredients to troubleshooting tips.
Whether you’re making them for a special occasion or simply craving that classic New England flavor combination these cookies deliver every time. The make-ahead options and storage tips ensure you can enjoy fresh warm cookies whenever the craving strikes.
Don’t hesitate to experiment with our suggested variations – each twist adds its own delightful surprise while maintaining that beloved peanut butter and marshmallow magic we all remember and love.
Frequently Asked Questions
What are fluffernutter cookies?
Fluffernutter cookies are a delicious twist on the classic New England fluffernutter sandwich. These soft and chewy cookies combine a peanut butter cookie base with a marshmallow fluff filling, creating the perfect balance of salty and sweet flavors that evoke childhood memories.
What ingredients do I need to make fluffernutter cookies?
You’ll need two main components: peanut butter cookie base ingredients (all-purpose flour, baking soda, salt, butter, granulated sugar, brown sugar, eggs, peanut butter, vanilla extract) and marshmallow fluff filling ingredients (marshmallow fluff, butter, powdered sugar, vanilla extract, heavy cream or milk).
What kitchen equipment is essential for making these cookies?
Key equipment includes a large mixing bowl, electric mixer, baking sheets with parchment paper, cookie scoop, wire cooling racks, and measuring cups and spoons. These tools ensure even baking and help maintain the cookies’ signature soft texture.
How should I store fluffernutter cookies?
Store assembled cookies in a well-sealed container at room temperature for up to 5 days or freeze for up to 3 months. Proper storage prevents the marshmallow filling from becoming sticky and maintains the cookies’ soft texture.
Can I make fluffernutter cookie dough ahead of time?
Yes! You can prepare the peanut butter cookie dough in advance, assemble filled dough balls, and flash freeze them. When ready to bake, place frozen dough balls directly into a preheated oven for freshly baked cookies with minimal preparation time.
What are some popular variations of fluffernutter cookies?
Popular variations include mini fluffernutter bites (party-sized versions), chocolate-drizzled cookies with melted chocolate on top, and graham cracker twist cookies that incorporate crushed graham crackers for a s’mores-like crunch while maintaining the classic peanut butter and marshmallow combination.
How should fluffernutter cookies be served?
Fluffernutter cookies are best served warm and gooey. They pair wonderfully with savory breakfast items for brunch, seasonal beverages for snack time, and homemade ice cream for dessert. They’re perfect for special occasions and appeal to both children and adults.
What are common troubleshooting tips for making fluffernutter cookies?
Key tips include ensuring proper butter temperature, handling marshmallow fluff carefully to prevent sticking, sealing cookie dough properly around the filling, using the correct type of marshmallow, monitoring baking times closely, and handling cookies gently during cooling and transfer.


