Hot milk cake brings back memories of our grandmothers’ kitchens with its incredibly tender crumb and nostalgic vanilla flavor. This classic American dessert gained popularity in the early 1900s and remains a beloved staple because it’s surprisingly simple yet delivers bakery-quality results every time.
What makes this cake special is the technique of heating milk and butter together before incorporating them into the batter. This creates an exceptionally moist texture that stays fresh for days. We love how this cake strikes the perfect balance between rich and light – it’s substantial enough to satisfy but never feels heavy.
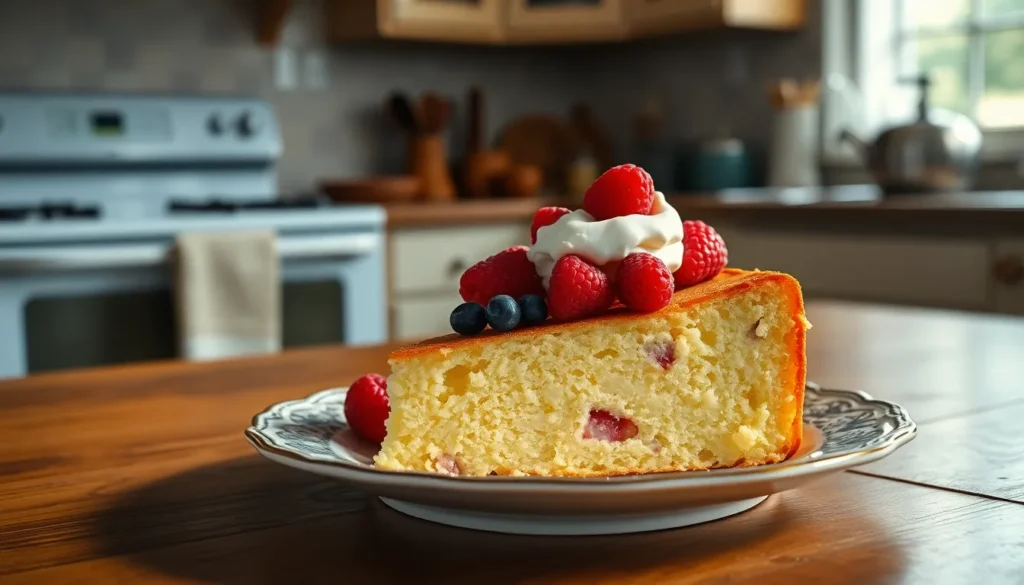
Whether you’re serving it plain with a dusting of powdered sugar or dressing it up with fresh berries and whipped cream, hot milk cake adapts beautifully to any occasion. It’s the kind of foolproof recipe that builds confidence in novice bakers while delivering the comfort food satisfaction we all crave.
Ingredients
We’ll need just a handful of pantry staples to create this tender and flavorful hot milk cake. The beauty lies in the simplicity of these common ingredients working together to produce extraordinary results.
For the Cake
- 2 large eggs, room temperature
- 1 cup granulated sugar
- 1 cup all-purpose flour
- 1 teaspoon baking powder
- 1/2 teaspoon salt
- 1/2 cup whole milk
- 4 tablespoons unsalted butter
- 1 teaspoon vanilla extract
For the Frosting (Optional)
- 1/2 cup unsalted butter, softened
- 3 cups powdered sugar
- 1/4 cup whole milk
- 1 teaspoon vanilla extract
- 1/4 teaspoon salt


Equipment Needed

We recommend gathering these essential tools before starting our hot milk cake recipe to ensure smooth preparation and professional results.
Mixing Equipment
- Electric mixer (stand or hand mixer) for beating eggs and sugar to the perfect fluffy consistency
- Large mixing bowls for combining wet and dry ingredients separately
- Wire whisk for manual mixing when needed
Baking Essentials
- 9×13 inch baking pan for creating the ideal cake thickness and serving size
- Measuring cups and spoons for accurate ingredient proportions
- Rubber spatula for folding ingredients and scraping bowls clean
Cooking Tools
- Medium saucepan for heating milk and butter to the proper temperature
- Wooden spoon for stirring the hot milk mixture
- Fine mesh sieve for sifting dry ingredients if desired
Additional Items
- Oven thermometer to verify accurate 350°F temperature
- Toothpick or cake tester for checking doneness
- Wire cooling rack for proper cake cooling
- Parchment paper or cooking spray for pan preparation
Having these tools ready transforms our baking process from chaotic to organized. The electric mixer proves particularly crucial for achieving the light and airy texture that makes this cake special. Our saucepan needs sufficient capacity to heat the milk and butter mixture without overflow while allowing easy stirring access.
Quality equipment directly impacts our final results. Sharp measuring tools ensure precision while sturdy mixing bowls prevent ingredient spillage during the vigorous beating process that creates this cake’s signature texture.


Instructions

These step-by-step instructions will guide you through creating our signature hot milk cake with its distinctive tender crumb and bakery-quality texture. We’ll walk you through each stage to ensure perfect results every time.
Prep the Pan and Oven
We start by preheating our oven to 350°F for optimal baking temperature. Thoroughly grease our 9×13-inch baking pan with butter or cooking spray. Dust the greased pan with flour and tap out any excess to prevent sticking. This preparation ensures our cake releases cleanly after baking.
Heat the Milk and Butter
We combine 1/2 cup whole milk and 4 tablespoons unsalted butter in our medium saucepan. Heat the mixture over medium-low heat while stirring occasionally. Watch for tiny bubbles to form around the edges just before boiling point. Remove from heat immediately when bubbles appear and set aside to keep warm.
Mix the Dry Ingredients
We whisk together 1 cup all-purpose flour, 1 teaspoon baking powder, and 1/2 teaspoon salt in a medium bowl. Ensure all dry ingredients are evenly distributed throughout the mixture. Set this flour mixture aside until we’re ready to incorporate it into our batter.
Combine Wet Ingredients
We beat 2 large eggs in our stand mixer at medium-high speed for 3 to 5 minutes until they become fluffy and pale yellow. Gradually add 1 cup granulated sugar while continuing to beat until the mixture becomes thick and voluminous. Add 1 teaspoon vanilla extract and mix well to combine all wet ingredients.
Create the Batter
We reduce our mixer speed to low and add the dry ingredients in batches to the egg mixture. Mix until just combined without overbeating the batter. Gradually pour in our hot milk and butter mixture while mixing continuously. The finished batter will be thin and smooth, which creates our cake’s signature light texture.
Bake the Cake
We pour the batter into our prepared 9×13-inch pan and spread it evenly. Bake for 28 to 35 minutes until the top turns golden brown. Test doneness by inserting a toothpick into the center; it should come out clean or with just a few moist crumbs. Cool the cake in the pan for 10 minutes before inverting onto a wire rack to cool completely.


Directions for Serving

Once our hot milk cake has finished baking we need to follow proper serving protocols to achieve the best results. The cooling process and presentation choices will determine the final quality of our dessert.
Cooling the Cake
We must allow the cake to cool completely in the pan on a wire rack after removing it from the oven. This cooling method prevents the delicate structure from breaking apart when we remove it from the pan. The cooling process typically takes 45 minutes to 1 hour depending on room temperature. We recommend avoiding the temptation to remove the cake early as the residual heat continues to set the texture during this critical period.
Frosting Options
Our hot milk cake pairs beautifully with several frosting and topping combinations. We can dust the surface lightly with powdered sugar for an elegant and sweet finishing touch that highlights the cake’s natural flavor. For those seeking richer options we recommend preparing a caramel coconut topping using brown sugar butter evaporated milk coconut and nuts which creates a decadent flavor profile. Chocolate lovers will appreciate a thick layer of chocolate fudge frosting that complements the cake’s dense yet tender crumb structure.
Serving Suggestions
We have multiple serving approaches that showcase this versatile cake effectively. Fresh fruit and whipped cream create a refreshing dessert presentation when we top generous slices with berries and dollops of cream. Drizzling chocolate or caramel sauce over individual portions adds extra sweetness and visual appeal. For a creative twist we can arrange fruit like peaches or plums on the bottom of our baking pan before adding batter to create an impressive fruit upside down variation. We slice the cooled cake into generous portions and can enhance each serving with our preferred toppings or sauces for a customized dessert experience.


Storage Instructions

Proper storage keeps our hot milk cake fresh and delicious for days after baking. We recommend allowing the cake to cool completely before storing to prevent moisture accumulation that could affect texture and flavor.
Room Temperature Storage
We can store our hot milk cake at room temperature using an airtight container or by wrapping it tightly with cling wrap and foil. This method keeps the cake fresh for up to three to five days depending on our wrapping technique and kitchen conditions.
| Storage Method | Duration | Best For |
|---|---|---|
| Airtight container | 3-5 days | Daily serving |
| Cling wrap + foil | 3-5 days | Transport and gifting |
Refrigerated Storage
For extended freshness we place our cake in an airtight container and store it in the refrigerator for up to seven days. This option works particularly well when we live in humid climates or want to preserve frosted cake layers.
Freezer Storage
We can freeze our hot milk cake for two to six months by wrapping individual slices or the entire cake in plastic wrap before placing them in ziplock bags. This method preserves the cake’s signature tender crumb and allows us to enjoy portions whenever we desire.
When we’re ready to serve frozen cake we allow it to thaw completely at room temperature or in the refrigerator. The thawing process restores the cake’s original moisture and texture making it taste freshly baked.
Tips for Perfect Hot Milk Cake

Achieving bakery-quality results with hot milk cake requires attention to several key techniques that distinguish this classic dessert. We’ve gathered essential tips that ensure consistent success every time you bake this beloved recipe.
Master the Scalded Milk Technique
The foundation of exceptional hot milk cake lies in properly scalding the milk and butter mixture. We heat the milk and butter gently until small bubbles form around the edges of the pan rather than allowing it to reach a full boil. This precise temperature control preserves the milk’s natural sweetness while preventing the butter from separating. The scalded milk method enhances the cake’s tenderness and helps dissolve sugar and butter evenly throughout the batter.
Choose Whole Milk for Superior Texture
Whole milk delivers the best texture and flavor results in hot milk cake. Lower-fat milk alternatives produce a less tender cake with reduced richness. The fat content in whole milk contributes significantly to the cake’s signature moist crumb and delicate structure.
Prevent Dense Results Through Proper Mixing
Over-mixing ranks among the most common mistakes when preparing hot milk cake batter. We recommend mixing ingredients just enough to combine them thoroughly without overworking the gluten. Excessive mixing leads to a dense or dry cake that lacks the characteristic light texture this recipe is known for.
Time Your Baking Perfectly
Avoiding over-baking preserves the cake’s essential moisture content. We bake until a toothpick inserted in the center emerges clean or with just a few moist crumbs clinging to it. The cake should spring back lightly when touched in the center and pull slightly away from the pan edges.
Cool Strategically for Best Results
Proper cooling prevents structural damage to your finished cake. We allow the cake to rest in the pan for approximately 10 minutes before transferring it to a wire rack or serving plate. This brief cooling period lets the cake set while remaining warm enough to release easily from the pan without breaking.
Maximize Freshness Through Proper Storage
Hot milk cake maintains its quality when stored correctly in an airtight container at room temperature. The cake stays fresh for up to 5 days when protected from air exposure. This extended shelf life makes hot milk cake an excellent choice for advance preparation or enjoying over several days.


Variations and Flavor Options

The beauty of hot milk cake lies in its adaptability to different flavors while maintaining its signature moist texture. We can transform this classic recipe into exciting variations that suit any taste preference or occasion.
Chocolate Hot Milk Cake
We create this rich variation by adding 1/4 cup of unsweetened cocoa powder to our dry ingredients and replacing the regular milk with scalded chocolate milk. The cocoa powder should be sifted with the flour to prevent lumps from forming in our batter. We heat the chocolate milk and butter mixture until it reaches the proper scalding temperature just as we do with the original recipe.
Our chocolate version delivers an intensely rich flavor that pairs beautifully with chocolate fudge frosting. We recommend using high-quality cocoa powder for the best results and deepest chocolate taste. The scalded chocolate milk enhances the cake’s moisture while amplifying the chocolate flavor throughout every bite.
Lemon Hot Milk Cake
We brighten the traditional recipe by incorporating 2 tablespoons of fresh lemon zest and 2 tablespoons of fresh lemon juice into our batter. The lemon zest gets mixed directly into the sugar during the creaming process to release its essential oils. We add the lemon juice to the wet ingredients along with the vanilla extract.
Fresh lemons provide the most vibrant flavor compared to bottled juice. We ensure the lemon juice is at room temperature before adding it to prevent the batter from curdling. This citrusy variation offers a perfect balance of sweet and tart flavors that makes it ideal for spring and summer gatherings.
Vanilla Bean Hot Milk Cake
We elevate the classic recipe by using the seeds from one vanilla bean pod or increasing the vanilla extract to 2 teaspoons for enhanced vanilla depth. When using vanilla bean paste we substitute 1 tablespoon for the regular extract. The vanilla bean seeds get scraped directly into the sugar during mixing to distribute the flavor evenly.
Premium vanilla extract or vanilla bean paste creates a more complex flavor profile than standard extract. We can finish this elegant variation with a simple dusting of powdered sugar to showcase the pure vanilla flavor. The tiny black specks from vanilla bean seeds create an appealing visual element that signals the cake’s gourmet quality.


Make-Ahead Instructions

We love that hot milk cake offers excellent make ahead flexibility for busy schedules and special occasions. Our testing shows this cake actually improves in flavor and texture when prepared in advance.
Complete Cake Preparation
We recommend baking the entire cake up to one week before serving when stored properly in the refrigerator. Allow the cake to cool completely in the pan before wrapping tightly with plastic wrap followed by aluminum foil. This double wrapping method prevents moisture loss and maintains the signature tender crumb we cherish in hot milk cake.
For longer storage periods we suggest freezing the wrapped cake for up to 3 to 4 months. The cake maintains its quality remarkably well during freezing thanks to the hot milk technique that creates superior moisture retention. When ready to serve simply transfer the frozen cake to the refrigerator and thaw overnight.
Batter Preparation Strategy
We find that hot milk cake batter should be baked immediately after mixing for optimal results. The hot milk and butter mixture activates the leavening agents instantly which means the batter cannot sit without losing its lift and airy texture. This differs from other cake batters that can wait briefly before baking.
Frosting Timeline
We suggest preparing any frosting or glazes on the day of serving for best flavor and appearance. Most buttercream frostings can be made up to three days ahead and stored in the refrigerator. Simply bring the frosting to room temperature and rewhip before spreading on the cake.
Storage Requirements
| Storage Method | Duration | Temperature | Wrapping Requirements |
|---|---|---|---|
| Refrigerated | Up to 1 week | 35-40°F | Tight plastic wrap + foil |
| Frozen | 3-4 months | 0°F | Double wrapped airtight |
| Room Temperature | 3-5 days | 68-72°F | Airtight container |
The versatility of advance preparation makes hot milk cake perfect for entertaining since we can focus on other menu items while the cake waits patiently. We always label frozen cakes with the baking date to track storage time accurately.
Conclusion
Hot milk cake proves that sometimes the most beloved recipes are also the simplest ones. We’ve shown you how this timeless dessert delivers bakery-quality results with minimal fuss and maximum flavor satisfaction.
Whether you’re planning ahead for a special occasion or craving a comforting treat tonight this cake adapts to your schedule beautifully. The make-ahead flexibility means you can bake with confidence knowing your dessert will taste even better tomorrow.
From classic vanilla to chocolate and lemon variations there’s a hot milk cake for every palate and season. We encourage you to start with the traditional recipe then explore the flavor possibilities that make this cake truly your own.
Frequently Asked Questions
What is hot milk cake and why is it special?
Hot milk cake is a nostalgic American dessert that gained popularity in the early 1900s. Its unique preparation method involves heating milk and butter together, creating a tender, moist crumb that stays fresh for days. The cake offers bakery-quality results with simple ingredients and techniques, making it perfect for both novice and experienced bakers.
What ingredients do I need to make hot milk cake?
The basic recipe requires 2 large eggs, 1 cup granulated sugar, 1 cup all-purpose flour, 1 teaspoon baking powder, 1/2 teaspoon salt, 1/2 cup whole milk, 4 tablespoons unsalted butter, and 1 teaspoon vanilla extract. Optional frosting ingredients include butter, powdered sugar, milk, vanilla, and salt.
What equipment is essential for making hot milk cake?
Key equipment includes an electric mixer for fluffy consistency, large mixing bowls, a 9×13 inch baking pan, a medium saucepan for heating milk and butter, accurate measuring cups and spoons, and a wire cooling rack. Quality equipment ensures professional results and the cake’s signature texture.
How do I bake the perfect hot milk cake?
Preheat oven to 350°F and prepare your pan. Heat milk and butter, mix dry ingredients separately, beat eggs and sugar until fluffy, combine wet and dry ingredients, then fold in the hot milk mixture. Bake until golden brown and a toothpick comes out clean.
How should I store hot milk cake?
Allow the cake to cool completely before storing. Keep at room temperature in an airtight container for 3-5 days, refrigerate for up to 7 days, or freeze for 2-6 months. Proper wrapping prevents moisture loss and maintains the cake’s tender texture.
Can I make variations of hot milk cake?
Yes! Popular variations include chocolate (add cocoa powder and chocolate milk), lemon (incorporate fresh zest and juice), and vanilla bean (use vanilla bean seeds or extra extract). Each variation maintains the signature moist texture while offering different flavor profiles.
Can I make hot milk cake ahead of time?
Hot milk cake actually improves when made in advance. Bake up to one week before serving when properly wrapped, or freeze for 3-4 months. However, bake the batter immediately after mixing, and prepare frostings on the day of serving for best results.
What are the best serving suggestions for hot milk cake?
This versatile cake can be served plain with powdered sugar, topped with fresh fruit and whipped cream, drizzled with chocolate or caramel sauce, or frosted with chocolate fudge or caramel coconut frosting. It’s perfect for any occasion and can be customized to personal preferences.