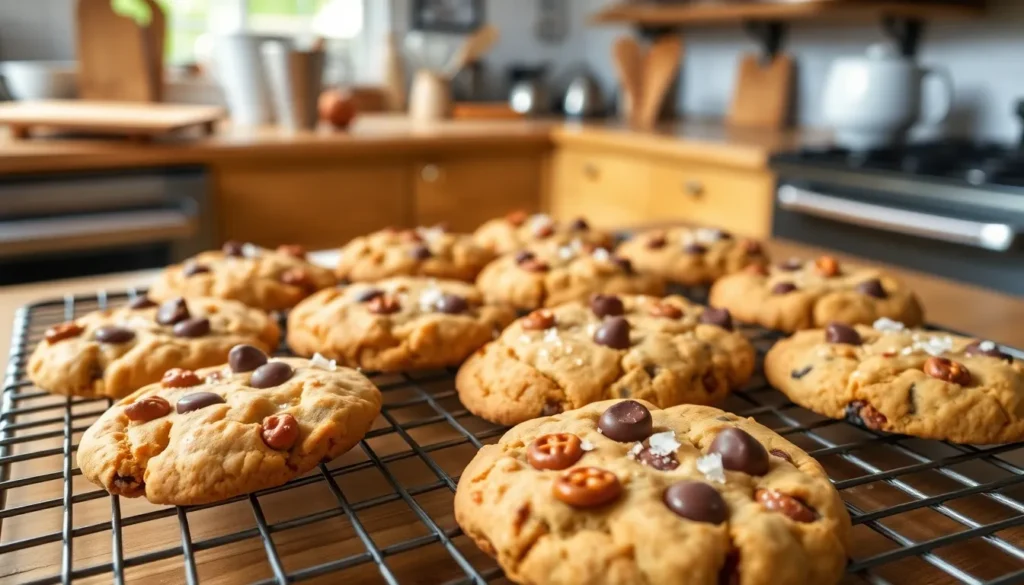
We’ve all been there – staring at a pantry full of random ingredients and wondering what delicious magic we can create. That’s exactly how kitchen sink cookies came to be! These wonderfully chaotic treats got their name because they contain “everything but the kitchen sink,” making them the perfect solution for using up those odds and ends cluttering your baking supplies.
What makes kitchen sink cookies absolutely irresistible is their unpredictable nature. Each bite delivers a different combination of textures and flavors – maybe you’ll get a chunk of chocolate with a salty pretzel, or perhaps a sweet dried cranberry paired with a crunchy walnut. We love how these cookies celebrate imperfection and turn potential food waste into something extraordinary.
The beauty of this recipe lies in its flexibility. We’ll show you how to create the perfect base that can handle whatever mix-ins you’ve got on hand, ensuring every batch becomes your new favorite cookie adventure.
What Are Kitchen Sink Cookies
Kitchen sink cookies get their quirky name from the saying “everything but the kitchen sink.” We load these versatile treats with whatever sweet and salty ingredients we have on hand. The beauty lies in their unpredictable nature since no two batches ever turn out exactly the same.
These cookies embrace the philosophy of creative baking without strict rules. We combine classic cookie staples like chocolate chips and oats with unexpected additions such as pretzels, dried fruit, nuts, and even cereal. The result creates a delightful medley of textures and flavors that keeps everyone guessing with each bite.
Our kitchen sink cookies serve as the perfect vehicle for using up pantry odds and ends. We transform random leftover ingredients into something delicious rather than letting them go to waste. This approach makes baking both economical and environmentally conscious.
The base recipe provides a sturdy foundation that can support many mix-ins without compromising the cookie’s structure. We typically include a combination of sweet elements like chocolate or butterscotch chips alongside salty components such as crushed potato chips or pretzels. Dried fruits add chewy texture while nuts contribute satisfying crunch.
What makes these cookies special is their ability to surprise us with unexpected flavor combinations. We might discover that coconut flakes pair beautifully with dark chocolate and sea salt or that dried cranberries complement white chocolate and pistachios perfectly. Each ingredient brings its own personality to the mix while contributing to the overall harmony of the cookie.


Ingredients

Our kitchen sink cookie recipe starts with a solid foundation of basic baking ingredients before we add the exciting mix-ins that make these cookies special. We’ve organized everything into three simple categories to make your baking process smooth and enjoyable.
Dry Ingredients
We begin with the essential dry ingredients that create our cookie base:
- All-purpose flour: 2 1/2 cups (approximately 338g)
- Baking soda: 1 to 1 3/4 teaspoons
- Salt: 1 to 1 1/4 teaspoons
- Baking powder: 1/2 teaspoon (optional for extra lift)
Wet Ingredients
Our wet ingredients bind everything together and create the perfect cookie texture:
- Unsalted or salted butter: 1 cup (softened to room temperature)
- Light brown sugar: 1 cup (200g)
- Granulated sugar: 1/2 cup (100g)
- Large eggs: 2 eggs
- Vanilla extract: 2 teaspoons
Mix-Ins and Add-Ons
Here’s where we get creative with our pantry ingredients. We recommend using any combination of these favorites:
- Chocolate chips: 1 cup each of milk chocolate and semisweet chocolate chips
- Crushed pretzels: 1 cup for that perfect salty crunch
- Potato chips: 1 cup (lightly crushed)
- Graham crackers: About 4 crackers broken into pieces
- Toffee bits: 1 cup for caramel sweetness
- M&M’s: Varies by preference
- Dried fruits: Dried cranberries and apricots work beautifully
- Flaky sea salt: Optional finishing touch
The beauty of kitchen sink cookies lies in their flexibility. We can substitute any of these mix-ins based on what’s available in our pantry or our personal taste preferences.


Equipment Needed

We keep the equipment requirements simple for kitchen sink cookies since they rely on standard baking tools found in most kitchens. Our core equipment list ensures smooth preparation without requiring specialized gadgets.
Essential Equipment:
- Stand mixer or hand mixer for creaming butter and sugars
- Large mixing bowls for combining ingredients
- Half sheet pan or rimmed baking sheet for even baking
- Parchment paper or silicone baking mat to prevent sticking
- Wire cooling rack for proper cookie cooling
Optional but Helpful Tools:
- Mechanical cookie scoop or ice cream scoop for uniform cookie sizing
- Additional mixing bowls for organizing mix-ins
- Measuring cups and spoons for accurate ingredient portions
The beauty of kitchen sink cookies lies in their accessibility. We don’t need any specialized equipment beyond what most home bakers already own. A reliable mixer helps achieve the perfect creamy texture when combining butter and sugars. Quality baking sheets ensure even heat distribution for consistent results across all cookies.
Our choice of parchment paper or silicone mats makes cleanup effortless while preventing cookies from sticking to the pan. The cooling rack allows air circulation around finished cookies, maintaining their ideal texture as they cool.
For those who prefer uniform cookie sizes, a mechanical scoop creates consistent portions that bake evenly. This tool becomes particularly valuable when working with thick, loaded cookie dough that contains multiple mix-ins.


Instructions

Now we’ll walk through the step-by-step process for creating these delightfully unpredictable cookies. Our method ensures proper texture while accommodating all those wonderful mix-ins.
Prep Work
Preheat your oven to 375°F and line a half sheet pan with parchment paper or a silicone baking mat. Gather all your chosen mix-ins in separate bowls so they’re ready to fold into the dough. We recommend crushing any larger items like pretzels or graham crackers into bite-sized pieces for even distribution. Set your wire cooling rack nearby for the finished cookies.
Making the Cookie Dough
Melt the butter in a microwave-safe bowl or use softened butter at room temperature. In your stand mixer bowl, combine the melted or softened butter with both brown sugar and granulated sugar. Beat on medium speed until the mixture is well combined and slightly fluffy.
Add eggs one at a time, mixing well after each addition. Pour in the vanilla extract and beat until incorporated. In a separate bowl, whisk together the flour, baking soda, and salt. Gradually add the dry ingredients to the wet mixture, mixing on low speed until just combined. Avoid overmixing to prevent tough cookies.
Adding the Mix-Ins
Fold in your chosen mix-ins using a wooden spoon or sturdy spatula. We suggest starting with about 2 cups total of various ingredients, adjusting based on your preferences. Distribute the mix-ins evenly throughout the dough, ensuring each cookie will have a good variety of flavors and textures. The dough should hold together well even though the abundance of additions.
Shaping and Baking
Use a medium-sized cookie scoop or spoon to portion the dough onto your prepared baking sheet. Space cookies about 2 inches apart to allow for spreading. Bake for approximately 10 minutes or until the edges are lightly golden brown. The centers may look slightly underbaked, which is perfect for chewy cookies.
Remove from the oven and let cookies cool on the baking sheet for 5 minutes before transferring to the wire cooling rack. For extra flavor, sprinkle with flaky sea salt while the cookies are still warm.


Baking Tips for Perfect Kitchen Sink Cookies

We’ve discovered several crucial techniques that transform good kitchen sink cookies into extraordinary ones. These methods ensure your cookies maintain the perfect balance of chewy texture and bold flavors that make this recipe so beloved.
Start with Melted Butter for Superior Texture
Using melted butter rather than softened butter creates the ideal soft and chewy texture we all crave in kitchen sink cookies. We recommend melting your butter completely and allowing it to cool slightly before mixing it with brown sugar. This combination produces cookies with a moist crumb and tender bite that stays fresh longer.
Balance Your Mix-ins Strategically
The secret to outstanding kitchen sink cookies lies in balancing sweet and salty elements throughout each bite. We suggest combining chocolate chips or toffee bits with crushed pretzels or potato chips to create that perfect flavor contrast. This approach ensures every cookie delivers the complex taste profile that makes kitchen sink cookies so addictive.
Master the Mixing Technique
Proper mixing technique prevents tough cookies and ensures even distribution of ingredients. We cream the butter and sugars until the mixture becomes light and fluffy before adding eggs one at a time. When incorporating dry ingredients, we fold them in gently by hand just until combined to avoid overworking the dough.
Avoid Overmixing at All Costs
Overmixing develops gluten strands that result in tough, dense cookies rather than the tender texture we desire. We stop mixing immediately once the flour disappears into the dough. This gentle approach preserves the cookie’s soft texture while allowing mix-ins to distribute evenly throughout the dough.
Portion Cookies for Uniform Results
Consistent cookie sizes ensure even baking and professional presentation. We use a 2-tablespoon scoop to portion our dough and space cookies 2 inches apart on parchment-lined baking sheets. This spacing prevents cookies from spreading into each other while maintaining their characteristic large size.
Nail the Baking Temperature and Timing
We preheat our oven to 350°F and bake cookies for 10 to 12 minutes until the edges turn golden brown. The centers should appear slightly underdone when we remove them from the oven, as they continue cooking on the hot baking sheet. This technique produces cookies with crispy edges and soft centers.
Cool Cookies Properly for Best Results
Allowing cookies to cool on the baking sheet for 5 minutes before transferring prevents them from breaking apart. We then move them to a wire cooling rack to finish cooling completely. This two-step cooling process helps cookies maintain their shape while developing the perfect texture.


Storage Instructions

After spending time perfecting our kitchen sink cookies, we want to ensure they maintain their delicious texture and flavor for as long as possible. Proper storage techniques can significantly extend the life of these treat-packed cookies.
Room Temperature Storage
We recommend storing our freshly baked kitchen sink cookies in an airtight container or sealed Ziploc bag at room temperature. Most variations will stay fresh for 3 to 7 days using this method. But, gluten-free or dairy-free versions typically maintain their quality for only 3 days at room temperature due to their different ingredient compositions.
| Storage Method | Duration | Container Type |
|---|---|---|
| Room Temperature (Standard) | 3-7 days | Airtight container or Ziploc bag |
| Room Temperature (Gluten-free/Dairy-free) | 3 days | Airtight container or Ziploc bag |
| Refrigeration | 5-7 days | Airtight container |
| Freezer (Baked cookies) | 1-3 months | Freezer-safe container with parchment layers |
| Freezer (Cookie dough) | 2-6 months | Freezer bag or container |
Refrigeration Options
While we don’t commonly recommend refrigerating baked cookies, some kitchen sink cookie recipes benefit from cold storage. We can keep them in the refrigerator for 5 to 7 days when stored in an airtight container.
Freezing for Long-Term Storage
Baked Cookies: We always allow our cookies to cool completely before freezing. Place them in freezer-safe containers or bags for up to 1 to 3 months. We suggest placing parchment paper between layers to prevent the cookies from sticking together and preserve their shape.
Cookie Dough: We can freeze unbaked cookie dough by scooping it into balls and freezing them in a single layer until hard. Once frozen solid, we transfer the dough balls to freezer bags or containers where they’ll keep for 2 to 6 months. When ready to bake, we add one to two extra minutes to the original baking time.
Thawing and Serving
We recommend placing frozen cookies at room temperature for about 15 minutes to thaw properly. This brief thawing period restores their ideal texture without making them soggy.
Essential Storage Tips
We always use parchment paper on our baking sheets to prevent cookies from sticking and browning excessively on the bottom. When storing multiple batches, we limit the number of cookies per container to maintain proper air circulation and prevent overcrowding that could affect texture.


Variations and Substitutions

The beauty of kitchen sink cookies lies in their endless customization possibilities. We can transform our base recipe into specialized versions that cater to exact flavor preferences and dietary needs.
Chocolate Lovers Version
For those who can never have too much chocolate, we recommend loading the dough with a triple chocolate combination. Semi-sweet chocolate chips provide the classic foundation while milk chocolate chips add creamy sweetness and white chocolate chips contribute vanilla notes. We suggest using 1 cup of semi-sweet chips, ½ cup of milk chocolate chips, and ½ cup of white chocolate chips for optimal balance.
When we want to intensify the chocolate experience even further, cocoa nibs offer a sophisticated bitter edge that pairs beautifully with the sweeter chips. Chocolate chunks work wonderfully as a substitute for chips since they create irregular pockets of melted chocolate throughout each cookie. We can also fold in chopped dark chocolate bars for a more artisanal texture.
Nutty Delight Version
Nuts bring essential crunch and richness to our kitchen sink cookies. Walnuts deliver a slightly bitter earthiness that complements sweet mix-ins perfectly. Pecans offer buttery smoothness that melts beautifully into the cookie base. Hazelnuts provide a distinctive toasted flavor that pairs exceptionally well with chocolate elements.
We can easily customize the nutty profile by substituting peanuts for a more familiar taste or macadamia nuts for tropical luxury. Toasting any nuts before adding them to the dough enhances their natural oils and creates deeper flavor complexity. We recommend using 1 to 1½ cups of mixed nuts for substantial texture without overwhelming the other ingredients.
Tropical Twist Version
Transport your taste buds to paradise with tropical inspired mix-ins that bring sunshine to every bite. Dried pineapple chunks provide tangy sweetness that cuts through the rich cookie base. Coconut flakes add chewy texture and subtle tropical aroma that pairs beautifully with chocolate or vanilla elements. Macadamia nuts contribute buttery richness that echoes Hawaiian cookie traditions.
We can expand the tropical theme by incorporating dried mango pieces or chopped dried apricots for additional fruity complexity. These substitutions work particularly well when we balance them with white chocolate chips or vanilla baking chips. Toasted coconut flakes offer more intense flavor than regular coconut and create beautiful golden specks throughout our finished cookies.


Make-Ahead Instructions

Preparing kitchen sink cookies ahead of time offers incredible flexibility for busy schedules and spontaneous cravings. We can prepare both the cookie dough and fully baked cookies in advance using different storage methods.
Cookie Dough Storage
Refrigerated Dough: We recommend preparing the cookie dough and storing it in the refrigerator for up to 3 days before baking. Simply cover the bowl tightly with plastic wrap or transfer the dough to an airtight container. This short-term storage actually improves the cookies’ flavor as the ingredients meld together.
Frozen Dough Balls: For longer storage we can portion the dough into individual cookie-sized balls and freeze them for up to 2 months. Place the dough balls on a parchment-lined baking sheet and freeze until solid. Transfer the frozen dough balls to freezer-safe bags or containers for extended storage.
Baking Frozen Dough: We can bake frozen dough balls directly from the freezer without thawing. Add 1 to 2 extra minutes to the original baking time at 375°F. The cookies will spread slightly less than fresh dough but maintain their delicious texture.
Baked Cookie Storage
Short-Term Storage: Freshly baked kitchen sink cookies maintain their optimal texture when stored in an airtight container at room temperature for up to 5 days. We suggest placing parchment paper between layers to prevent sticking and preserve the cookies’ shape.
Extended Storage: Completely cooled cookies can be wrapped individually in plastic wrap and stored in freezer bags for up to 3 months. This method prevents freezer burn and maintains the cookies’ original flavor profile.
| Storage Method | Duration | Temperature | Container |
|---|---|---|---|
| Refrigerated Dough | 3 days | 35-40°F | Airtight container |
| Frozen Dough Balls | 2 months | 0°F | Freezer-safe bags |
| Room Temperature Cookies | 5 days | 68-72°F | Airtight container |
| Frozen Baked Cookies | 3 months | 0°F | Freezer bags |
Thawing Tips: We recommend removing frozen baked cookies from the freezer 15 to 20 minutes before serving. This brief thawing period restores their chewy texture without making them soggy. Frozen cookies can also be enjoyed straight from the freezer for a firmer texture that many people prefer.
Conclusion
Kitchen sink cookies represent the perfect marriage of creativity and practicality in baking. They’ve taught us that the most delicious treats often come from embracing spontaneity and working with what we have on hand.
We’ve discovered that these cookies aren’t just about clearing out our pantries—they’re about creating memorable moments and unique flavor combinations that can’t be replicated. Each batch tells its own story through the mix-ins we choose.
Whether you’re a seasoned baker or just starting your culinary journey these cookies offer endless possibilities for experimentation. They’ve proven that great baking doesn’t require perfection—it requires heart creativity and a willingness to try something new.
Now it’s time to raid your pantry gather those odds and ends and create your own signature kitchen sink cookie masterpiece.
Frequently Asked Questions
What are kitchen sink cookies?
Kitchen sink cookies are versatile cookies made by combining whatever sweet and salty ingredients you have on hand. They get their name from the saying “everything but the kitchen sink” because they’re loaded with various mix-ins like chocolate chips, pretzels, nuts, dried fruit, and even cereal. Each batch is unique and unpredictable.
Why are kitchen sink cookies good for reducing food waste?
Kitchen sink cookies help reduce food waste by using up leftover pantry ingredients that might otherwise go unused. Instead of letting small amounts of chocolate chips, nuts, or dried fruit expire, you can combine them all into delicious cookies, making this recipe both economical and environmentally conscious.
What equipment do I need to make kitchen sink cookies?
You only need standard baking equipment: a stand mixer or hand mixer, large mixing bowls, a half sheet pan, parchment paper or silicone baking mats, and a wire cooling rack. A mechanical cookie scoop is optional but helpful for uniform sizing when working with thick, mix-in-loaded dough.
How should I store kitchen sink cookies?
Store kitchen sink cookies in an airtight container at room temperature for 3-7 days. For longer storage, refrigerate for 5-7 days or freeze for 1-3 months. Gluten-free or dairy-free versions only last 3 days at room temperature. Unbaked cookie dough can be frozen for 2-6 months.
Can I make kitchen sink cookie dough ahead of time?
Yes! You can refrigerate prepared cookie dough for up to 3 days or freeze portioned dough balls for up to 2 months. This makes them perfect for busy schedules. Simply thaw frozen dough balls and bake as directed, adding a minute or two to the baking time if needed.
What’s the secret to perfect kitchen sink cookies?
Start with melted butter for superior chewy texture and balance sweet and salty mix-ins for complex flavor. Avoid overmixing the dough to prevent tough cookies, and use proper portioning for uniform results. Bake at 375°F until golden brown and cool on the pan before transferring to prevent breaking.