These zesty lemon raspberry cookies combine two beloved flavors that make every bite absolutely irresistible. We’ve perfected this recipe to deliver the perfect balance of tangy citrus and sweet-tart berries in a soft, chewy cookie that’ll have your kitchen smelling like heaven.
What makes these cookies truly special is how the bright lemon zest brightens the entire cookie while dried raspberries add bursts of fruity sweetness. The combination creates a sophisticated flavor profile that’s perfect for afternoon tea, special occasions, or whenever you’re craving something extraordinary.
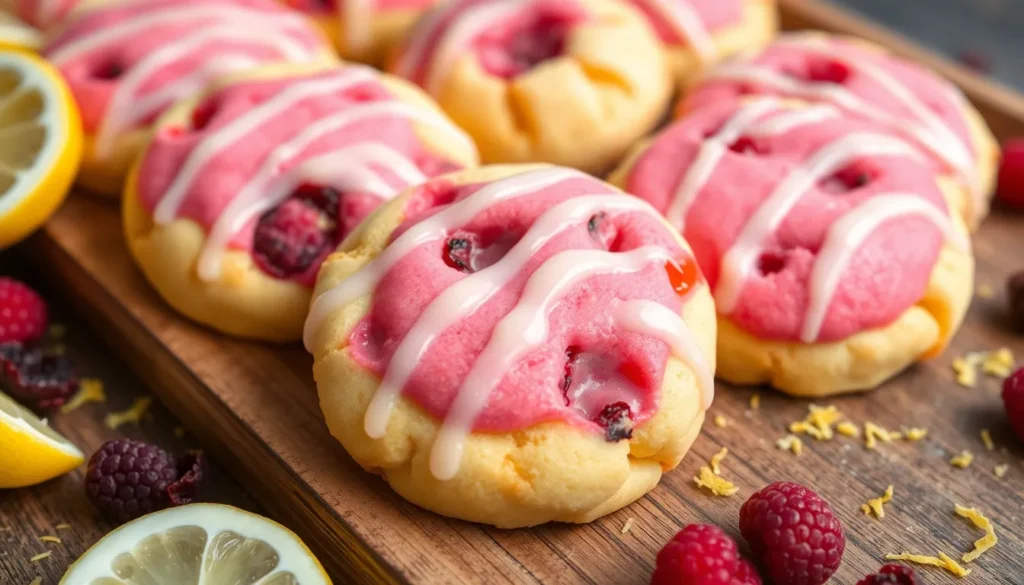
We guarantee these cookies will become your new go-to treat for impressing guests or treating yourself to something special. They’re surprisingly simple to make but taste like they came from a fancy bakery. Plus, the beautiful pink and yellow colors make them as stunning to look at as they are delicious to eat.
Ingredients
These lemon raspberry cookies require three distinct components that work together to create layers of complementary flavors. Each element contributes its own unique taste and texture to the final cookie experience.
For the Cookie Dough
- 2 1/4 cups all-purpose flour
- 1 teaspoon baking soda
- 1 teaspoon salt
- 1 cup unsalted butter, softened to room temperature
- 3/4 cup granulated sugar
- 3/4 cup packed light brown sugar
- 2 large eggs, room temperature
- 2 teaspoons pure vanilla extract
- 2 tablespoons fresh lemon zest
- 1 tablespoon fresh lemon juice
- 1/2 cup dried raspberries, chopped into small pieces
For the Raspberry Filling
- 1 cup fresh raspberries
- 1/4 cup granulated sugar
- 2 tablespoons cornstarch
- 1 tablespoon fresh lemon juice
- 1/4 teaspoon vanilla extract
For the Lemon Glaze
- 1 1/2 cups powdered sugar, sifted
- 3 tablespoons fresh lemon juice
- 1 tablespoon lemon zest
- 2 to 3 tablespoons whole milk
- 1/4 teaspoon vanilla extract
- Pinch of salt
Equipment Needed

Creating perfect lemon raspberry cookies requires having the right tools at our disposal. We recommend gathering all equipment before starting to ensure a smooth baking process.
Large mixing bowls serve as our primary workspace for combining ingredients. We need at least two bowls to keep dry and wet ingredients separate initially. A medium bowl works well for preparing the raspberry filling components.
Measuring cups and spoons ensure accuracy in our recipe execution. Precise measurements make the difference between cookies that spread perfectly and those that turn out too dense or too flat.
An electric mixer or sturdy whisk helps us cream butter and sugar until the mixture becomes light and fluffy. This step creates the foundation for our cookies’ tender texture. Hand mixing works but requires more time and effort.
A rubber spatula becomes essential when folding frozen raspberries into our dough. This tool prevents overmixing while ensuring even distribution of berries throughout the mixture.
Baking sheets allow us to bake multiple cookies simultaneously. We recommend having at least two sheets to rotate batches efficiently and maintain consistent baking temperatures.
Parchment paper or silicone baking mats prevent our cookies from sticking to the pan. These surfaces also make cleanup significantly easier and help achieve even browning.
A zester or microplane extracts maximum flavor from our lemons. Fresh lemon zest provides intense citrus notes that dried alternatives cannot match.
Cooling racks enable proper air circulation around our finished cookies. This equipment prevents soggy bottoms and helps maintain the ideal texture we want to achieve.
A small saucepan becomes necessary for preparing the raspberry filling component. This allows us to gently cook the berries and thicken the mixture properly.
Instructions

Follow these step-by-step instructions to create perfectly balanced lemon raspberry cookies with bright citrus flavors and bursts of sweet raspberry goodness. We’ll guide you through each stage from ingredient prep to the final glazed cookies.
Prep the Ingredients
Wash and dry fresh lemons thoroughly before zesting. Use a microplane or fine zester to remove the bright yellow outer peel, avoiding the bitter white pith underneath. Juice the zested lemons and set both zest and juice aside in separate bowls.
Remove frozen raspberries from the freezer and chop them into smaller pieces while they’re still frozen to prevent excess moisture. This technique helps maintain their shape and prevents color bleeding throughout the dough. Pat any excess moisture with paper towels if needed.
Measure all remaining ingredients accurately and bring butter and eggs to room temperature for optimal mixing. Room temperature ingredients blend more easily and create a smoother cookie dough texture.
Make the Cookie Dough
Whisk together flour, baking powder, salt, and baking soda in a medium bowl until evenly combined. Set this dry mixture aside for later incorporation.
Cream butter with granulated sugar and lemon zest in your stand mixer fitted with the paddle attachment. Beat on medium speed for 3-4 minutes until the mixture becomes light and fluffy with a pale yellow color.
Add eggs one at a time to the creamed butter mixture, beating well after each addition. Pour in lemon juice and vanilla extract, mixing until just combined.
Gradually add the dry ingredients to the wet mixture on low speed. Mix only until the flour disappears to avoid overworking the dough and creating tough cookies.
Prepare the Raspberry Filling
Combine fresh raspberries, granulated sugar, and cornstarch in a small saucepan over medium heat. The cornstarch helps thicken the mixture and prevents it from becoming too runny.
Cook the raspberry mixture for 3-4 minutes while stirring gently until the berries break down and release their juices. The mixture should thicken slightly and coat the back of a spoon.
Remove from heat and stir in lemon juice and vanilla extract. Allow the filling to cool completely before using, as hot filling will melt the cookie dough and create uneven baking.
Shape and Fill the Cookies
Scoop cookie dough into 1.5-tablespoon portions using a cookie scoop or spoons for consistent sizing. Roll each portion into a ball between your palms.
Create a small indentation in the center of each dough ball using your thumb or the back of a small spoon. Make the wells deep enough to hold the filling without breaking through the bottom.
Spoon about 1/2 teaspoon of cooled raspberry filling into each indentation. Avoid overfilling, as the mixture may overflow during baking and create messy cookies.
Place filled cookies on parchment-lined baking sheets with 2 inches of space between each cookie to allow for spreading during baking.
Bake the Cookies
Preheat your oven to 350°F (177°C) and position racks in the upper and lower thirds for even heat distribution.
Bake cookies for 10-14 minutes until the edges are set and lightly golden while the centers remain soft. The cookies will continue cooking slightly on the hot baking sheet after removal.
Cool cookies on the baking sheet for 5 minutes before transferring to wire racks. This brief cooling period prevents the cookies from breaking when moved and allows them to firm up properly.
Make the Lemon Glaze
Sift powdered sugar into a medium bowl to eliminate any lumps that could create an uneven glaze texture.
Whisk lemon juice, lemon zest, and melted butter into the powdered sugar until smooth and glossy. The mixture should coat the back of a spoon but still drip easily.
Adjust the glaze consistency by adding more lemon juice for a thinner glaze or more powdered sugar for a thicker coating. Add whole milk, vanilla extract, and salt for enhanced flavor depth.
Assemble and Finish
Drizzle the lemon glaze over completely cooled cookies using a spoon or piping bag for controlled application. Work quickly, as the glaze will begin to set within minutes.
Allow the glaze to set for 15-20 minutes at room temperature before serving or storing. The glaze should form a glossy coating that doesn’t smudge when lightly touched.
Store finished cookies in an airtight container at room temperature for up to one week, separating layers with parchment paper to prevent sticking.
Storage Instructions

We recommend storing your freshly baked lemon raspberry cookies properly to maintain their soft texture and delicious flavor. These delicate treats require exact storage methods depending on how long you plan to keep them and your local climate conditions.
Room Temperature Storage
For short-term storage, we store our lemon raspberry cookies in an airtight container at room temperature. Place wax or parchment paper between layers to prevent the cookies from sticking together since these treats maintain a soft texture. The cookies will stay fresh for 3 to 7 days when stored this way, though the exact duration depends on your recipe’s moisture content and local humidity levels.
Refrigerated Storage
We recommend refrigerating your cookies if you live in a hot or humid climate. The lemon glaze and any fresh raspberry pieces in your cookies benefit from cooler temperatures to maintain their integrity. Store the cookies in an airtight container in the refrigerator where they will remain fresh for up to 1 week. This method prevents moisture buildup and preserves the glaze’s smooth consistency.
Freezing for Long-Term Storage
Both baked cookies and raw cookie dough freeze exceptionally well for extended storage. For baked cookies, we place them in freezer-safe containers or zip-top bags with parchment paper separating each layer. Your cookies will maintain their quality in the freezer for 2 to 3 months.
Cookie dough can also be frozen for future baking. We scoop the dough into balls and freeze them until solid before transferring to freezer bags or containers. When ready to bake, we place the frozen dough balls directly on baking sheets and add a couple extra minutes to the baking time if needed.
| Storage Method | Room Temperature | Refrigerator | Freezer |
|---|---|---|---|
| Baked Cookies | 3-7 days | 1 week | 2-3 months |
| Cookie Dough | Not recommended | Up to 3 days | 2-3 months |
Remember to always use airtight containers regardless of your chosen storage method. We always include barrier layers between stacked cookies to prevent them from sticking together and losing their appealing appearance.
Make-Ahead Tips

Planning ahead makes baking these delightful lemon raspberry cookies much more manageable for busy schedules. We recommend several strategic approaches that will save time while maintaining the exceptional quality and fresh flavors our cookies are known for.
Freezing Cookie Dough
Cookie dough balls offer the most convenient make-ahead option for these treats. We shape the dough into portions using about 1½ tablespoons per cookie and place them on parchment-lined baking sheets. After freezing the shaped dough for two hours until solid, we transfer the balls to freezer-safe containers or bags for long-term storage. The frozen dough maintains its quality for up to three months without compromising taste or texture.
Baking frozen dough requires no thawing time, which makes this method particularly appealing for spontaneous baking sessions. We simply add two to three extra minutes to the standard baking time of 10-16 minutes when working with frozen dough balls.
Raspberry Handling Strategy
Frozen raspberries work better than fresh ones for make-ahead preparation since they hold their shape during the mixing process. We add these frozen berries directly to the dough just before combining all ingredients to prevent them from becoming mushy or bleeding color throughout the mixture. This timing ensures our cookies maintain their attractive appearance and distinct raspberry pieces.
Component Preparation Timeline
| Component | Make-Ahead Window | Storage Method |
|---|---|---|
| Cookie dough balls | 3 months | Frozen in airtight containers |
| Raspberry filling | 3 days | Refrigerated in covered bowl |
| Lemon glaze | 1 week | Refrigerated, re-whisk before use |
The raspberry filling can be prepared up to three days in advance and stored covered in the refrigerator. We bring it to room temperature before using to ensure easy spreading. Our lemon glaze keeps well for a week when refrigerated, though we always give it a quick whisk to restore its smooth consistency before drizzling.
Baked Cookie Storage
Completely cooled and glazed cookies freeze beautifully for up to three months when stored properly in airtight containers. We place parchment paper between layers to prevent the glaze from sticking and maintain the cookies’ pristine appearance. Room temperature storage works well for immediate consumption, keeping the cookies fresh for up to seven days in airtight containers.
Conclusion
These lemon raspberry cookies deliver the perfect balance of tangy citrus brightness and sweet berry goodness that’ll have everyone asking for the recipe. We’ve shown you how simple it is to create bakery-quality treats in your own kitchen using basic ingredients and straightforward techniques.
The make-ahead options and storage tips we’ve shared mean you can enjoy these stunning cookies whenever the craving strikes. Whether you’re planning for a special event or just want to treat yourself these cookies are guaranteed to impress.
Now it’s time to roll up your sleeves and start baking. Your kitchen will smell amazing and your taste buds will thank you for this delightful combination of flavors that truly captures the essence of sunshine in every bite.
Frequently Asked Questions
What makes lemon raspberry cookies special?
Lemon raspberry cookies combine tangy lemon zest with sweet-tart raspberries, creating a unique flavor profile that’s both refreshing and indulgent. Their appealing pink and yellow colors make them visually stunning, while the easy-to-follow recipe produces gourmet-tasting results perfect for any occasion.
What ingredients do I need for lemon raspberry cookies?
You’ll need three components: cookie dough (flour, baking soda, salt, butter, sugars, eggs, vanilla, lemon zest/juice, dried raspberries), raspberry filling (fresh raspberries, sugar, cornstarch, lemon juice, vanilla), and lemon glaze (powdered sugar, lemon juice/zest, milk, vanilla, salt).
What equipment is essential for making these cookies?
Essential equipment includes mixing bowls, measuring cups and spoons, an electric mixer, baking sheets, cooling racks, and basic kitchen tools. These items ensure smooth preparation and professional-looking results for your lemon raspberry cookies.
How do I prepare the raspberry filling?
Cook fresh raspberries with granulated sugar and cornstarch over medium heat, stirring constantly until the mixture thickens. Add lemon juice and vanilla extract, then let it cool completely before using as cookie filling.
Can I make lemon raspberry cookies ahead of time?
Yes! Cookie dough balls can be frozen for up to 3 months. The raspberry filling stays fresh in the refrigerator for 3 days, and lemon glaze lasts a week refrigerated. Baked cookies can be frozen for up to 3 months with parchment paper between layers.
How should I store lemon raspberry cookies?
Store cookies in an airtight container at room temperature for 3-7 days, using wax paper between layers. In hot/humid climates, refrigerate for up to a week. For long-term storage, freeze baked cookies for 2-3 months in airtight containers.
Why use frozen raspberries instead of fresh in the dough?
Frozen raspberries maintain their shape better when mixed into cookie dough, preventing them from breaking apart and creating streaks. They distribute more evenly throughout the dough, ensuring consistent flavor and appearance in every cookie.
How do I achieve the perfect lemon glaze consistency?
Start with powdered sugar, lemon juice, and zest, then gradually add milk until you reach your desired consistency. For thicker glaze, use less milk; for thinner glaze, add more. The glaze should coat the back of a spoon smoothly.


