We’ve all been there – staring at a package of Oreos wondering how to make them even more irresistible. Enter our game-changing Oreo dip that transforms America’s favorite cookie into a creamy, dreamy dessert that’ll have your guests begging for the recipe.
This no-bake wonder combines crushed Oreos with rich cream cheese and fluffy whipped topping to create the ultimate party pleaser. Whether you’re hosting a birthday bash, game night, or just treating yourself to something special, this dessert dip delivers maximum flavor with minimal effort.
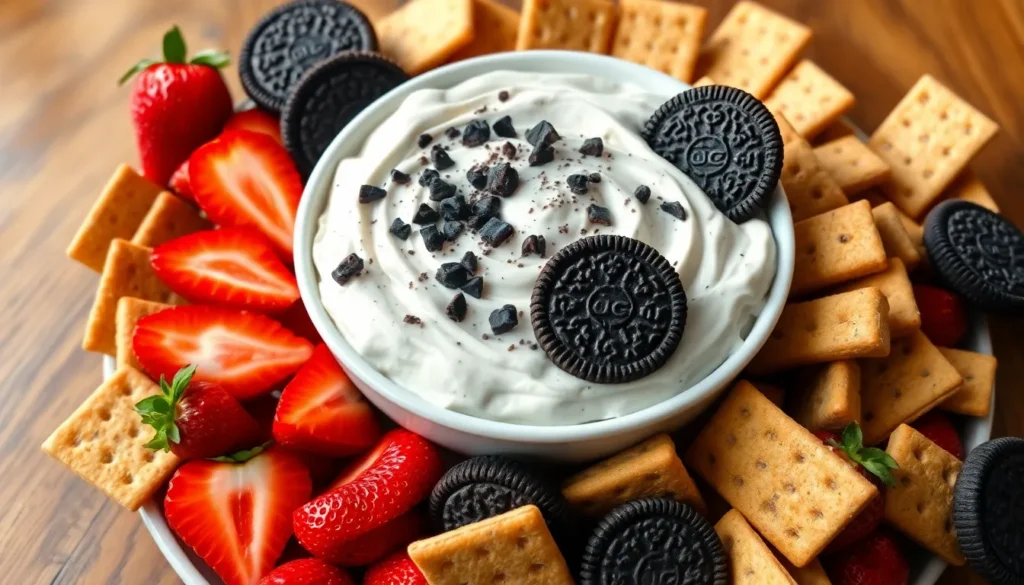
What makes this recipe truly special is its versatility – we love serving it with graham crackers, fresh fruit, or even more Oreos for the ultimate indulgence. In just 10 minutes, you’ll have a crowd-pleasing dessert that looks fancy but couldn’t be easier to make.
Ingredients
We keep this Oreo dip recipe simple with just a handful of pantry staples that deliver maximum flavor. Our ingredient list focuses on quality components that blend together seamlessly to create that perfect creamy texture everyone craves.
For the Oreo Dip:
- 24 Oreo cookies, divided (20 for crushing, 4 for garnish)
- 8 oz cream cheese, softened to room temperature
- 1/4 cup powdered sugar
- 1 teaspoon vanilla extract
- 8 oz whipped topping (like Cool Whip), thawed
- 2 tablespoons milk (optional, for thinning)
For Serving:
- Graham crackers
- Fresh strawberries
- Apple slices
- Additional Oreo cookies
- Vanilla wafers
We recommend using name-brand Oreos for the best flavor and texture in this dip. The cream cheese needs to be completely softened before mixing to avoid lumps in our final product. Room temperature cream cheese blends effortlessly with the other ingredients and creates that silky smooth consistency we’re after.
Our whipped topping should be fully thawed if using frozen varieties. This ensures proper incorporation and prevents any icy chunks from affecting the dip’s creamy texture. The optional milk helps achieve your preferred consistency if the mixture seems too thick after combining all ingredients.
Equipment Needed

Making this irresistible Oreo dip requires only basic kitchen tools that most home cooks already have on hand. We’ve found that having the right equipment makes the preparation process much smoother and ensures the perfect creamy texture every time.
A handheld electric mixer serves as our primary tool for achieving that silky smooth consistency. Stand mixers work equally well if you prefer hands-free mixing. The electric mixer eliminates lumps in the cream cheese mixture and creates the ideal base for our dip.
Our large mixing bowl provides ample space for combining all ingredients without spillage. Choose a bowl that’s deep enough to accommodate the mixer without splattering ingredients across your countertop.
For crushing the Oreo cookies, we recommend either a rolling pin or food processor depending on your preferred method. The rolling pin method gives you more control over the texture, while a food processor creates uniform crumbs quickly and efficiently.
A serving bowl transforms your finished dip into an attractive presentation piece. Select one that complements your party theme or matches your existing dinnerware for a cohesive look.
Finally, keep a spatula or spoon nearby for folding ingredients together and transferring the finished dip to your serving bowl. These simple tools help maintain the light, fluffy texture we’re aiming for in our final product.
| Equipment | Purpose | Alternative Options |
|---|---|---|
| Handheld electric mixer | Smooth cream cheese mixture | Stand mixer |
| Large mixing bowl | Ingredient combining | Deep ceramic or glass bowl |
| Rolling pin | Cookie crushing | Food processor |
| Serving bowl | Presentation | Any attractive bowl |
| Spatula or spoon | Folding and transferring | Wooden spoon or rubber spatula |
Instructions

Follow these simple steps to create your perfect Oreo dip in just minutes. We’ll guide you through each stage to ensure smooth results every time.
Prep the Oreos
Place the Oreo cookies into a large plastic bag and seal tightly. Use a rolling pin to crush the cookies into small chunks, working from one end of the bag to the other. Alternatively, pulse the cookies in a food processor until you achieve your desired texture. Reserve ½ cup of the crushed cookies in a separate bowl for garnish. We recommend keeping some larger pieces mixed with finer crumbs for optimal texture contrast.
Mix the Base
Beat the softened cream cheese in a large mixing bowl using an electric hand mixer on medium speed until smooth and fluffy. Add the powdered sugar gradually while continuing to mix until fully incorporated. Pour in the vanilla extract and beat for another 30 seconds until the mixture becomes light and creamy. Ensure no lumps remain before proceeding to the next step.
Combine and Fold
Add the thawed whipped topping to the cream cheese mixture and gently fold together using a large spoon or spatula. Fold in the crushed Oreos (except for the reserved ½ cup) until evenly distributed throughout the mixture. Mix gently to maintain the light texture while ensuring visible Oreo pieces appear throughout the dip. Add milk one tablespoon at a time if the mixture seems too thick for your preference.
Chill and Set
Transfer the completed dip to your serving bowl using a spatula to scrape every bit from the mixing bowl. Sprinkle the reserved crushed Oreos evenly across the top as an attractive garnish. Serve immediately or refrigerate for up to 30 minutes to allow the flavors to meld and the texture to set. Chilling enhances the overall experience but is not required for immediate serving.
Serving Suggestions

Our creamy Oreo dip pairs wonderfully with various dippers that complement its rich cookies and cream flavor. The right accompaniments can elevate this simple dessert into an impressive party spread.
Dippers That Work Best
Graham crackers provide the perfect crunchy foundation for our smooth dip. Their honey-sweetened flavor creates a delightful contrast without overwhelming the Oreo taste. We recommend breaking them into convenient dipping-sized pieces for easy serving.
Fresh strawberries offer a bright and juicy complement to the rich cream cheese base. Their natural sweetness balances the cookies while adding a pop of color to your dessert table. We suggest halving larger berries to create the perfect bite-sized portions.
Pretzels introduce a welcome salty element that enhances the overall flavor profile. The salt crystals on traditional pretzels create an irresistible sweet and salty combination that keeps guests coming back for more.
Additional Oreos serve as both dipper and decoration. Breaking them into wedges creates sturdy scoops while maintaining the cookies and cream theme throughout your presentation.
Vanilla wafers provide a lighter alternative that won’t compete with the dip’s bold flavors. Their delicate crunch and subtle vanilla notes allow the Oreo mixture to remain the star of the show.
Presentation Ideas
Garnish with crushed Oreos by sprinkling reserved cookie pieces over the dip’s surface before serving. This technique reinforces the flavor while creating visual appeal that immediately communicates what guests can expect.
Arrange fresh fruit around your serving bowl to create an attractive border of color. Strawberries work particularly well due to their vibrant red hue against the dip’s creamy white and black appearance.
Use a festive serving bowl that matches your occasion or party theme. A colorful ceramic bowl or elegant glass dish can transform this simple dip into an eye-catching centerpiece.
Create a dipping station by arranging various dippers on a large platter surrounding your dip bowl. This presentation encourages guests to try different combinations while keeping everything organized and accessible.
Storage Instructions

We recommend storing your Oreo dip in an airtight container in the refrigerator to maintain its freshness and creamy texture. This delicious dessert dip can be prepared ahead of time and will stay fresh for up to 3 days when properly refrigerated.
Refrigeration Best Practices
Our storage tests show that Oreo dip maintains optimal quality when kept at consistent refrigeration temperatures. Place the dip in a sealed container immediately after preparation to prevent it from absorbing other flavors in your refrigerator. The cream cheese base requires cold storage to maintain food safety standards and prevent spoilage.
Texture Changes Over Time
The longer our Oreo dip sits in the refrigerator, the softer the cookie pieces become, creating a delightful mousse-like texture. Many people actually prefer this softer consistency as it develops more complex flavors. If you want to restore some crunch to day-old dip, we suggest adding fresh crushed Oreos just before serving.
Serving After Storage
When serving chilled Oreo dip, we recommend letting it stand at room temperature for 15 to 20 minutes before serving. This brief warming period softens the mixture for easier dipping and enhances the overall flavor profile. The dip becomes more spreadable and pleasant to eat when it reaches the ideal serving temperature.
Freezing Considerations
We do not recommend freezing Oreo dip as it does not maintain its creamy texture when thawed. But, leftover dip can be transformed into homemade pudding pops by freezing portions in paper cups with popsicle sticks inserted. This creative solution prevents waste while creating a fun frozen treat.
Make Ahead Tips
Our experience shows that Oreo dip can be served immediately after preparation or chilled for an hour to allow flavors to meld together. Chilling helps set the consistency and intensifies the cookies and cream flavor combination that makes this dessert so irresistible.
Recipe Variations

Our classic Oreo dip recipe serves as the perfect foundation for creative twists that cater to different flavor preferences. These delicious variations maintain the same simple preparation method while introducing exciting new taste profiles.
Peanut Butter Oreo Dip
We transform our standard recipe into a nutty delight by incorporating two tablespoons of creamy peanut butter into the cream cheese mixture. Beat the peanut butter along with the softened cream cheese until completely smooth before adding the powdered sugar and vanilla extract. This combination creates a rich, sweet flavor profile that perfectly complements the chocolate cookie pieces.
The peanut butter adds extra creaminess while maintaining the dip’s smooth texture. We recommend folding in the crushed Oreos gently to preserve the light, airy consistency. Serve this variation with the same variety of dippers including graham crackers, strawberries, and pretzels for a satisfying contrast of flavors.
Mint Oreo Dip
We create a refreshing twist by substituting regular Oreos with mint-flavored Oreos throughout the entire recipe. The mint-filled cookies provide a cool, crisp flavor that transforms the dessert into a refreshing treat. For an even more pronounced mint taste, we add a single drop of peppermint extract to the cream cheese mixture.
This variation pairs exceptionally well with chocolate-themed dippers or mint-flavored treats. We crush the mint Oreos using the same technique as the original recipe, ensuring some pieces remain chunky for texture. The result is a cooling dessert that offers a delightful departure from the traditional chocolate flavor.
Double Stuff Version
We elevate the creaminess factor by using Double Stuf Oreos instead of regular cookies throughout the preparation process. The extra cream filling in these cookies creates a richer, more indulgent texture in the finished dip. Follow the same crushing and mixing techniques as outlined in our standard recipe.
The additional cream filling from the Double Stuf cookies naturally enhances the dip’s smooth consistency without requiring any recipe modifications. We find this version particularly satisfying for those who crave extra sweetness and richness. The preparation time remains the same, making this an effortless upgrade to our classic recipe.
Make-Ahead Tips

We love how this Oreo dip becomes even more delicious when prepared in advance. The flavors meld together beautifully during refrigeration, creating a richer and more cohesive taste experience.
Advance Preparation Timeline
| Preparation Time | Storage Duration | Best Results |
|---|---|---|
| 1 hour ahead | Same day serving | Enhanced flavor development |
| 24 hours ahead | Next day events | Optimal taste and texture |
| Up to 4 days | Extended storage | Maintains quality throughout |
Storage Best Practices
We recommend transferring the completed dip to an airtight container before refrigerating. This prevents the dip from absorbing other flavors in your refrigerator and maintains its creamy consistency. The cream cheese base actually improves with time, becoming smoother and more luxurious.
Optimal Serving Temperature
After extended refrigeration, we suggest removing the dip from the fridge 15 to 20 minutes before serving. This brief room temperature rest allows the texture to soften slightly, making it perfect for dipping. The consistency becomes more spreadable without losing its structural integrity.
Texture Considerations
The Oreo pieces continue to soften during storage, creating an even more integrated flavor profile. We find that dips prepared a day ahead offer the perfect balance between cookie texture and creamy smoothness. The vanilla and cream cheese flavors also develop more depth during this resting period.
Last Minute Assembly
For the freshest presentation, we recommend adding the final garnish of crushed Oreos just before serving. This ensures maximum visual appeal and provides a delightful contrast between the softer dip and the crunchier topping pieces.
Troubleshooting Common Issues

Even the simplest recipes can present challenges. We’ve identified four common problems that home cooks encounter when making Oreo dip and our proven answers to fix them.
Dip Too Thick or Lumpy
Lumpy texture typically occurs when cream cheese hasn’t been properly softened before mixing. We recommend leaving your cream cheese at room temperature for at least 30 minutes before starting. The cream cheese should yield easily to gentle pressure from your finger.
If you’ve already started mixing and notice lumps, use a hand mixer to blend the mixture until smooth. Beat the cream cheese first before adding any other ingredients. This creates a silky base that prevents lumps from forming as you incorporate additional components.
Dip Too Runny
Excess liquid from improperly thawed whipped topping causes runny consistency. We ensure our whipped topping is completely thawed but not warm before folding it into the mixture. Overmixing can also break down the structure and create unwanted liquid.
Add more crushed Oreos gradually if your dip remains too thin. The cookie pieces absorb excess moisture while providing additional texture. Mix gently using a folding motion rather than vigorous stirring to maintain the dip’s body.
Dip Losing Flavor or Becoming Overly Sweet
Incorrect ratios between powdered sugar and cream cheese create flavor imbalances. We taste our mixture after each addition of powdered sugar to achieve the perfect sweetness level. Start with less sugar than the recipe calls for and adjust according to your preference.
Crushed Oreos provide the signature cookie flavor that makes this dip special. Add more crushed cookies if the dip tastes too sweet or lacks the distinctive Oreo taste. The cookies balance sweetness while intensifying the overall flavor profile.
Dip Separates When Chilled
Fat and liquid separation happens when whipped topping isn’t folded in gently enough. We use a spatula to fold ingredients together using an under and over motion. This technique preserves the whipped topping’s structure while creating a cohesive mixture.
Cover your dip with plastic wrap pressed directly onto the surface before refrigerating. This prevents a skin from forming and reduces separation. Stir gently before serving if any separation occurs during storage.
Conclusion
We’ve shown you how simple it is to create this crowd-pleasing Oreo dip that’ll become your go-to dessert for any occasion. With just a few basic ingredients and minimal prep time you’ll have a creamy indulgent treat that’s perfect for sharing.
The versatility of this recipe means you can customize it to match your taste preferences or dietary needs. Whether you stick with the classic version or experiment with our suggested variations you’re guaranteed to impress your guests.
Remember that this dip actually tastes better when made ahead of time so don’t hesitate to prepare it earlier in the day. Store it properly and let it come to room temperature before serving for the best texture and flavor experience.
Frequently Asked Questions
How long does it take to make Oreo dip?
This no-bake Oreo dip takes just 10 minutes to prepare. Simply crush the Oreos, mix the cream cheese base, fold in the cookies, and transfer to a serving bowl. You can serve it immediately or chill for enhanced flavor and texture.
What ingredients do I need for Oreo dip?
You’ll need 24 Oreo cookies, cream cheese (softened), powdered sugar, vanilla extract, and whipped topping. Optional ingredients include milk for thinning the consistency. Using name-brand Oreos and ensuring cream cheese is properly softened will give you the best results.
How should I store leftover Oreo dip?
Store Oreo dip in an airtight container in the refrigerator for up to 3-4 days. The dip maintains its freshness and develops a softer, mousse-like texture over time. Let it sit at room temperature for 15-20 minutes before serving for optimal consistency.
What can I serve with Oreo dip?
Popular dippers include graham crackers, fresh strawberries, apple slices, pretzels, vanilla wafers, and additional Oreos. These options provide contrasting textures and flavors that complement the rich cookies and cream taste of the dip perfectly.
Can I make Oreo dip ahead of time?
Yes! Oreo dip actually tastes better when made in advance as the flavors meld during refrigeration. Prepare it 1-24 hours ahead for optimal taste and texture. Add the final garnish of crushed Oreos just before serving for maximum crunch.
What equipment do I need to make Oreo dip?
You’ll need basic kitchen tools: a handheld electric mixer for smooth consistency, a large mixing bowl, a rolling pin or food processor for crushing Oreos, a serving bowl, and a spatula. Most home cooks already have these items available.
How do I fix Oreo dip that’s too thick or lumpy?
Ensure your cream cheese is properly softened before mixing. If the dip is too thick, add a tablespoon of milk gradually until you reach the desired consistency. Beat the mixture thoroughly with an electric mixer to eliminate lumps and achieve smoothness.
Can I make different flavored variations of Oreo dip?
Absolutely! Try Peanut Butter Oreo Dip by adding creamy peanut butter, Mint Oreo Dip using mint-flavored cookies and peppermint extract, or Double Stuff version with Double Stuf Oreos for extra creaminess. All variations follow the same simple preparation method.


