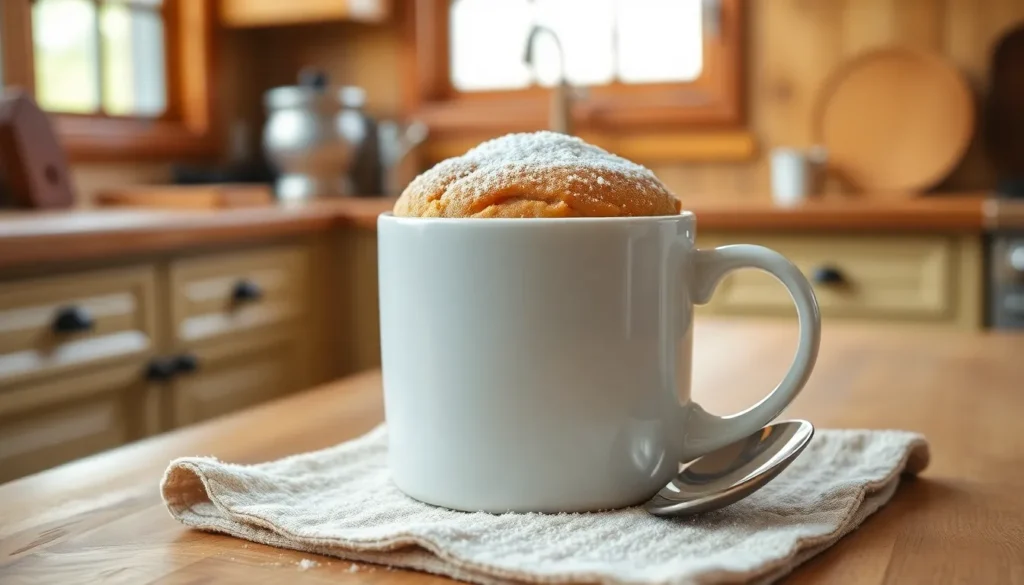
We’ve all been there – that moment when you’re craving something sweet but don’t want to bake an entire cake. That’s where this peanut butter mug cake becomes your kitchen hero. This single-serving dessert takes just 5 minutes from start to finish and requires no fancy equipment or mixing bowls.
The beauty of this recipe lies in its simplicity. We’re talking about combining a handful of pantry staples directly in your favorite mug and popping it in the microwave. The result? A warm, fluffy cake with that rich peanut butter flavor we all love, ready in under two minutes of cooking time.
What makes this mug cake truly special is how it satisfies your dessert cravings without the commitment of a full batch. Whether you’re cooking for one or want to treat yourself to a midnight snack, this easy peanut butter mug cake delivers bakery-quality taste with minimal effort and maximum satisfaction.
Ingredients
We need just five simple pantry staples to create this delicious peanut butter mug cake. Our ingredient list focuses on items you likely already have in your kitchen cupboard.
For the Mug Cake:
- 4 tablespoons all-purpose flour
- 3 tablespoons granulated sugar
- 2 tablespoons creamy peanut butter
- 2 tablespoons milk (any type)
- 1 tablespoon vegetable oil or melted butter
- 1/4 teaspoon baking powder
- Pinch of salt
Optional Toppings:
- 1 tablespoon chocolate chips
- 1 teaspoon powdered sugar for dusting
- Extra peanut butter for drizzling
- Vanilla ice cream
Our recipe calls for standard measuring spoons to ensure perfect proportions every time. We recommend using natural peanut butter for the richest flavor though any smooth variety works well. Room temperature ingredients blend more easily so we suggest taking your milk and peanut butter out of the refrigerator about 10 minutes before mixing.
The beauty of this recipe lies in its flexibility. We can easily substitute almond milk for regular milk or swap the vegetable oil for melted coconut oil. Each substitution maintains the cake’s moist texture while accommodating different dietary preferences.
Equipment Needed
 1")
Creating our peanut butter mug cake requires minimal equipment that most kitchens already have on hand. We need just a few essential tools to transform our simple ingredients into a delicious single-serving dessert.
Large Microwave-Safe Mug forms the foundation of our recipe. We recommend choosing a mug with at least 12-16 ounce capacity to prevent the batter from overflowing during cooking. Ceramic or glass mugs work best as they distribute heat evenly throughout the cooking process.
Measuring Spoons ensure accuracy when portioning our ingredients. Standard measuring spoons help us achieve the perfect balance of flavors and textures in our mug cake. We suggest having both tablespoon and teaspoon measurements available for precise ingredient ratios.
Whisk or Spoon serves as our primary mixing tool for combining the batter. A small whisk creates the smoothest texture by eliminating lumps, though a regular spoon works perfectly well for mixing all ingredients together thoroughly.
Microwave provides the cooking method that makes this recipe so convenient and quick. We rely on the microwave to cook our cake in just 70-90 seconds, making it an ideal option for instant gratification when sweet cravings strike.
These basic kitchen tools allow us to create our peanut butter mug cake without any specialized equipment or extensive cleanup. The simplicity of the required equipment matches the straightforward nature of this quick dessert recipe.
Instructions
 2")
We’ll walk you through each simple step to create this delicious single-serving dessert. Our streamlined process takes just minutes from start to finish.
Prep the Mug
We start by selecting a microwave-safe mug that holds at least 12-16 ounces to prevent overflow during cooking. The mug needs enough space to accommodate the batter as it rises and expands in the microwave.
Mix Dry Ingredients
We combine all dry ingredients directly in our prepared mug for easy cleanup. Add ¼ cup all-purpose flour, 2 to 2.5 tablespoons granulated sugar, and ¼ teaspoon baking powder to the mug. We whisk these ingredients together until evenly distributed and no lumps remain.
Add Wet Ingredients
We pour in the wet ingredients one at a time for the smoothest batter consistency. Add 2 tablespoons milk, 1 tablespoon vegetable oil or melted butter, and 2 tablespoons creamy peanut butter to our dry mixture. We stir thoroughly until the batter becomes smooth and well combined. For enhanced flavor, we can add a dash of vanilla extract at this stage.
Microwave the Cake
We place the mug in the microwave and cook on high power for 70 to 90 seconds. The cake is ready when it appears just set and shows a slightly shiny surface on top. We check for doneness by gently touching the center, which should spring back when properly cooked. Cooking times may vary depending on microwave wattage, so we start with 70 seconds and add more time if needed.
Directions for Perfect Results
 3")
Achieving the perfect peanut butter mug cake requires attention to timing and texture cues. We want to guide you through the final steps to ensure your single-serving dessert turns out fluffy and delicious every time.
Checking for Doneness
The cake reaches perfection when the top appears just set and slightly shiny. We recommend checking this visual cue rather than relying solely on time since microwave power varies significantly between models. A toothpick inserted into the center should come out clean or with just a few moist crumbs clinging to it.
Avoid overcooking as this creates a rubbery texture that diminishes the cake’s appeal. The surface should look slightly glossy rather than completely dry. Undercooking leaves you with a gooey center that hasn’t properly set.
Cooling Time
Allow the cake to rest in the microwave for 1 minute before removing it. This brief cooling period lets the residual heat finish the cooking process while preventing burns from the hot mug. The cake continues to set during this resting time.
We suggest waiting an additional minute or two before digging in if you plan to add toppings like ice cream. The contrast between the warm cake and cold toppings creates an irresistible temperature combination that enhances the overall dessert experience.
Variations and Add-Ins
 4")
We can easily customize our basic peanut butter mug cake by incorporating different flavors and ingredients. These simple modifications transform our dessert into exciting new creations while maintaining the same quick preparation method.
Chocolate Chip Version
Adding 1-2 tablespoons of chocolate chips creates the perfect chocolate peanut butter combination that never fails to satisfy. We recommend folding the chips into our batter after mixing the wet and dry ingredients together. Mini chocolate chips work exceptionally well since they distribute more evenly throughout the small cake. For extra indulgence, we can substitute chocolate chips with chopped Reese’s Peanut Butter Cups or peanut butter chips. White chocolate chips offer a sweeter alternative that pairs beautifully with the nutty peanut butter base. Toffee bits provide a delightful crunch and caramel flavor that elevates our mug cake experience.
Banana Peanut Butter
Mashed banana transforms our peanut butter mug cake into a moist and naturally sweet treat. We add 1-2 tablespoons of well mashed banana to our wet ingredients before combining with the dry mixture. The banana should be very ripe for maximum sweetness and easier incorporation into the batter. This variation creates a denser texture while adding natural moisture that keeps our cake from drying out. We find that the banana flavor complements peanut butter perfectly without overpowering the nutty taste. The combination reminds us of childhood sandwiches while providing a more sophisticated dessert experience.
Sugar-Free Option
We can create a healthier version by replacing granulated sugar with sugar-free alternatives like stevia or erythritol. Start with half the amount of sugar substitute since these sweeteners are typically more potent than regular sugar. Stevia works well but may leave a slight aftertaste that some people notice. Erythritol provides the closest taste and texture match to traditional sugar without the calories. We adjust the sweetness level by adding small amounts until we reach our desired taste preference. This modification significantly reduces the sugar content while maintaining the cake’s satisfying texture and flavor profile.
Serving Suggestions
 5")
We believe the right toppings and accompaniments can transform your peanut butter mug cake from a simple treat into an indulgent dessert experience. The warm cake creates the perfect base for both hot and cold additions that complement its rich peanut butter flavor.
Ice cream serves as our top recommendation for improving this warm dessert. A scoop of vanilla ice cream creates a delightful temperature contrast that makes each bite more satisfying. Chocolate ice cream pairs equally well and amplifies the dessert’s overall richness. The ice cream begins to melt slightly against the warm cake, creating a creamy sauce that blends beautifully with the peanut butter flavor.
Chocolate chips deserve special mention as an easy way to add extra chocolatey taste to your creation. We suggest sprinkling them on top immediately after microwaving while the cake remains hot. The residual heat softens the chips slightly without fully melting them, providing pleasant textural variety in every bite.
Peanut butter sauce takes the peanut butter experience to the next level. Drizzle melted peanut butter over the finished cake for added flavor intensity. We recommend warming the peanut butter for 15-20 seconds in the microwave to achieve the perfect drizzling consistency.
Fresh fruit adds brightness and balances the dessert’s richness. Sliced strawberries or banana pieces provide natural sweetness and appealing color contrast. Raspberries work exceptionally well because their tartness cuts through the dense peanut butter flavor.
Whipped cream offers another excellent topping choice that adds lightness to the dense cake. A dollop of freshly whipped cream or even store-bought whipped topping creates an elegant presentation while providing textural interest.
For those who enjoy extra sweetness, a light dusting of powdered sugar creates visual appeal and adds delicate sweetness without overwhelming the peanut butter base. This simple garnish makes the dessert look more professional and finished.
Storage and Reheating Tips
 6")
Once you’ve enjoyed your warm and fluffy peanut butter mug cake, proper storage becomes essential for maintaining its delicious texture and flavor. We understand that sometimes you might want to save part of your creation for later or prepare multiple servings ahead of time.
Room Temperature Storage
We recommend storing your peanut butter mug cake at room temperature only for short periods. Place the cooled cake in an airtight container or wrap it tightly in plastic wrap for up to one day. Keep your stored cake away from direct sunlight and strong odors that could affect its taste and texture.
Refrigeration Method
Refrigerator storage offers the best option for keeping your mug cake fresh for several days. We suggest covering your leftover cake tightly or placing it in an airtight container before refrigerating. Your peanut butter mug cake will maintain its quality for 3 to 5 days when stored this way, depending on the exact ingredients you used.
| Storage Method | Duration | Container Type |
|---|---|---|
| Room Temperature | Up to 1 day | Airtight container or plastic wrap |
| Refrigeration | 3-5 days | Airtight container or tight covering |
| Freezing | 3-6 months | Plastic wrap + foil |
Freezing for Long-Term Storage
Long-term storage becomes possible when you freeze your cooled mug cake properly. We recommend removing the cake from the mug first, then wrapping it in plastic wrap followed by aluminum foil. Your frozen peanut butter mug cake will stay fresh for up to 3 to 6 months, though the texture may become slightly drier upon thawing.
Reheating Your Stored Cake
Reheating your stored mug cake requires gentle heat to restore its warm, fluffy texture. We suggest removing the cake from its container or plastic wrap, then microwaving it for 15 to 30 seconds until just warm. Avoid overheating, as this can dry out the cake or create a rubbery texture.
Alternative Reheating Approach
Batter storage offers another convenient option if you want to prepare ahead. We recommend storing the mixed batter in the refrigerator and cooking it fresh in the microwave just before serving. This method ensures optimal texture and maintains the cake’s signature moistness and flavor.
Troubleshooting Common Issues
 7")
Even with our simple peanut butter mug cake recipe, we sometimes encounter challenges that can affect the final result. Understanding these common issues helps us achieve the perfect texture and flavor every time.
Cake Turns Out Dry or Overcooked
Microwave wattage varies significantly between models, making overcooking the most frequent problem we encounter. We recommend microwaving for 70 to 90 seconds maximum, checking for doneness when the top appears slightly shiny. The cake continues cooking as it rests, so removing it while still glossy prevents dryness. Allowing the cake to sit for one minute before eating helps retain moisture and improves the overall texture.
Dense or Heavy Texture
Too much peanut butter creates a dense, heavy cake that lacks the fluffy texture we desire. We suggest measuring peanut butter carefully and including baking powder for proper lift. Following the recommended proportions ensures our cake rises properly and maintains its light, airy consistency.
Batter Sticks to the Mug
Insufficient greasing causes the cake to stick, making removal difficult and messy. We always lightly coat our mug with oil or butter before adding the batter. This simple step prevents sticking and ensures easy cleanup after enjoying our dessert.
Uneven Cooking Results
Ingredient clumping or improper mixing leads to uneven cooking with some areas remaining raw while others overcook. We thoroughly combine all ingredients before microwaving, ensuring no flour pockets or unmixed peanut butter remains. Proper mixing creates uniform texture throughout the cake.
Cake Collapses in the Center
Undercooking or overmixing the batter causes the center to sink as the cake cools. We microwave until just set but still glossy on top, mixing the batter only until ingredients combine. Overmixing develops gluten, creating a tough texture that collapses during cooking.
Bland or Lackluster Flavor
Insufficient seasoning results in a flat-tasting cake that lacks depth. We add a pinch of salt to enhance the peanut butter flavor and include vanilla extract for complexity. Chocolate chips provide additional flavor bursts that complement the peanut butter base.
| Issue | Cooking Time Adjustment | Visual Cue |
|---|---|---|
| Dry/Overcooked | Reduce by 10-15 seconds | Still shiny on top |
| Undercooked | Add 10-15 seconds | Toothpick comes out clean |
| Uneven cooking | Standard 70-90 seconds | Uniform rise across surface |
Microwave Power Considerations
Different microwave wattages require timing adjustments for optimal results. We start with the lower suggested time and check for doneness before adding more cooking time. Higher wattage microwaves cook faster, while lower wattage units need additional time to achieve proper texture.
Resting Period Importance
Letting the cake rest for one minute after microwaving allows residual heat to finish the cooking process. We use this resting time to prepare toppings or simply let the cake settle to its final texture. This step prevents overcooking while ensuring thorough doneness throughout.
Conclusion
We’ve shown you how this simple peanut butter mug cake can transform your dessert game in under two minutes. With just a handful of pantry staples and basic kitchen tools you’ll never have to wait for satisfaction again.
The beauty lies in its versatility – whether you’re craving a late-night treat or need a quick dessert for unexpected guests this recipe delivers every time. From chocolate chip additions to sugar-free alternatives there’s a variation for every taste preference.
Most importantly this isn’t just about convenience – it’s about creating moments of pure indulgence without the commitment of baking an entire cake. We’re confident that once you master this technique you’ll find yourself reaching for that trusty mug whenever sweet cravings strike.
Frequently Asked Questions
How long does it take to make a peanut butter mug cake?
The entire process takes just 3-5 minutes. You’ll spend 2-3 minutes mixing the ingredients in the mug, then microwave for 70-90 seconds. After letting it rest for one minute in the microwave, your warm, fluffy peanut butter mug cake is ready to enjoy.
What ingredients do I need for peanut butter mug cake?
You need five basic pantry staples: all-purpose flour, granulated sugar, creamy peanut butter, milk, vegetable oil (or melted butter), baking powder, and a pinch of salt. Optional toppings include chocolate chips, powdered sugar, extra peanut butter, or vanilla ice cream for extra indulgence.
What size mug should I use for this recipe?
Use a large microwave-safe mug that holds 12-16 ounces. This size prevents overflow during cooking and gives the cake room to rise properly. Avoid smaller mugs as the batter may spill over during microwaving, creating a mess in your microwave.
Can I customize the peanut butter mug cake recipe?
Absolutely! Add chocolate chips for a classic combination, mash in half a banana for extra moisture, or use sugar alternatives like stevia for a healthier version. You can also substitute almond milk or coconut oil to accommodate dietary preferences while maintaining the cake’s moist texture.
How do I know when my mug cake is done cooking?
Look for a slightly shiny top and check that the center springs back when lightly touched. Insert a toothpick into the center – it should come out with just a few moist crumbs. Avoid overcooking as it will make the cake rubbery rather than fluffy.
Can I store leftover peanut butter mug cake?
Store at room temperature for up to one day in an airtight container or wrapped in plastic. For longer storage, refrigerate for 3-5 days or freeze for 3-6 months. Reheat gently in the microwave for 15-30 seconds to restore the fluffy texture before serving.
What toppings work best with peanut butter mug cake?
Popular toppings include vanilla or chocolate ice cream, melted peanut butter drizzle, chocolate chips, fresh berries, whipped cream, and powdered sugar. The contrast between warm cake and cold toppings creates an especially indulgent dessert experience that’s perfect for satisfying sweet cravings.
Why did my mug cake turn out dry or dense?
Common causes include overcooking, incorrect measurements, or overmixing the batter. Use measuring spoons for accuracy, mix until just combined, and start with 70 seconds of cooking time. Let the cake rest in the microwave for one minute after cooking to finish the cooking process naturally.


