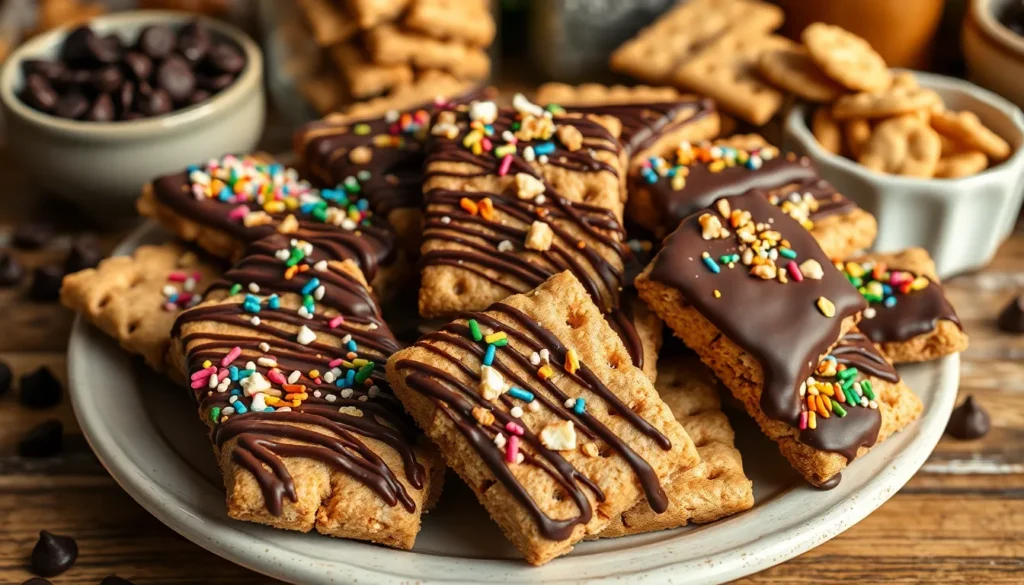
We’re about to transform your favorite childhood snack into something absolutely irresistible. Chocolate covered graham crackers take the humble honey-sweetened cracker and elevate it to dessert status with a rich coating of melted chocolate. This simple treat delivers the perfect balance of crispy texture and smooth sweetness that’ll have you reaching for seconds.
The beauty of these chocolate-dipped delights lies in their versatility and ease. We can whip up a batch in just minutes using basic pantry ingredients, making them perfect for last-minute entertaining or satisfying those sudden sweet cravings. Whether you’re hosting a party or looking for a fun kitchen project with the kids, these treats never disappoint.
From classic milk chocolate to dark chocolate variations, we’ll show you how to create bakery-quality results right in your own kitchen. Once you taste these homemade chocolate covered graham crackers, store-bought versions simply won’t compare.
Ingredients
We need just a handful of simple ingredients to create these bakery-quality chocolate covered graham crackers. Our recipe uses basic pantry staples that deliver exceptional results every time.
For the Graham Crackers
- 1 sleeve (9 crackers) honey graham crackers
- 1 sleeve (9 crackers) cinnamon graham crackers
- Additional graham crackers as desired for larger batches
For the Chocolate Coating
- 12 oz semi-sweet chocolate chips
- 2 tablespoons coconut oil or vegetable shortening
- 1 teaspoon vanilla extract
- Pinch of sea salt
Optional Toppings
- 1/2 cup chopped toasted nuts (almonds, pecans, or walnuts)
- 1/4 cup mini marshmallows
- 2 tablespoons crushed freeze-dried strawberries
- 1/4 cup toasted coconut flakes
- 2 tablespoons colorful sprinkles
- 1/4 cup crushed pretzels
- Sea salt flakes for finishing
Equipment Needed
 1")
Creating perfect chocolate covered graham crackers requires minimal kitchen equipment that most home bakers already have on hand. We’ll walk you through each essential tool to ensure your treats turn out beautifully every time.
Baking sheet serves as our primary workspace for arranging graham crackers before dipping and transferring finished treats. This flat surface provides ample room to organize crackers efficiently throughout the process.
Microwave-safe bowl or double boiler becomes crucial for melting chocolate smoothly without burning. We recommend using a microwave-safe bowl for quick convenience or a double boiler for more controlled melting when working with larger batches.
Spoon or silicone spatula helps us stir melted chocolate thoroughly and spread it evenly when needed. The silicone spatula works particularly well since chocolate releases easily from its non-stick surface.
Fork acts as our dipping tool for submerging graham crackers into melted chocolate and lifting them out cleanly. This utensil allows us to maintain control while excess chocolate drips away naturally.
Parchment or wax paper provides the perfect non-stick surface for setting our dipped crackers to dry. This paper prevents the finished treats from sticking and makes cleanup effortless.
Optional equipment can enhance your chocolate covering experience significantly. A melting cup offers precision for controlled chocolate drizzling while a piping bag creates professional-looking decorative patterns. Small kitchen tools become handy when adding sprinkles crushed pretzels or other creative toppings to your graham crackers.
| Equipment Type | Purpose | Essential/Optional |
|---|---|---|
| Baking sheet | Arranging and transferring crackers | Essential |
| Microwave-safe bowl | Melting chocolate safely | Essential |
| Fork | Dipping crackers | Essential |
| Parchment paper | Setting surface | Essential |
| Melting cup | Precise drizzling | Optional |
| Piping bag | Decorative patterns | Optional |
No specialized equipment is required beyond these standard kitchen tools making this recipe accessible for any home baker ready to create delicious homemade treats.
Instructions
 2")
Follow these simple steps to create perfect chocolate covered graham crackers that rival any bakery treat. Our method ensures smooth chocolate coating and professional results every time.
Prep the Graham Crackers
Break graham crackers along their perforated lines into individual rectangles if using full sheets. Place crackers on a clean work surface and inspect for any broken pieces that might not hold up during dipping.
Line a baking sheet with parchment paper to prevent the finished treats from sticking. This preparation step saves time later and ensures easy removal once the chocolate sets.
Melt the Chocolate
Combine chocolate chips with coconut oil or vegetable shortening in a microwave safe bowl. The added fat creates a smoother consistency for dipping and prevents the chocolate from becoming too thick.
Heat the mixture in 30 second intervals in the microwave. Stir thoroughly between each interval to ensure even melting and prevent burning. Continue this process until the chocolate reaches a completely smooth consistency.
Add vanilla extract and a pinch of sea salt to the melted chocolate. Stir well to incorporate these flavor enhancers that will elevate the overall taste.
Dip the Graham Crackers
Hold each graham cracker with a fork and dip it completely into the melted chocolate. Ensure both sides receive full coverage by gently turning the cracker in the chocolate.
Lift the cracker and gently tap the fork against the bowl’s edge to remove excess chocolate. This technique prevents thick chocolate pools from forming on the finished treat.
Allow any excess chocolate to drip back into the bowl before transferring to the prepared baking sheet.
Add Toppings
Apply optional toppings immediately after dipping while the chocolate remains wet. Sprinkle crushed pretzels, colorful sprinkles, or sea salt flakes over the chocolate surface.
Press toppings gently into the chocolate to ensure they adhere properly. Work quickly since the chocolate begins to set within minutes of application.
Consider creating different topping combinations on separate crackers to offer variety in your final presentation.
Set the Chocolate
Place the chocolate covered graham crackers on the parchment lined baking sheet. Space them apart to prevent touching during the setting process.
Refrigerate the baking sheet for approximately 30 minutes until the chocolate hardens completely. The cold temperature accelerates the setting process and creates a satisfying snap when bitten.
Store finished crackers in an airtight container at room temperature for up to one week once the chocolate has fully set.
Make-Ahead Instructions
 3")
We love how these chocolate covered graham crackers can be prepared well in advance for any occasion. Making these treats ahead of time actually improves their flavor as the chocolate fully sets and develops a perfect snap.
Preparation Timeline: We recommend preparing these crackers up to two weeks before your event. This extended timeline allows us to tackle party prep without last minute stress while ensuring optimal taste and texture.
Storage Method: After the chocolate completely sets, we transfer our crackers to an airtight container. Layer parchment paper between each row of crackers to prevent sticking and maintain their pristine appearance.
Container Options: Ziplock bags work perfectly for casual storage, while rigid containers protect delicate decorative toppings better. We always label our containers with the preparation date to track freshness.
Temperature Considerations: Room temperature storage works best for maintaining the ideal texture contrast between crispy graham crackers and smooth chocolate coating. Refrigeration can cause condensation issues that affect the chocolate’s appearance.
| Storage Method | Duration | Best For |
|---|---|---|
| Airtight container | Up to 2 weeks | Party planning |
| Ziplock bag | Up to 2 weeks | Casual snacking |
| Gift boxes | Up to 1 week | Special occasions |
Quality Maintenance: Our crackers maintain their crunch and chocolate integrity throughout the storage period when properly sealed. We notice no important texture or flavor changes even after two weeks of storage.
Serving Flexibility: These make ahead treats can be served directly from storage or arranged on serving platters hours before guests arrive. We often prepare multiple batches with different chocolate varieties to create an impressive dessert spread.
Storage Tips
 4")
Proper storage ensures our chocolate covered graham crackers maintain their perfect texture and flavor for weeks. We recommend storing these treats in an airtight container at room temperature to preserve both the chocolate’s set finish and the crackers’ signature crispness.
Room Temperature Storage Method
We place our chocolate covered graham crackers in an airtight container using parchment or wax paper between layers. This prevents the crackers from sticking together while maintaining optimal texture. Room temperature storage avoids condensation that can create white spots on the chocolate surface.
When to Refrigerate
During warm weather or humid conditions we move our treats to the refrigerator to prevent melting. Refrigeration extends freshness beyond several days though it may cause chocolate bloom. These harmless white spots result from sugar or fat crystallization and don’t affect taste quality.
Extended Freshness Techniques
For maximum shelf life we wrap each cracker individually in cellophane or plastic wrap before container storage. This method extends freshness up to three weeks at room temperature while providing excellent protection against moisture and air exposure.
| Storage Method | Duration | Key Benefits |
|---|---|---|
| Airtight container (room temp) | 1 week | Maintains texture, prevents condensation |
| Individual wrapping + container | 3 weeks | Maximum freshness, gift-ready presentation |
| Refrigerated storage | Several days+ | Prevents melting in warm conditions |
Layer Separation Strategy
We always use parchment or wax paper between stacked layers to prevent chocolate surfaces from bonding together. This maintains the chocolate’s smooth appearance and makes individual crackers easy to remove without damage.
Environmental Considerations
Heat and humidity damage both chocolate coating and cracker texture so we keep containers away from kitchen heat sources. Proper environmental control preserves the treats’ quality and prevents softening or unwanted texture changes.
Variations and Flavor Ideas
 5")
The beauty of chocolate covered graham crackers lies in their endless customization possibilities. We can transform these classic treats into personalized creations that match any occasion or taste preference.
Different Chocolate Types
Milk chocolate remains the classic choice that appeals to every palate with its sweet and creamy profile. This universally loved option creates the perfect balance between the honey sweetness of graham crackers and rich chocolate coating.
Dark chocolate delivers a more sophisticated flavor experience with its intense cocoa notes and reduced sweetness. We recommend this option for those who appreciate deeper chocolate flavors and want to create a more adult-oriented treat.
White chocolate offers a completely different taste profile with its creamy richness and milder flavor. This option works beautifully when we want the graham cracker’s cinnamon and honey notes to shine through the coating.
Colored or flavored chocolate opens up exciting possibilities for themed treats and special occasions. We can use colored candy melts or specialty flavored chocolates to create festive variations that match party themes or seasonal celebrations.
Creative Toppings
Sprinkles or nonpareils instantly transform our chocolate covered graham crackers into celebration-worthy treats. These colorful additions provide both visual appeal and subtle texture contrast that makes each bite more interesting.
Crushed pretzels nuts or coconut introduce compelling flavor combinations that elevate the basic recipe. The salty crunch of pretzels creates an addictive sweet and salty contrast while nuts add richness and coconut brings tropical flair.
Miniature candies like M&M’s Smarties or Reese’s Pieces turn our treats into candy-loaded delights. These additions provide bursts of concentrated flavor and create visually stunning results that appeal especially to children.
Flaky sea salt adds a gourmet touch that balances the sweetness with sophisticated flavor complexity. This simple addition transforms our homemade treats into bakery-quality confections that impress guests.
Marshmallows or peppermint work particularly well for seasonal variations and holiday themes. Mini marshmallows create texture interest while peppermint pieces add refreshing coolness that cuts through rich chocolate.
Seasonal Variations
Spring and Easter celebrations call for pastel sprinkles or colored chocolate that captures the season’s fresh energy. We can add candy eggs or flower-shaped decorations to create treats that perfectly match springtime gatherings.
Halloween provides opportunities for dramatic orange and black color schemes using themed sprinkles. Candy pumpkins or ghost marshmallows transform our graham crackers into spooky seasonal treats that delight trick-or-treaters.
Winter holidays inspire us to use red green or white chocolate combined with crushed candy canes. Holiday-themed candies and festive sprinkles create treats that capture the magic of the season and work beautifully for gift giving.
Summer celebrations benefit from toasted coconut rainbow sprinkles or tropical fruit decorations. These bright colorful additions reflect the season’s vibrant energy and create treats perfect for outdoor gatherings and pool parties.
Troubleshooting Tips
 6")
Even experienced bakers encounter challenges when making chocolate-covered graham crackers. We’ve compiled answers to the most common issues you might face during preparation.
Chocolate becomes too thick for smooth dipping
Add coconut oil or vegetable shortening in small increments to thin your chocolate. Start with just 1-2 teaspoons and stir thoroughly before adding more. Melted shortening works better than solid oil for achieving the perfect consistency. Paramount crystals serve as another excellent option for professional-quality thinning.
White spots or bloom appear on finished crackers
Avoid using chocolate chips since they contain stabilizers that prevent smooth melting and cause fat separation. High-quality chocolate bars or melting wafers provide superior results without the fuzzy white appearance. Rapid cooling in the refrigerator also helps prevent bloom formation on your finished treats.
Chocolate coating appears uneven or bumpy
Tap your dipping fork gently against the bowl’s edge to remove excess chocolate before placing crackers on parchment paper. This technique ensures smooth coverage without thick buildup. Use parchment-lined baking sheets rather than bare surfaces to prevent sticking and promote even setting.
Melted chocolate hardens during the dipping process
Reheat your chocolate briefly in the microwave using 15-second intervals to restore workability. Alternatively add a small amount of your chosen thinning agent to maintain the proper consistency throughout the dipping process. Keep your workspace warm to slow the chocolate’s natural cooling.
Crackers stick to the cooling surface
Always use parchment or wax paper on your baking sheets to prevent adhesion. Wait until chocolate sets completely before attempting to remove crackers from the surface. Properly set chocolate releases easily without leaving residue or damaging your treats.
Chocolate develops streaks or lines during setting
Allow crackers to set undisturbed in the refrigerator for 30 minutes minimum. Moving or touching crackers before the chocolate hardens completely creates unsightly marks. Room temperature setting takes longer but often produces the smoothest finish.
Conclusion
Now you’ve got everything you need to create these irresistible chocolate-covered graham crackers that’ll become your new favorite treat. With our simple techniques and helpful tips you can achieve bakery-quality results right in your own kitchen.
Whether you’re making them for a special occasion or just because you’re craving something sweet these homemade delights are guaranteed to impress. The best part? You can customize them endlessly with different chocolates and toppings to match any mood or celebration.
We’re confident that once you try making these at home you’ll never want to buy store-bought versions again. So grab your ingredients and get ready to create something truly special that friends and family will be asking for again and again.
Frequently Asked Questions
What ingredients do I need for chocolate-covered graham crackers?
You’ll need honey and cinnamon graham crackers, semi-sweet chocolate chips, coconut oil or vegetable shortening, vanilla extract, and a pinch of sea salt. Optional toppings include chopped nuts, mini marshmallows, crushed freeze-dried strawberries, toasted coconut flakes, colorful sprinkles, crushed pretzels, and sea salt flakes for finishing touches.
What kitchen equipment is required for this recipe?
Essential tools include a baking sheet, microwave-safe bowl or double boiler, spoon or silicone spatula, fork for dipping, and parchment or wax paper. Optional equipment like a melting cup for precise drizzling and piping bag for decorative patterns can enhance your results, but most home bakers already have everything needed.
How long do chocolate-covered graham crackers last?
When stored properly in an airtight container at room temperature, chocolate-covered graham crackers last up to one week. For maximum freshness, wrap each cracker individually before container storage to extend shelf life up to three weeks. Use parchment paper between layers to prevent sticking.
Can I make these treats ahead of time?
Yes! Chocolate-covered graham crackers can be prepared up to two weeks in advance, and their flavor actually improves as the chocolate sets. Store them in airtight containers or Ziplock bags with parchment paper layered between crackers to prevent sticking and maintain their perfect crunch.
What should I do if my chocolate is too thick for dipping?
Add a small amount of coconut oil or vegetable shortening to thin the chocolate. Heat in short intervals, stirring between each one until you reach the desired consistency. This ensures smooth, even coating on your graham crackers without clumping or uneven coverage.
How do I prevent the chocolate from sticking to parchment paper?
Ensure your chocolate has the right consistency before dipping and allow excess chocolate to drip off completely. Place dipped crackers on parchment or wax paper and let them set undisturbed. Refrigerate for faster setting, which typically takes 15-20 minutes for the chocolate to fully harden.
What chocolate varieties work best for this recipe?
Semi-sweet chocolate chips work excellently, but you can experiment with milk chocolate for sweetness, dark chocolate for richness, or white chocolate for variety. Each type offers unique flavor profiles, and you can even combine different chocolates for marbled effects or use them for different batches.
Should I refrigerate chocolate-covered graham crackers?
Store at room temperature in normal conditions. Refrigerate only during warm weather or humid conditions to prevent melting. While refrigeration may cause harmless chocolate bloom (white spots), it doesn’t affect taste or safety. Always use airtight containers regardless of storage location.


